How to Make Raised Garden Beds Out of Plastic Barrels: DIY Steps
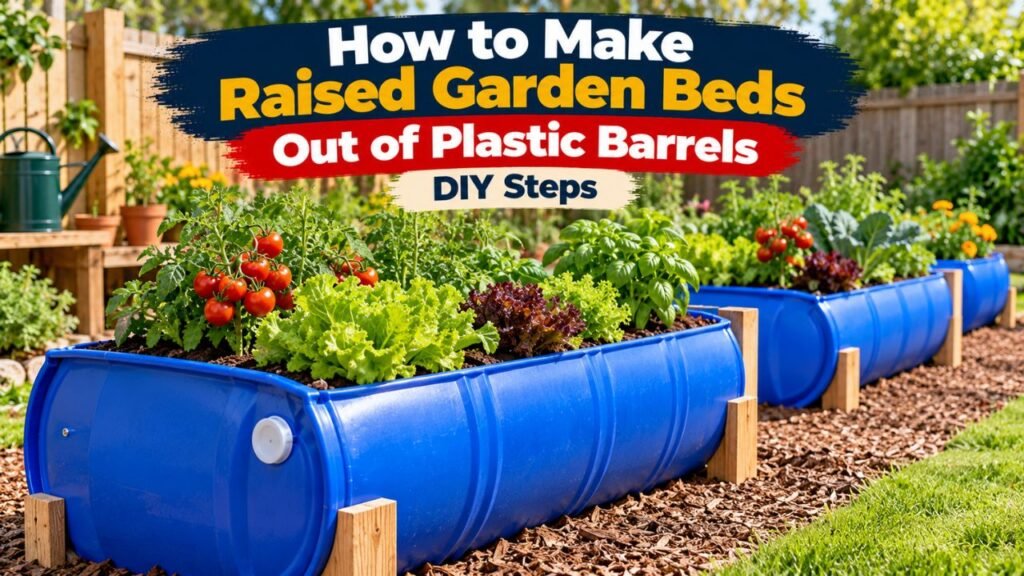
To make raised garden beds out of plastic barrels, choose a clean, food-grade plastic drum, cut it lengthwise into two planting troughs, drill drainage holes, and place each half in a sturdy supporting frame. Fill the containers with a suitable growing mix, and you’ll have two raised planters from one barrel.
A standard 55-gallon plastic barrel is a practical option because its curved shape can provide enough growing space for leafy greens, herbs, radishes, and other compact vegetables. Plastic also resists rot and is relatively easy to cut with appropriate tools.
However, not every recycled barrel is suitable for food gardening. Containers that previously held pesticides, industrial chemicals, or unknown substances should never be repurposed for growing edible plants. Structural support matters, too, because a plastic barrel can become unstable once filled with wet soil.
In this article, I explain how to select safe plastic barrels, cut and support them, install drainage holes, and calculate the required potting mix. You’ll also learn which vegetables grow well in barrel beds, how to maintain them, and which construction mistakes to avoid.
Are Plastic Barrels Safe for Raised Garden Beds?
Yes, plastic barrels can be used to make raised garden beds, provided the containers are suitable for gardening and have a known, safe history.
Plastic drums are commonly made from high-density polyethylene (HDPE), a durable material used in many food-storage and industrial containers.
However, the type of plastic alone doesn’t determine whether a used barrel is safe for growing vegetables.
Choose Food-Grade HDPE Plastic Barrels
For edible gardening, a food-grade HDPE barrel with a verified history is a sensible choice.
Look for:
- Recycling code #2 (HDPE): Identifies high-density polyethylene.
- Food-contact designation: Indicates that the specific container was manufactured for food-related use.
- Known previous contents: Confirm that the barrel held a suitable food or beverage ingredient.
- Sound structural condition: Avoid cracked, brittle, badly warped, or severely damaged barrels.
- Outdoor suitability: Choose plastic capable of tolerating the expected sunlight and weather exposure.
According to the University of Maryland Extension’s container vegetable gardening guidance, HDPE marked with recycling code #2 is commonly used for food storage. Its guidance also emphasizes choosing food-grade containers and avoiding previously used containers that held chemicals.
Important: A #2 recycling mark identifies the plastic resin, not the barrel’s previous contents or its individual food-contact certification.
A food-grade barrel that was later used to store hazardous chemicals should not be reused for vegetable gardening.
Which Used Plastic Barrels Should You Avoid?
Do not use barrels that previously contained:
- Pesticides or herbicides.
- Industrial solvents.
- Gasoline, diesel, or other fuels.
- Paint or paint-removing chemicals.
- Automotive fluids.
- Unknown cleaning agents.
- Unidentified commercial chemicals.
Washing a barrel does not guarantee that hazardous residues have been removed.
Certain substances may remain in seams, closures, or the plastic itself.
Barrels with an unknown history are also poor choices for edible gardening.
Safety Warning: Never cut, grind, weld, or heat a barrel that may have contained flammable or hazardous substances. Residual vapors can create a fire, explosion, or toxic exposure hazard even when the container appears empty.
For this project, choose a new food-grade barrel or one whose entire use history is reliably documented.
Which Plastic Barrel Design Works Best for a Raised Garden Bed?
There are two practical ways to convert a plastic barrel into a raised planter.
You can cut the barrel lengthwise to create two long growing troughs or cut it across the middle to make two deeper cylindrical planters.
Each design has different advantages.
Lengthwise-Cut Plastic Barrel Raised Beds
Cutting a barrel lengthwise produces two half-cylinder planters.
Each half has a long planting surface with curved sides and a rounded bottom.
This arrangement works particularly well for:
- Lettuce.
- Spinach.
- Radishes.
- Compact herbs.
- Swiss chard.
- Small flowering plants.
The containers can rest inside a wooden cradle or another appropriately designed support frame.
This is the better option when you want long, narrow planting areas resembling traditional raised beds.
Upright Half-Barrel Raised Planters
Another approach is to cut the barrel across its middle.
This creates two shorter cylindrical containers that can stand vertically with their original closed ends facing downward.
Each half needs proper drainage holes.
An upright barrel planter generally provides more growing depth than a lengthwise trough made from the same barrel.
That can make it useful for larger vegetables, including certain compact tomato and pepper varieties.
However, both halves must have stable bottoms, and any existing bung openings must be handled appropriately.
Plastic Barrel Raised Bed Design Comparison
| Feature | Lengthwise half-barrel | Upright half-barrel |
| Shape | Long, curved planting trough | Deep, round planter |
| Number from one barrel | Two | Two |
| Growing depth | Relatively shallow | Generally deeper |
| Support needed | Cradle or supporting frame | Stable, level base |
| Best suited plants | Greens, herbs, radishes | Peppers, dwarf tomatoes, compact vegetables |
| Gardening space | Long planting surface | Concentrated circular planting area |
| Construction challenge | Supporting curved bottom and sides | Preparing stable drainage and cut edges |
For a beginner wanting a small raised vegetable garden, I recommend starting with a lengthwise-cut 55-gallon food-grade plastic barrel, provided a sturdy cradle can be built to support it.
Materials and Tools Needed for Plastic Barrel Raised Beds
Most of the project involves measuring, cutting, building supports, and preparing the planting containers.
You don’t need complicated equipment, but the cutting tools and support materials must be appropriate for the job.
Materials List
| Material | Purpose |
| 55-gallon food-grade HDPE barrel | Creates two raised planting troughs |
| Suitable lumber or structural supports | Forms the barrel support frame |
| Exterior-rated screws or fasteners | Connects the support components |
| Outdoor-rated straps or brackets, if needed | Prevents unwanted barrel movement |
| Water-permeable mesh | Covers large drainage openings |
| Quality container potting mix | Supports plant roots |
| Finished compost, if appropriate | Adds organic matter and nutrients |
| Organic mulch | Helps reduce evaporation |
| Optional protective edge trim | Covers rough cut plastic edges |
Choose support materials suitable for outdoor exposure.
For lumber, use dimensions and connections capable of supporting the filled barrel. The correct framing depends on the planter’s shape, soil weight, and proposed height.
Tools Required
Prepare these tools before starting:
- Measuring tape.
- Permanent marker.
- Straightedge or flexible measuring guide.
- Jigsaw with a blade suitable for cutting plastic.
- Drill with appropriate bits.
- Clamps or other secure barrel restraints.
- Screwdriver or drill driver.
- Utility knife or deburring tool.
- Sandpaper.
- Safety glasses.
- Work gloves.
- Hearing and suitable dust protection.
Use cutting equipment according to its manufacturer’s instructions.
Avoid using a torch or other open flame to cut the plastic.
How to Make Raised Garden Beds Out of Plastic Barrels Step by Step
The following method converts one suitable 55-gallon HDPE barrel into two lengthwise planting troughs.
The main construction challenge is keeping the curved plastic sections stable after they are filled with moist growing medium.
Step 1: Inspect and Clean the Plastic Barrel
Confirm that the barrel is food-grade and has a known, suitable use history.
Inspect its exterior and interior for cracks, unusual residue, damaged seams, and signs of deterioration.
If it previously held an appropriate food ingredient, remove any remaining material and wash the container with mild dish soap and clean water.
Rinse thoroughly.
Allow the barrel to drain and dry before marking or cutting.
Open the appropriate closures to confirm the container is unpressurized.
Never assume an unknown drum is safe to open or cut. If its contents or condition are uncertain, obtain a different barrel.
Step 2: Mark the Barrel for Lengthwise Cutting
Place the empty barrel horizontally on a stable working surface.
Secure it so it cannot roll.
For two approximately equal troughs, mark a lengthwise cutting line that divides the barrel into two halves.
The line should extend:
- Along one side of the barrel.
- Across the corresponding end.
- Along the opposite side.
- Across the remaining end.
Use the barrel’s shape and a measuring guide to keep both halves reasonably symmetrical.
Inspect where the markings pass near molded seams, raised ribs, and bung openings.
Avoid cutting through closures or structural features unnecessarily.
If the barrel has an unsuitable shape for a clean lengthwise cut, choose a different container rather than forcing an awkward design.
Step 3: Cut the Plastic Barrel Into Two Halves
Cutting HDPE requires a suitable blade and a controlled work area.
A jigsaw with a blade intended for plastic is one practical option.
Follow this procedure:
- Secure the barrel against rolling or shifting.
- Support the sections that will separate during cutting.
- Make a suitable starting opening if the cutting tool requires one.
- Cut gradually along the marked line.
- Keep the blade clear of clamps and support materials.
- Reposition the barrel safely as needed.
- Support both halves before completing the final cut.
Avoid forcing the saw or using excessive cutting speed that causes the plastic to melt around the blade.
Wear eye protection and keep your hands away from the cutting path.
If the tool produces excessive heat, melting, or smoke, stop and correct the cutting setup.
Once separated, inspect both halves for damaged areas or irregular edges.
Safety Note: A cut barrel can spring slightly out of shape as stresses are released. Keep the workpiece restrained and supported throughout the cutting process.
Step 4: Smooth the Cut Edges
Freshly cut plastic may have rough edges, thin burrs, or sharp projections.
Remove loose plastic fragments using an appropriate deburring tool, utility knife, or sandpaper.
Take care not to remove excessive material from the barrel rim.
The goal is to make the edges comfortable to handle without unnecessarily weakening the remaining plastic.
You may also install an outdoor-compatible protective edge trim.
Choose a trim material that remains secure in sunlight and wet conditions.
For barrels that will be placed in frequently used walkways, smooth and protected edges are particularly important.
Step 5: Build a Stable Support Frame
A plastic barrel cut lengthwise has a curved bottom.
It will not stand securely on a flat surface without appropriate support.
A wooden cradle is a practical solution.
The support should hold the curved barrel securely, distribute its weight, and prevent rolling or tipping.
A basic cradle design can include:
- Two lengthwise base rails.
- Shaped or angled cross supports that fit beneath the barrel.
- Reinforced connections between the supports.
- Additional support near the middle of longer sections.
- Bracing that prevents side-to-side movement.
Build the cradle to match the actual barrel dimensions.
Avoid relying on just two narrow contact points at the ends if the plastic can sag between them.
The frame must support the growing medium after it becomes saturated, not merely the weight of the empty barrel.
Important: Wet potting mix can be heavy. A raised support structure should be designed for the filled planter, irrigation water, mature plants, and any loads from normal use.
Step 6: Position the Barrel Halves in the Cradles
Place each plastic barrel half into its support frame.
Check whether the curved bottom rests evenly against the supports.
The planter should remain stable when gently pushed by hand.
Look for:
- Side-to-side rocking.
- Uneven support.
- Excessive flexing.
- Sharp framing components touching the barrel.
- Unstable legs or base connections.
If necessary, use suitable exterior-rated straps or manufacturer-compatible retaining hardware to prevent the barrel from shifting.
Avoid drilling unnecessary fastener holes through the lower curved surface.
Any holes below the intended soil level can contribute to leakage or local stress concentrations.
For elevated stands, make sure the support frame is properly braced and positioned on a stable surface.
Step 7: Drill Drainage Holes in the Barrel Bottom
Drainage is necessary because these half-barrel planters function as containers rather than traditional open-bottom raised beds.
Water cannot escape into the ground unless you provide openings.
Drill multiple drainage holes along the lower curved portion of each barrel half.
Distribute the openings so excess water can leave different parts of the planter.
For a typical half-barrel trough, small holes approximately ¼–⅜ inch in diameter may be a practical starting size, provided they do not compromise the barrel’s strength.
The exact number and arrangement depend on the barrel’s shape and its support system.
Keep the drainage openings clear of the cradle.
After drilling:
- Remove loose plastic fragments.
- Smooth rough hole edges.
- Check that the holes are unobstructed.
- Add water to the empty planter.
- Observe where the water collects and exits.
If water remains trapped in a low area, determine whether another outlet is needed.
Key Takeaway: Drainage holes belong at the lowest practical points of the barrel, where gravity can move excess water out of the growing medium.
Step 8: Add Potting Mix to the Barrel Raised Beds
Once the drainage system is working, fill the containers with a suitable growing medium.
Because the barrel halves have enclosed curved bottoms, treat them as large container planters.
A lightweight, well-draining container potting mix is generally more appropriate than dense garden topsoil.
A suitable growing medium may include:
- Peat moss or coconut coir.
- Aged bark or other structural organic materials.
- Perlite for aeration.
- Finished compost.
- Appropriate plant nutrients.
Many commercial container mixes already contain several of these ingredients.
Check the package before adding extra compost or fertilizer.
Fill the container gradually, allowing the potting mix to settle naturally.
Avoid compressing it tightly.
Leave approximately 1–2 inches below the rim to provide space for watering and mulch.
Step 9: Plant the Barrel Raised Garden Beds
Choose plants that suit the available rooting depth and growing space.
For lengthwise barrel planters, smaller vegetables and herbs are often the easiest starting choices.
Before planting:
- Moisten the growing medium evenly.
- Check the recommended depth and spacing for each crop.
- Plant seeds or transplants at the appropriate depth.
- Water gently to settle the growing medium around the roots.
- Add a light mulch layer when appropriate.
- Position the planters where the plants receive suitable sunlight.
Avoid overcrowding.
Although a 55-gallon barrel produces two generously sized containers, a lengthwise half has a relatively shallow central rooting depth compared with many conventional raised beds.
Select crop varieties that can grow successfully within those conditions.
How Many Bags of Soil Do Plastic Barrel Raised Beds Need?
The soil requirement depends on the barrel’s capacity, how it is cut, and how much space you leave below the rim.
A standard 55-gallon barrel contains approximately 7.35 cubic feet of volume.
If divided into two equal halves, each half has a theoretical full capacity of:
55 ÷ 2 = 27.5 gallons
Converting gallons to cubic feet:
27.5 ÷ 7.48 = approximately 3.68 cubic feet
This is the approximate volume of each half when filled to its full rim.
Potting Mix for a 55-Gallon Barrel Cut Lengthwise
In practice, you should leave a small space below the rim.
For a roughly cylindrical 55-gallon barrel cut into equal lengthwise halves, each planter might need around 3 cubic feet of growing medium, depending on its actual dimensions and fill height.
| Measurement | Approximate amount |
| Full barrel capacity | 55 gallons |
| Full capacity of one equal half | 27.5 gallons |
| Full capacity of one half in cubic feet | 3.68 cu. ft. |
| Practical soil allowance per half | About 3 cu. ft., depending on fill depth |
| Practical soil allowance for both halves | About 6 cu. ft. |
| 2-cu.-ft. bags to purchase for both | About 4 bags, with possible leftover mix |
The practical filling estimates are approximate, not guaranteed capacities for every barrel shape.
A barrel with tapered ends, molded recesses, or an uneven cut will have different usable volume.
Buying four 2-cubic-foot bags provides 8 cubic feet, enough to cover the full theoretical capacity of both equal halves before accounting for soil left below the rim.
You may have some growing medium left over.
How to Calculate Soil for a Different Barrel Size
For a barrel divided into two equal halves:
Volume per half (gallons) = Full barrel capacity ÷ 2
Then:
Volume per half (cubic feet) = Gallons per half ÷ 7.48
This calculation gives the theoretical full volume.
Reduce the required amount if you leave substantial space below the rim.
For barrels that aren’t cut into equal halves, measure or estimate the usable container volume instead of assuming both pieces are identical.
What Vegetables Grow Best in Plastic Barrel Raised Beds?
The most suitable crops depend on the barrel’s orientation, depth, planting area, and available sunlight.
Lengthwise barrel halves are generally well suited to smaller plants and crops with relatively modest rooting requirements.
Best Vegetables and Herbs for Barrel Planters
| Plant | Suitable barrel design | Growing consideration |
| Lettuce | Lengthwise or upright | Needs consistent moisture |
| Spinach | Lengthwise or upright | Prefers cooler growing conditions |
| Radishes | Lengthwise | Loose growing medium supports root development |
| Basil | Lengthwise or upright | Needs warmth and suitable sunlight |
| Parsley | Lengthwise or upright | Benefits from consistent soil moisture |
| Swiss chard | Lengthwise or upright | Allow space for mature leaves |
| Bush beans | Suitable deeper trough or upright | Avoid overcrowding |
| Compact peppers | Preferably upright or sufficiently deep trough | Need adequate root space |
| Dwarf tomatoes | Preferably upright | Need support, nutrients, and consistent watering |
| Marigolds | Lengthwise or upright | Suitable for decorative planting |
The Virginia Cooperative Extension’s vegetable container gardening publication identifies barrels and other suitable containers as options for vegetable production. It emphasizes adequate container size, drainage, and avoiding containers previously used for toxic substances.
Why Lettuce and Herbs Work Well
Leafy greens and many culinary herbs are practical choices because they can grow in relatively shallow containers when provided with adequate space and moisture.
You can plant several smaller crops in a lengthwise barrel, depending on the planting recommendations.
For example, a trough may accommodate rows of leaf lettuce or several appropriately spaced herb plants.
Avoid planting too densely simply because the container is long.
Good spacing supports airflow, root development, and easier harvesting.
Can You Grow Tomatoes in Plastic Barrel Beds?
Yes, but tomato selection and planting depth matter.
A deeper upright half-barrel is generally more suitable than a shallow lengthwise trough for a large tomato plant.
Choose a compact or container-friendly variety.
Provide a sturdy cage, trellis, or stake system that can support the mature plant.
If the support is attached to the barrel, ensure the entire frame can resist the added force from wind and the plant’s weight.
Large indeterminate tomato varieties may require more rooting space and support than a shallow barrel trough can comfortably provide.
How to Improve Drainage in Plastic Barrel Raised Beds
Plastic does not allow water to move through its walls the way some porous materials can.
Therefore, the drainage holes and growing medium determine how excess water leaves the container.
Keep Drainage Openings Clear
Inspect the holes before adding soil.
If the openings are large enough for potting mix to escape, cover them with small pieces of suitable water-permeable mesh.
Do not place a continuous waterproof sheet across the bottom.
Make sure the support frame does not press directly against the drainage outlets.
Avoid Putting Gravel at the Bottom
A gravel layer isn’t necessary for an ordinary barrel planter.
Adding stones beneath the growing medium does not automatically improve drainage.
Instead, the change from a fine-textured medium to coarse gravel can leave water held in the growing mixture above the gravel layer.
It also reduces the available rooting depth.
For better drainage, use a suitable potting mix and keep the outlets open.
Test the Planter Before Planting
After filling the barrel, water slowly and observe the drainage.
Excess water should eventually exit from the bottom openings.
If water remains pooled on the surface or the growing medium stays saturated, investigate:
- Blocked drainage holes.
- Excessively compacted potting mix.
- Inadequate drainage openings.
- Obstructed outlets beneath the support.
- Excessive irrigation.
Correct these conditions before establishing plants.
How to Make Elevated Plastic Barrel Raised Beds
One advantage of barrel planters is that they can be mounted above ground level.
Elevating the containers can make planting, watering, and harvesting more comfortable.
However, a raised frame must support substantial weight.
Build a Raised Wooden Support Stand
For an elevated barrel planter, construct a rigid wooden frame with properly braced legs.
The barrel should rest in a curved cradle rather than balancing along a narrow contact point.
Important structural features include:
- A stable base with adequate resistance to tipping.
- Supports that follow the barrel’s curved underside.
- Cross-bracing to resist side-to-side movement.
- Connections suitable for sustained outdoor loads.
- Support beneath the barrel’s middle where needed.
- A finished height appropriate for the intended user.
Avoid using thin, unsupported wooden legs or lightweight furniture frames.
The growing medium can become considerably heavier after rain or irrigation.
For a tall stand, consider having its load capacity and stability checked by someone qualified to design outdoor structures.
Can You Use Concrete Blocks as Barrel Supports?
Concrete blocks may be incorporated into a suitable support arrangement, but placing a curved barrel on two loose blocks is not necessarily stable.
The barrel may roll, slide, or deform under load.
If using masonry, provide a level, stable base and a properly designed cradle above it.
Do not stack loose blocks into a tall, narrow support without an appropriate structural arrangement.
Can Plastic Barrel Planters Go on a Balcony?
They can be suitable for some balconies, but the supporting structure must carry the complete load safely.
Consider the combined weight of:
- The plastic barrel.
- Moist growing medium.
- Water retained in the soil.
- Mature plants.
- The supporting frame.
The load may also be concentrated at the frame’s legs.
Don’t assume that a balcony or elevated deck can safely support several large barrel planters.
Verify the structure’s capacity and applicable building requirements before installation.
How to Prevent Plastic Barrel Raised Beds From Overheating
Plastic barrels exposed to direct sunlight can become warm, especially when their surfaces are dark.
This matters because the growing medium inside the barrel can experience more temperature variation than soil in a large ground-level garden.
Choose the Right Barrel Color
Dark plastic generally absorbs more solar energy than lighter-colored surfaces.
A black or dark blue barrel may become particularly warm during intense summer sunlight.
Light-colored barrels may help reduce surface heat absorption, although temperature also depends on the plastic, growing medium, moisture, and local conditions.
Use suitable shading during extreme heat when necessary.
Do not apply unknown coatings to the inside surfaces that contact edible-growing soil.
Protect the Growing Medium With Mulch
A suitable organic mulch can help reduce moisture loss and moderate surface temperature changes.
Options include:
- Clean straw.
- Shredded leaves.
- Fine aged bark suitable for gardens.
Keep mulch away from small seedlings where it might prevent emergence.
Avoid allowing the growing medium to remain constantly saturated in an effort to keep it cool.
Maintain Consistent Moisture
Barrel planters have a limited volume of growing medium compared with traditional garden beds.
During hot weather, they may dry more quickly than in-ground soil.
Check moisture a few inches beneath the surface.
Water when necessary rather than following a rigid daily schedule.
Plants in exposed elevated barrels may need more frequent checks because air circulates around the container’s bottom and sides.
Common Mistakes When Making Raised Beds From Plastic Barrels
Several avoidable mistakes can reduce the safety or usefulness of a DIY barrel garden.
Using Barrels With Unknown Previous Contents
The most serious mistake is assuming that every blue or white plastic drum is food-safe.
Industrial drums may look identical to food-grade containers.
Confirm the previous contents before cutting or planting.
If you cannot establish the barrel’s history, do not use it for edible crops.
Cutting the Barrel Without Securing It
A round plastic barrel can roll unexpectedly during cutting.
Always clamp or restrain the empty container.
Support the sections being separated and keep the blade away from your body.
Do not cut a barrel that is pressurized or may contain hazardous vapors.
Building a Weak Support Stand
A half-barrel may appear lightweight when empty.
Once filled with wet growing medium, it places much greater stress on its support frame.
An unstable cradle can cause the planter to tip, damaging plants or injuring someone nearby.
Build the support for the loaded condition and inspect its connections regularly.
Leaving Out Drainage Holes
Without drainage, excess water can accumulate inside the barrel.
This reduces oxygen availability around roots and may encourage root disease.
Provide suitable openings before planting.
Filling the Barrel With Heavy Garden Clay
Dense garden soil can become compacted inside a container.
A quality container potting mix generally provides a better balance of aeration and moisture retention.
Avoid adding excessive compost or fertilizer without checking the growing medium’s existing ingredients.
Planting Too Many Vegetables
A large barrel doesn’t automatically provide enough rooting space for several mature tomatoes, peppers, or other large plants.
Consider both soil volume and depth.
Select compact varieties and follow appropriate plant spacing.
Ignoring Plastic Deterioration
Plastic exposed to sunlight and weather may eventually become brittle or develop cracks.
Inspect the barrel periodically, especially near cuts, drainage holes, and support contact points.
Replace a container showing serious cracking or structural deterioration.
How Long Do Plastic Barrel Raised Beds Last?
A suitable HDPE barrel can remain functional for multiple gardening seasons, but its lifespan depends on material quality, sunlight exposure, temperature changes, and mechanical stress.
There is no reliable fixed lifespan that applies to every reused barrel.
UV-stabilized plastic intended for outdoor use generally handles sunlight better than plastic not designed for prolonged outdoor exposure.
However, even durable plastic should be inspected regularly.
Inspect the Barrel Before Each Growing Season
Check for:
- Cracks around the curved bottom.
- Splitting near the cut edges.
- Damage surrounding drainage holes.
- Excessive bending or sagging.
- Brittle or discolored areas.
- Loose support straps.
- Deteriorating wooden frame components.
Do not continue using a barrel that has lost its ability to support the growing medium safely.
Refresh the Potting Mix as Needed
Organic ingredients gradually decompose, and the growing medium may settle.
Remove old plant debris after harvesting.
Check the remaining mix for compaction, nutrient deficiencies, or signs of disease.
Healthy used growing medium can sometimes be refreshed with compatible fresh material, but discard or appropriately handle media affected by serious soilborne disease.
Avoid filling the container with pure compost every year.
Use a suitable potting mixture and follow plant-specific fertilizer needs.
Protect the Planters During Severe Weather
In areas with freezing winters, make sure water can drain rather than collecting in the barrel.
Standing water may freeze and expand.
Strong winds can also overturn elevated containers, particularly when they hold tall plants.
Inspect the frame and move or secure the planters when severe weather is expected.
Are Plastic Barrel Raised Beds Better Than Wooden Raised Beds?
Plastic barrel planters and conventional wooden raised beds serve somewhat different purposes.
A plastic barrel planter is essentially a contained growing system, while many wooden raised beds have open bottoms and connect directly to the garden soil.
Plastic Barrel vs. Wooden Raised Bed
| Feature | Plastic barrel planter | Wooden raised bed |
| Material cost | Can be economical with suitable reused barrels | Depends on lumber selection |
| Construction | Requires cutting plastic and building supports | Usually straightforward frame assembly |
| Growing depth | Limited by barrel shape and orientation | Can be customized |
| Drainage | Requires drainage openings | Open-bottom designs drain into the ground |
| Durability | Resists rot but can suffer UV damage | Depends on wood species and moisture |
| Portability | Easier to relocate when empty | Depends on frame size |
| Planting capacity | Limited container volume | Can provide larger continuous growing space |
| Best application | Compact gardens, patios, elevated planters | Larger vegetable gardens and permanent layouts |
Plastic barrels are a practical choice for compact, recycled-material gardening projects.
Traditional wooden raised beds are generally more flexible when you need substantial soil depth, larger planting areas, or unrestricted root growth into the ground underneath.
The better option depends on available space, materials, and the vegetables you want to grow.
Conclusion
Understanding how to make raised garden beds out of plastic barrels begins with choosing a suitable food-grade container and deciding how to divide it into planting sections.
A 55-gallon HDPE barrel can be cut lengthwise to create two compact raised planting troughs. Each half needs smooth edges, a stable support cradle, drainage holes, and a suitable container potting mix.
The most important precautions are verifying the barrel’s previous contents, using safe cutting methods, and building supports strong enough to carry the filled containers.
For leafy greens, herbs, radishes, and other smaller vegetables, lengthwise half-barrels offer a practical use for suitable recycled materials. Upright half-barrels provide a deeper alternative for plants that need more rooting space.
I recommend starting with one verified food-grade barrel, building two properly supported troughs, and choosing compact vegetables for the first planting season. This keeps the project manageable while providing a functional growing space.
FAQs About How to Make Raised Garden Beds Out of Plastic Barrels
Can You Use Any Plastic Barrel for a Raised Garden Bed?
No. Use a barrel made from suitable plastic with a known, safe use history.
For vegetable gardening, a food-grade HDPE container is a practical choice.
Avoid drums that previously held pesticides, fuels, industrial chemicals, or unknown substances, even if they have been washed.
How Many Raised Garden Beds Can You Make From One 55-Gallon Barrel?
You can make two planting containers by cutting a suitable 55-gallon barrel lengthwise or across its middle.
Lengthwise cutting produces two long troughs.
Cutting across the middle creates two deeper, round planters.
The number and style of containers depend on the barrel’s construction and the chosen design.
Do Plastic Barrel Raised Beds Need Drainage Holes?
Yes. Ordinary plastic barrel planters need drainage openings so excess water can escape.
Without drainage, the growing medium may become saturated and damage plant roots.
Drill holes in appropriate low points of the containers and keep them unobstructed by the supporting frame.
How Much Potting Soil Do You Need for Half a 55-Gallon Barrel?
An equal half of a 55-gallon barrel has a theoretical full capacity of approximately 27.5 gallons, or 3.68 cubic feet.
The actual amount of potting mix needed is lower when you leave space below the rim.
For a typical lengthwise half-barrel, approximately 3 cubic feet may be a useful planning estimate, depending on the barrel’s dimensions.
Can You Grow Tomatoes in a Plastic Barrel Raised Bed?
Yes. Tomatoes can grow in plastic barrel planters when the container provides enough rooting space, drainage, and nutrients.
An upright half-barrel is generally more suitable for a compact tomato variety than a shallow lengthwise trough.
Choose a suitable variety and provide sturdy support for the mature plant.
Do You Need to Line a Plastic Barrel Raised Bed?
Usually not. The plastic barrel already forms a continuous container that holds the growing medium.
A separate plastic liner is generally unnecessary.
If drainage holes are large enough to lose soil, use small pieces of water-permeable mesh over the openings rather than covering the entire bottom with waterproof material.
Can You Make Self-Watering Raised Beds From Plastic Barrels?
Yes, a suitable plastic barrel can be adapted into a self-watering planter using a properly designed water reservoir, wicking system, fill pipe, and overflow outlet.
However, simply sealing the drainage holes does not create a functional self-watering bed.
The reservoir must store water below the growing medium while allowing moisture to move upward without continuously saturating the roots.

I’m Maya L. Greenwood, a lifelong plant lover who believes anyone can grow something beautiful with the right guidance. After years of testing soil mixes, pruning methods, irrigation tricks, and pest-safe solutions, I started EasyGardenTips.com to turn hard-won lessons into step-by-step advice. From seed starting and container gardens to composting and seasonal checklists, my goal is to make gardening simple, sustainable, and fun.