How to Build a Trellis for Raised Bed Garden: 3 Easy Designs
To build a trellis for a raised bed garden, install sturdy posts along one side of the bed, secure them properly, and attach garden netting, wire mesh, or another climbing support between them. For a typical 4 × 8-foot raised bed, three evenly spaced posts with netting can create a practical trellis for cucumbers, peas, and other climbing vegetables.
A trellis allows plants to grow vertically instead of spreading across the soil. This saves growing space, keeps many fruits cleaner, improves access for harvesting, and can increase airflow around the foliage.
However, raised-bed trellises require careful planning. A lightweight support may work for peas but struggle under mature pole beans or heavily loaded cucumber vines. Poorly anchored posts can also become unstable in strong winds.
You can build a useful trellis from wooden posts, metal stakes, garden netting, or rigid livestock panels. The best option depends on your crops, bed dimensions, and whether the structure will remain outdoors year-round.
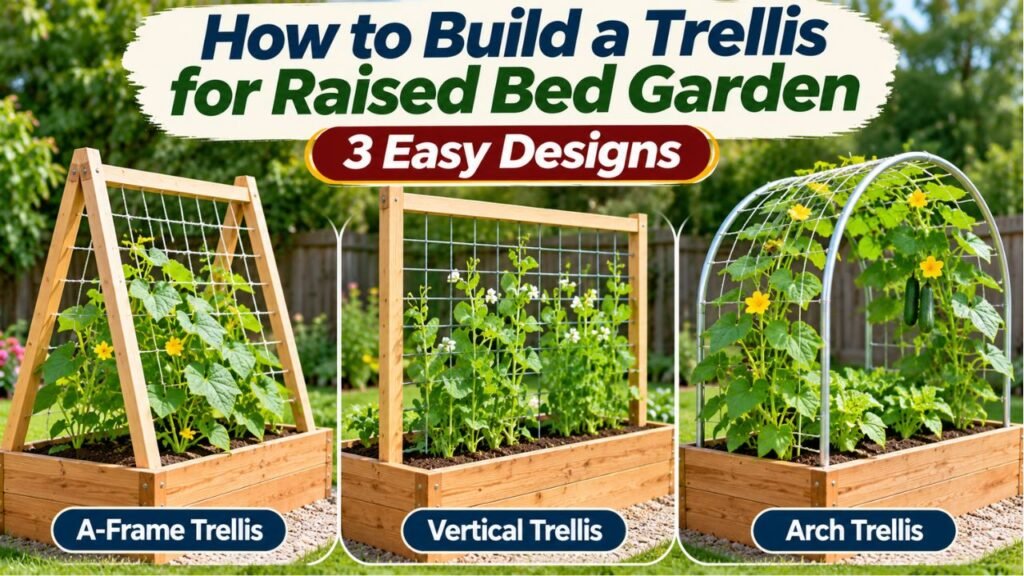
In this article, I explain how to build three raised-bed trellis designs, including a simple post-and-netting system, a wooden frame, and a cattle-panel arch. I also cover materials, dimensions, secure anchoring, crop-specific heights, placement, maintenance, and common construction mistakes.
How to Build a Trellis for Raised Bed Garden: Basic Plan
The simplest raised-bed trellis consists of two or three vertical posts supporting a securely attached mesh or netting panel.
It can be built along the back or northern side of a raised bed to allow climbing vegetables to grow upward.
The important design choices are the trellis height, post spacing, anchoring method, and strength of the climbing material.
Three DIY Trellis Designs Compared
| Trellis Design | Main Materials | Suitable Crops | Difficulty |
| Post-and-netting trellis | Metal or wooden posts, garden netting, fasteners | Peas, cucumbers, pole beans | Easy |
| Wooden-frame trellis | Lumber, screws, wire mesh or netting | Cucumbers, peas, beans, supported tomatoes | Easy to moderate |
| Cattle-panel arch | Welded livestock panel, T-posts, metal clips | Cucumbers, pole beans, selected small squash | Moderate |
The post-and-netting design is generally the easiest starting point for beginners.
A wooden frame is useful when you want a more permanent structure.
A cattle-panel arch creates an overhead growing space, particularly between two raised beds.
What Size Should a Raised-Bed Trellis Be?
The ideal height depends on the crop.
| Crop | Practical Trellis Height |
| Short garden peas | 3–4 feet |
| Tall climbing peas | 5–6 feet |
| Vining cucumbers | 4–6 feet |
| Pole beans | 6–8 feet |
| Indeterminate tomatoes | 6–8 feet, with suitable support and training |
| Compact climbing flowers | 4–6 feet |
| Small vining squash | 5–7 feet, with stronger support |
These are planning ranges, not fixed requirements.
Choose the height according to the mature growth habit of the specific variety.
For example, some cucumber varieties grow successfully on shorter supports, while vigorous pole beans may quickly reach the top of a 6-foot trellis.
The University of Minnesota Extension’s vegetable trellis guide recommends approximately 5–6 feet between support stakes and notes that a third stake can help support longer trellises.
Key Takeaway: Choose the trellis design according to the crop and the bed’s dimensions. A simple vertical mesh trellis is practical for most beginners.
Materials and Tools Needed to Build a Raised-Bed Trellis
The exact materials depend on the design you choose.
For a basic post-and-netting trellis, the following supplies are a useful starting point.
Materials for a Simple 4 × 8-Foot Raised Bed
| Material | Suggested Quantity | Purpose |
| Metal garden posts or sturdy wooden posts | 3 | Vertical support |
| Outdoor-rated garden trellis netting | Approximately 8 feet wide, cut to the needed height | Climbing surface |
| UV-resistant cable ties or suitable wire clips | As needed | Secure netting to posts |
| Strong outdoor twine or cord | As needed | Reinforce or tension netting |
| Optional top support or tensioned line | 1 | Reduce netting sag |
| Plant ties or soft garden tape | As needed | Guide vines |
| Optional ground anchors or bracing | As needed | Improve stability |
For an example bed approximately 12 inches tall, 8-foot posts driven 18–24 inches into suitable native ground outside the bed can provide roughly 5–5½ feet of support above the bed’s soil surface.
This is only an example. Actual post length and embedment must account for soil conditions, wind, crop weight, and the raised bed’s height.
Taller pole beans may require longer posts.
Tools
You may need:
- Measuring tape
- Level
- Post driver or suitable mallet
- Drill and bits for wooden construction
- Screwdriver or driver
- Wire cutters
- Pliers
- Garden scissors
- Work gloves
- Safety glasses
If you are driving posts into the ground, check for underground utilities first.
In the United States, contact 811 before digging and follow your state’s required notification process. Privately installed irrigation, electrical, and other lines may require separate locating arrangements.
Which Trellis Materials Are Best?
Wood: Useful for custom frames and decorative structures. Select sound, outdoor-suitable lumber.
Galvanized steel: A practical material for long-lasting mesh and livestock panels.
Garden netting: Lightweight, inexpensive, and easy to install for appropriate crops.
Bamboo: Suitable for simple teepees and small climbing supports when properly secured.
PVC: Sometimes used for lightweight structures, but may need additional bracing and may become brittle or deteriorate outdoors.
For vigorous crops or exposed locations, choose stronger materials rather than relying on a lightweight decorative trellis.
Key Takeaway: Basic netting trellises need only posts, mesh, and secure fasteners. Stronger plants require stronger supports and more reliable anchoring.
Method 1: How to Build a Simple Post-and-Netting Trellis
This is one of the easiest designs for raised-bed vegetables.
It works particularly well for peas, cucumbers, and pole beans when the posts and mesh are appropriately sized.
The following example uses a 4 × 8-foot raised bed.
Step 1: Choose the Trellis Location
Select one long side of the bed.
In most Northern Hemisphere gardens, the northern side is a useful starting location because a tall trellis there is less likely to shade shorter vegetables growing to its south.
However, nearby trees, fences, and the actual sunlight pattern may require a different location.
The trellis should remain accessible for planting, training, and harvesting.
Step 2: Mark the Post Locations
For an 8-foot-long trellis, mark three positions:
- One near the left end
- One near the center
- One near the right end
This creates two spans of approximately 4 feet.
You can adjust the positions to avoid bed hardware, irrigation lines, or other obstacles.
Make sure the posts align with one another.
Step 3: Install the Posts
Set the posts in stable ground.
Whenever possible, anchor a tall freestanding trellis into firm native soil beside the raised bed instead of relying only on loose raised-bed fill.
The soil inside a raised bed may not provide sufficient resistance to wind or a heavily loaded trellis.
Use the post manufacturer’s installation instructions.
Drive the posts deeply enough for the intended structure and conditions.
For example, the University of Minnesota Extension describes a 6-foot stake driven 1 foot into the ground, leaving 5 feet exposed, as a basic garden support illustration.
That is not a universal anchoring requirement.
Taller posts, weak soil, high winds, or heavy crops may require deeper foundations, bracing, or a different design.
Step 4: Check the Posts for Alignment
Place a level against each post.
Make sure the posts are upright and reasonably aligned.
A slight installation error can become more noticeable once the netting is attached.
If a post shifts easily, correct its anchoring before proceeding.
Step 5: Measure and Cut the Netting
Measure the space between the posts and the intended support height.
Cut the garden netting accordingly.
Choose netting suitable for the crop’s weight and climbing habit.
For example:
- Lightweight pea netting can support many pea varieties.
- Stronger polypropylene trellis netting can support suitable cucumber crops.
- Wire mesh or heavier netting may be more appropriate for vigorous plants.
Avoid very small openings if you need to reach through the trellis to harvest.
A mesh with openings around 4–6 inches can make reaching through easier for many cucumber-growing setups, provided the mesh is strong enough and the plant’s tendrils can grip it.
Step 6: Attach the Netting to the Top
Begin at one end.
Fasten the upper corners of the netting to the posts.
Use suitable UV-resistant cable ties, outdoor cord, wire clips, or other compatible fasteners.
If needed, install a tensioned upper line or rigid crossbar to reduce sagging.
Do not depend on a single weak fastener to support the entire netting panel.
Step 7: Secure the Sides and Bottom
Work downward, fastening the netting at regular intervals.
Keep the mesh reasonably taut without overstretching it.
Secure the lower edge so it cannot lift excessively in the wind.
Leave sufficient clearance for the plants to reach the climbing material.
Step 8: Inspect the Completed Trellis
Check that:
- Posts remain stable.
- Netting is securely attached.
- Fasteners are not loose.
- There are no sharp wire ends.
- The mesh does not sag excessively.
- The structure does not interfere with paths.
- Growing vines will have adequate support.
Make any corrections before planting.
Step 9: Plant Along the Base
Plant the selected climbing crop near the trellis.
Follow the seed packet or variety-specific spacing recommendations.
Do not automatically crowd more plants into the bed because the trellis saves horizontal space.
Step 10: Train the Vines
As the plants grow, guide their growing tips toward the netting.
Cucumbers and peas use tendrils to attach to suitable supports.
Pole beans generally climb by twining around supports.
Some plants may require gentle encouragement before they begin climbing.
Key Takeaway: Three aligned posts supporting taut netting make a practical trellis for an 8-foot-long raised bed. Anchor the posts securely and install the structure before planting.
Method 2: How to Build a Wooden Trellis Frame for a Raised Bed
A wooden trellis can provide a more permanent structure and a coordinated appearance with wooden raised-bed frames.
It can also support heavier mesh than a basic lightweight netting system.
The important consideration is making the structure strong enough for the crop and site.
Materials for a Wooden Trellis
For a basic rectangular frame, you may use:
- Two outdoor-suitable wooden upright posts
- One top crossbar
- An optional bottom crossbar
- Galvanized welded-wire mesh or strong garden netting
- Exterior-rated structural fasteners appropriate for the lumber
- Suitable post anchors or structural brackets
- Outdoor-rated staples or compatible mesh fasteners
For lightweight crops, smaller framing lumber may be sufficient.
For tall or heavily loaded trellises, stronger posts and bracing may be necessary.
Do not assume a thin 2 × 2-inch frame will safely support large mature squash vines in a windy location.
Step 1: Measure the Bed
Determine the width or length of the area you want to cover.
For example, a trellis across the short side of a 4-foot-wide bed might have a frame approximately 4 feet wide.
Check the actual outside dimensions.
If the trellis sits outside the bed, allow for post placement and anchoring hardware.
Step 2: Decide the Finished Height
A 5- or 6-foot growing height above the soil surface can be appropriate for many cucumbers and tall peas.
Pole beans may need additional height.
Remember to account for the raised bed’s height and the portion of each post used for anchoring.
The exposed height of a post is not the same as its full purchased length.
Step 3: Cut and Prepare the Lumber
Measure and cut the posts and crossbars.
Use appropriate cutting equipment and safety protection.
Sand or smooth rough edges.
For edible gardening, use sound materials suitable for outdoor conditions.
Avoid reclaimed lumber with unknown chemical treatments, old paint, or contamination.
Step 4: Assemble the Frame
Place the two upright posts on a flat working surface.
Position the upper crossbar between or across the posts according to your design.
Check that the corners are square.
Install the appropriate fasteners.
A bottom crossbar can help maintain the frame’s shape.
For larger structures, corner braces or diagonal bracing may be needed.
Step 5: Attach the Climbing Mesh
Cut the mesh to fit the inside or exterior of the frame.
Secure it with suitable galvanized staples, clips, screws with washers, or other compatible fasteners.
Keep it reasonably taut.
Make sure that exposed wire edges cannot scratch hands or damage plants.
Step 6: Anchor the Frame
This is the most important step.
For a freestanding wooden trellis, install the posts in suitable ground or approved post anchors.
If attaching the trellis to a wooden raised bed, confirm that the bed’s structural framing is strong enough for the added load.
Do not attach a tall, wind-catching trellis only to thin decorative boards.
A solid connection to properly reinforced structural posts is more dependable than screws driven into weak side panels.
Step 7: Test the Structure
Check for movement.
Inspect the fasteners and braces.
Make sure the frame is stable before vines begin growing.
If the structure sways or pulls on the raised-bed walls, strengthen the anchoring.
Should You Paint or Seal a Wooden Trellis?
You can use an appropriate exterior finish when needed.
However, select a product suitable for the intended application and follow its curing instructions.
Avoid allowing wet coatings to contact edible plant parts or garden soil.
Naturally decay-resistant wood may be used without an added coating, depending on the desired lifespan and local climate.
Key Takeaway: A wooden frame offers a customizable, attractive trellis, but its durability and safety depend on sound framing, weather-resistant fasteners, and proper anchoring.
Method 3: How to Build a Cattle-Panel Arch Between Raised Beds
A cattle-panel arch creates a walk-through trellis between two raised garden beds.
This design allows climbing vines to grow upward and across an overhead structure.
It is particularly useful for cucumbers, pole beans, and certain small-fruited climbing crops.
What Is a Cattle Panel?
A cattle panel is a rigid welded-wire livestock fence panel.
A common size is approximately:
- 16 feet long
- 50 inches wide
Sizes, wire gauges, and stiffness vary by manufacturer.
For an arch, the 16-foot dimension curves over the walkway.
The approximately 50-inch dimension becomes the length of the arch along the path.
Materials for One Arch
| Material | Quantity |
| Rigid cattle panel, commonly 16 ft × 50 in | 1 |
| Suitable steel T-posts | 4 |
| Compatible metal fence clips or heavy-duty ties | As needed |
| Outdoor-rated tie wire | As needed |
| Tape measure | 1 |
| Post driver | 1 |
| Heavy work gloves | 1 pair per person |
| Safety glasses | 1 pair per person |
| Helper | At least 1 |
Because cattle panels are stiff and springy, use another person to help handle and position the panel.
Do not attempt to bend a large panel alone.
Step 1: Choose Two Adjacent Raised Beds
Select two beds with a walkway between them.
The arch should span the path while leaving enough room to walk and harvest.
Check the width of the walkway and the space available for posts.
A wider span generally produces a lower, broader arch from the same panel.
A narrower span changes the curvature and available overhead clearance.
Do not assume every panel will produce the same arch height.
Step 2: Measure the Post Locations
Mark two supporting posts on each side of the walkway.
The posts should align with the ends of the cattle panel.
Use the actual panel width and planned curvature to determine the spacing.
Ensure the final arch will not obstruct gates, irrigation systems, or regular garden access.
Step 3: Install the T-Posts
Anchor the posts securely in firm ground.
If placing them beside raised beds, ensure they can resist the outward spring force of the bent panel as well as future wind and crop loads.
The panel should not depend on thin bed walls for structural support.
Use the post manufacturer’s guidance and suitable ground conditions.
Step 4: Position the Cattle Panel
With a helper, lift the panel carefully.
Keep control of both ends.
Gradually bend it into the intended arch shape.
A cattle panel stores spring force when bent. Never release either end until the structure is restrained and securely fastened.
Keep hands away from pinch points.
Avoid sudden movement.
Step 5: Secure the Panel to the Posts
Attach the panel to the T-posts at several locations.
Use compatible metal fence clips or other suitable outdoor-rated fasteners.
A structural connection should restrain the panel against both outward movement and vertical shifting.
Ordinary lightweight plastic ties alone may not be sufficient in exposed or heavily loaded locations.
Step 6: Check the Arch Clearance
Once the panel is fully secured, inspect the walking space.
Make sure the overhead clearance is adequate.
Remember that foliage and fruit will hang into the walkway later.
If the arch is low or the panel remains unstable, correct the layout before planting.
Step 7: Inspect the Connections
Check that:
- All four posts are firmly anchored.
- The panel cannot spring free.
- Clips are fully engaged.
- Exposed wire ends are protected.
- The structure does not wobble.
- There is enough clearance for safe access.
The University of Vermont Extension’s guide to garden plant supports discusses bending wire fencing into arches for raised beds and emphasizes secure installation before planting.
Step 8: Plant Vines on Both Sides
Plant appropriate climbing vegetables near the arch.
Guide the vines toward the wire openings.
Over time, the plants may climb over the arch and create a leafy tunnel.
Can a Cattle-Panel Arch Support Pumpkins?
Do not assume a standard arch can safely support large pumpkins or heavy winter squash.
Fruit weight, foliage, wind, and the anchoring system create combined loads.
The University of Minnesota Extension recommends smaller fruits for ordinary trellis growing and advises against trellising larger pumpkins and squash without suitable specialized support.
Some small melons and squash may be supported with additional slings when the structure is properly designed.
Key Takeaway: A cattle-panel arch is a durable option for growing vines over a walkway. Its safe construction depends on firm posts, suitable metal fasteners, careful handling, and appropriate crop loads.
Where Should You Place a Trellis in a Raised Garden Bed?
Trellis placement affects sunlight, accessibility, and how plants share the growing space.
For most raised beds, the best location is along an edge rather than through the center.
North Side of the Raised Bed
In the Northern Hemisphere, placing tall crops and trellises toward the northern side can reduce shading of shorter plants to the south.
For example, a 4 × 8-foot bed may have:
- Tall cucumber vines along the north side
- Medium-height vegetables in the middle
- Shorter leafy greens or herbs toward the south
This is a useful starting layout, not a universal rule.
Actual shade depends on the bed’s orientation, season, nearby structures, and the sun’s path.
Along the Back Edge
For a raised bed positioned against a fence, place the trellis where you can still reach the plants.
Avoid leaving so little space behind the trellis that harvesting becomes difficult.
If the back is inaccessible, make sure the mesh openings allow you to harvest from the front.
Along the Short Side
A trellis across the 4-foot end of a raised bed can work well for a smaller number of plants.
This layout may be useful when the garden has limited walking space.
Across Two Raised Beds
A cattle-panel arch can span the walkway between beds.
This creates additional vertical growing space without occupying the center of the planting area.
However, keep the walkway accessible and do not obstruct regular garden maintenance.
Should the Trellis Face the Sun?
Climbing vegetables need suitable sunlight for healthy growth.
Most fruiting vegetables perform best with substantial direct sunlight.
Position the trellis so plants receive the light recommended for the crop.
Avoid placing a tall support where it will shade other sun-loving vegetables unnecessarily.
Key Takeaway: In many U.S. gardens, the northern edge of a raised bed is a good starting position for a tall trellis. Adjust placement for sunlight, bed orientation, and harvesting access.
How Tall Should a Trellis Be for Different Vegetables?
Different climbing crops require different support heights and strengths.
A trellis that is ideal for peas may not be tall or strong enough for pole beans.
Trellis for Cucumbers
A trellis approximately 4–6 feet above the planting soil can work for many vining cucumber varieties.
Cucumber tendrils attach naturally to suitable mesh or wire.
For example, the University of Minnesota Extension’s cucumber growing guide describes training cucumber vines on 3- to 4-foot supports as one option.
Larger or more vigorous varieties may benefit from taller structures.
Trellis for Pole Beans
Pole beans grow by twining around supports.
A height around 6–8 feet is often useful.
The University of Minnesota Extension’s bean growing guide recommends installing pole bean supports at planting time and describes simple systems using 6-foot stakes and twine.
If your variety grows taller, choose longer posts and appropriate anchoring.
Trellis for Peas
Shorter pea varieties may need only a modest support.
Tall peas can benefit from a 5- or 6-foot trellis.
Pea tendrils often attach readily to thin netting or twine.
Small mesh openings can make climbing easier.
Trellis for Tomatoes
Indeterminate tomatoes require support throughout their growing season.
However, tomatoes do not climb naturally in the same way as pole beans.
They need:
- Soft plant ties
- Clips
- A suitable staking system
- A strong trellis
- Or a properly sized tomato cage
A tall, rigid support is often preferable to lightweight pea netting.
Trellis for Squash and Melons
Small-fruited varieties can sometimes be trained vertically.
However, the support must be strong enough for the vine and fruit load.
Heavier fruits may require slings.
Do not select large pumpkins or heavy squash for an ordinary lightweight trellis.
Crop-Specific Summary
| Crop | Support Type | Training Needed |
| Cucumbers | Mesh, netting, or rigid panel | Guide tendrils early |
| Pole beans | Poles, twine, or strong mesh | Guide young vines |
| Tall peas | Netting or thin twine | Usually minimal |
| Indeterminate tomatoes | Strong frame, stakes, or cages | Regular tying and training |
| Small vining squash | Strong mesh or rigid arch | Training; slings when appropriate |
| Small melons | Heavy-duty trellis | Fruit slings and regular inspection |
| Sweet peas and climbing flowers | Twine or garden mesh | Depends on species |
Key Takeaway: Match the trellis height and strength to the mature plant. Cucumbers and peas can often use moderate supports, while pole beans and vigorous tomatoes need taller structures.
How to Attach a Trellis to Wooden Raised Garden Beds
Attaching a trellis directly to a wooden raised bed can save space, but the frame must be strong enough to carry the additional load.
A trellis behaves differently from the bed itself.
The raised bed holds soil.
The trellis must resist wind, plant weight, and forces that can pull or twist its supports.
Can You Screw a Trellis Into the Raised-Bed Frame?
Yes, when the bed has suitable structural framing.
For example, a wooden bed with sturdy corner posts or reinforced uprights may provide suitable connection points for a properly designed trellis.
Use exterior-rated fasteners compatible with the materials.
Avoid fastening tall posts only to thin side boards.
Why Are Thin Bed Boards a Problem?
A mature climbing vine creates a large surface that catches wind.
That force transfers through the trellis into its supports.
If the posts are attached only to weak boards, the boards may:
- Split
- Bend
- Pull away from corner joints
- Loosen their fasteners
- Damage the bed structure
Properly reinforced framing or independent ground anchors are safer choices.
Should You Use Metal Brackets?
Heavy-duty brackets can help create a secure connection when used with appropriate framing and fasteners.
However, a bracket is only as strong as the materials to which it is attached.
Choose hardware based on the expected loads and manufacturer ratings.
Can You Attach a Trellis to a Metal Raised Bed?
Some metal raised-bed systems offer compatible trellis brackets or accessory kits.
Use manufacturer-approved attachment points when available.
Avoid drilling random holes into thin metal panels.
Improper attachment can damage corrosion protection and create stress points.
For large trellises, independent posts anchored in surrounding ground may be preferable.
Key Takeaway: A trellis can attach to a raised-bed frame if the structural connection is adequate. For heavy crops or exposed locations, independent posts in firm ground often provide a more dependable solution.
How to Keep a Raised-Bed Trellis From Falling Over
A trellis can become unstable as plants grow.
Wind pushes against foliage, and developing fruit adds weight.
The supporting structure must handle these changing conditions.
Anchor Posts in Stable Ground
Firmly installed posts provide the foundation.
Loose raised-bed soil may not offer enough resistance for a tall trellis.
Whenever possible, use suitable native ground or a properly designed structural support.
Add a Middle Post
For longer trellises, an intermediate support reduces the unsupported span.
For example, an 8-foot trellis may use three posts with approximately 4 feet between them.
This can help control sagging and movement.
Brace Tall Wooden Frames
Wooden frames may need diagonal braces or stronger corner connections.
Bracing helps reduce racking, where the rectangular frame shifts out of square.
Use Strong Fasteners
Outdoor-rated fasteners are important because rain, sunlight, and temperature changes can weaken some materials.
Check cable ties and netting regularly.
For rigid metal panels, compatible fence clips may provide more reliable restraint than ordinary lightweight ties.
Consider Wind Exposure
A trellis in an open, windy yard needs more support than one in a sheltered garden.
Avoid assuming a particular post depth or fastener arrangement is sufficient everywhere.
If the structure is unusually tall, heavily loaded, or located where collapse could injure people, seek appropriate local construction guidance.
Inspect After Storms
After strong winds or heavy rain, check:
- Post alignment
- Ground movement
- Loose brackets
- Damaged netting
- Bent mesh
- Broken ties
- Plant stems caught in the structure
Repair damaged components before the next period of severe weather.
Key Takeaway: Stable posts, suitable bracing, strong connections, and regular inspection are essential for preventing a raised-bed trellis from falling over.
How to Train Vegetables to Climb a Raised-Bed Trellis
Installing a trellis does not guarantee that every plant will climb it correctly.
Some vegetables attach naturally.
Others need regular training.
Training Cucumber Vines
Cucumbers have tendrils that wrap around suitable supports.
When the vines begin extending:
- Identify the main growing tip.
- Guide it gently toward the mesh.
- Place a vine near a suitable opening.
- Allow the tendrils to attach.
- Check growth every few days.
Avoid forcing brittle stems through small openings.
As the plant develops, check that growing cucumbers are not trapped between rigid wires.
Training Pole Beans
Pole beans twine around supports as they grow.
Guide young stems toward vertical cords or poles.
Once a vine begins wrapping around the support, it often continues climbing with little assistance.
Use appropriately sized twine or poles for the variety.
Training Peas
Peas generally use tendrils to grip thin supports.
Lightweight netting with suitable openings can work well.
Guide early growth toward the netting.
Avoid overcrowding if multiple vines become tangled.
Training Tomatoes
Tomatoes require more active support.
Use soft plant ties or compatible clips.
Attach stems loosely enough to allow growth.
Inspect the ties regularly.
Do not use thin wire directly against tender stems.
Supporting Small Melons
Some small-fruited melons can be trained vertically.
When the fruit begins gaining weight, provide a sling where needed.
Use soft, breathable material secured to the trellis.
The sling should support the fruit without pulling on the stem.
Do not assume the sling makes an inadequate trellis structurally safe.
Key Takeaway: Cucumbers, peas, and pole beans often climb with gentle guidance. Tomatoes require regular ties, and selected small melons may need additional fruit support.
How Far Apart Should You Plant Vegetables Along a Trellis?
Plant spacing depends on the specific vegetable, variety, and growing system.
Using a trellis can reduce the horizontal area occupied by vines, but it does not remove the plants’ needs for water, nutrients, and airflow.
Cucumber Spacing
For trellised cucumbers, approximately 9–18 inches between plants can be appropriate in many home-garden systems.
For example, the University of Maryland Extension describes thinning trellised cucumbers to about 9–12 inches apart.
A separate University of Maryland planting guide notes that 18-inch spacing can also be used in intensive gardens.
The appropriate spacing depends on the variety and growing conditions.
Pole Bean Spacing
University of Minnesota Extension recommends planting pole bean seeds approximately 4 inches apart along a row with a suitable trellis.
Follow the seed packet for your particular variety.
Pea Spacing
Pea spacing varies with the type.
Tall climbing peas are typically planted in rows close to the trellis.
Some shorter types can support one another when planted in broader rows.
Follow the variety’s growing recommendations.
Tomato Spacing
Tomato spacing varies considerably.
Indeterminate plants may require substantial room even when trained vertically.
Follow the variety-specific spacing guidance and pruning system.
Avoid using a single spacing measurement for every tomato.
Does Closer Spacing Increase Yield?
A trellis can make better use of limited garden space.
However, crowding plants excessively can increase competition for water, light, and nutrients.
Poor airflow may also contribute to disease problems.
Maximize productive space without ignoring the needs of individual plants.
Key Takeaway: Use crop-specific spacing rather than automatically planting more densely. A trellis saves space but does not eliminate competition between plants.
How Much Does It Cost to Build a Raised-Bed Trellis?
The cost depends on materials, dimensions, and whether you already own tools.
A simple netting trellis generally requires fewer specialized materials than a wooden frame or cattle-panel arch.
Main Cost Factors
| Design | Main Cost Factors | Relative Cost |
| Post-and-netting | Posts, netting, fasteners | Usually low |
| Bamboo teepee | Bamboo poles, garden twine | Often low |
| Wooden frame | Lumber, screws, braces, mesh | Moderate |
| Rigid wire panel | Steel panel, posts, clips | Moderate |
| Cattle-panel arch | Livestock panel, T-posts, clips, transportation | Moderate to higher |
These categories are general comparisons, not fixed retail prices.
Local lumber prices, fencing supply availability, and delivery charges can substantially change the total.
What Is the Cheapest Trellis to Build?
If you already own suitable stakes, a simple twine trellis is often inexpensive.
For peas or other lightweight climbers, you can run strong cords between two posts.
For vigorous crops, however, saving money by using weak materials may lead to failure later.
Is a Cattle-Panel Trellis Worth the Cost?
A rigid livestock panel can last for many growing seasons when properly installed and maintained.
It may be worthwhile if you want a long-term arch or a strong climbing surface.
However, transporting a full 16-foot panel can be difficult.
Account for delivery or suitable transportation before purchasing.
Which Trellis Provides the Best Value?
For a first raised-bed garden, the post-and-netting design is a sensible starting point.
It is relatively easy to install, repair, and modify.
For permanent gardening areas, a strong wood or metal trellis may provide better long-term value.
Key Takeaway: A post-and-netting trellis is usually the most accessible budget option. Stronger permanent structures cost more initially but may require less frequent replacement.
How to Maintain a Raised-Bed Trellis Throughout the Season
A trellis needs occasional attention as vines grow and fruit develops.
The best time to discover a loose fastener is before a storm or heavy harvest.
Check Fasteners Regularly
Inspect ties, clips, screws, and brackets.
Replace damaged components.
Tighten loose connections where appropriate.
Guide New Vine Growth
Some climbing plants grow rapidly.
Check them every few days during active growth.
Redirect stems before they become tangled or grow across pathways.
Monitor Fruit Weight
Check that developing fruits are adequately supported.
Add slings for suitable small melons where needed.
Avoid allowing excessive fruit loads to accumulate on weak netting.
Keep the Planting Area Accessible
Maintain space for watering, weeding, harvesting, and checking plants for pests.
Avoid allowing vines to completely block garden paths.
Water According to Plant Needs
Vertical growing does not eliminate the need for adequate irrigation.
The University of Minnesota Extension notes that trellised cucumbers may require more frequent watering in some situations.
Check soil moisture and adjust watering according to weather and crop growth.
Inspect for Disease and Pests
Trellising can improve airflow and keep fruit away from soil.
However, it does not prevent all diseases.
Remove diseased plant material appropriately and avoid overcrowding.
Clean the Trellis After Harvest
At the end of the growing season:
- Remove dead vines.
- Cut away old twine and plant ties.
- Inspect the mesh for damage.
- Remove debris.
- Check wooden sections for decay.
- Examine metal components for corrosion or sharp edges.
- Repair or replace damaged parts.
If using seasonal biodegradable twine, remove or compost it according to the material and garden practices.
Key Takeaway: Maintain trellises by checking supports, guiding vines, managing crop weight, and cleaning the structure after harvest.
Common Mistakes When Building a Trellis for Raised Beds
Several common mistakes can make a trellis unstable or inconvenient.
1. Using Posts That Are Too Short
A post must provide enough height after the anchoring portion is installed.
Remember to subtract both the ground embedment and the raised bed’s height when determining the growing space above the soil.
2. Anchoring Only in Loose Raised-Bed Fill
Loose growing media may not provide enough support for a tall structure.
Use suitable ground anchors, independent posts, or a properly reinforced bed frame.
3. Building Too Close to a Wall
A trellis positioned against a wall may become difficult to harvest from behind.
Plan the access route before installing it.
4. Installing the Trellis After Plants Are Mature
Late installation can damage roots, stems, and developing fruit.
University extension guidance recommends placing supports before or during planting.
5. Using Weak Netting for Heavy Crops
Pea netting is not appropriate for every vigorous crop.
Choose stronger materials for fruit-heavy vines.
6. Ignoring Wind Loads
A leafy trellis catches more wind than an empty one.
Use adequate anchoring and inspect it during the growing season.
7. Placing the Trellis Where It Shades Everything
Tall structures can shade smaller vegetables.
Consider the direction of sunlight when choosing placement.
8. Making the Mesh Openings Too Small
Very small openings can make harvesting difficult.
They may also trap developing fruit.
Choose an opening size suitable for the crop and your ability to reach through it.
9. Forgetting About Maintenance Access
An attractive arch is not useful if it prevents you from walking through the garden.
Leave enough space for regular work and harvesting.
10. Trellising Overly Heavy Fruit
Large pumpkins and heavy squash can exceed the capacity of ordinary garden trellises.
Choose suitable crop varieties and provide properly designed support.
11. Using Inadequate Connections
A few weak cable ties may not be enough for a large cattle-panel structure.
Use fasteners suitable for the panel, post, wind exposure, and plant load.
12. Ignoring Underground Utilities
Driving stakes or posts into the ground can damage buried lines.
Arrange utility locating before ground disturbance, including small post installations.
Key Takeaway: Proper anchoring, suitable height, adequate strength, correct placement, and safe construction are more important than decorative appearance.
What Is the Best Trellis Design for a 4 × 8 Raised Bed?
For most beginners growing cucumbers or peas, I recommend a three-post vertical trellis with outdoor-rated netting along the 8-foot side.
It is simple, space-efficient, and easy to modify.
Recommended Example Layout
| Feature | Example Specification |
| Raised-bed size | 4 ft × 8 ft |
| Trellis position | Along one 8-foot edge |
| Number of posts | 3 |
| Post spacing | About 4 feet |
| Netting width | About 8 feet |
| Trellis height above soil | About 5–6 feet for many cucumbers |
| Netting type | Strong outdoor-rated garden mesh |
| Anchoring | Firm native ground or appropriately engineered structural frame |
| Best crops | Cucumbers, climbing peas, suitable beans |
The post length must account for the bed’s height and anchoring depth.
For a 12-inch-tall bed, an 8-foot post driven approximately 18–24 inches into suitable ground beside the bed will leave around 5–5½ feet above the bed.
If you need 6–7 feet of growing height above the bed, select longer posts and design the anchoring accordingly.
Why This Layout Works
Three posts reduce the span of unsupported netting.
The full 8-foot length provides useful climbing area.
Placing it along an edge keeps the center of the bed accessible for shorter crops.
Netting can also be removed or replaced without dismantling the entire garden bed.
When I Would Choose Another Design
For vigorous pole beans, I would use appropriately taller posts or a strong rigid support.
For a permanent garden with two parallel raised beds, a cattle-panel arch can provide an attractive overhead growing area.
For tomatoes, I would favor a sturdy frame, stakes, or a dedicated support system that allows regular tying and training.
Key Takeaway: A three-post netting trellis is a practical starting design for a 4 × 8-foot raised bed. Increase height and structural strength when growing more vigorous or heavily loaded crops.
Conclusion
Building a trellis for a raised bed garden is a practical way to grow climbing vegetables vertically, make better use of limited garden space, and improve access for harvesting.
The simplest approach uses sturdy posts and securely attached garden netting. A wooden frame offers a customizable and more permanent option, while a cattle-panel arch creates overhead growing space between adjacent beds.
For a typical 4 × 8-foot raised bed, three posts spaced along one long side provide a straightforward starting layout for cucumbers or peas.
However, the trellis should be designed for the mature plant, not just the size of the seedlings. Pole beans may need taller supports, tomatoes require regular training, and selected fruiting vines need stronger structures.
Always anchor the posts properly, protect exposed wire edges, and consider wind loads before installing the climbing material.
If you are building your first raised-bed trellis, I recommend starting with the post-and-netting design. It requires relatively few materials, is easy to maintain, and can be adapted for different vegetables.
Install it before planting, guide the vines as they grow, and inspect the supports throughout the season.
FAQs About How to Build a Trellis for Raised Bed Garden
What is the easiest way to build a trellis for a raised garden bed?
The easiest method is to install two or three sturdy posts along one side of the bed and attach outdoor-rated garden netting between them. Anchor the posts securely, keep the netting reasonably taut, and select a height suitable for the climbing crop.
How tall should a trellis be for a raised bed garden?
Most cucumber and tall pea trellises can be approximately 4–6 feet above the planting soil. Pole beans often benefit from 6–8 feet of support. The best height depends on the crop variety, mature growth, and available space.
Can you attach a trellis directly to a wooden raised bed?
Yes, if the raised bed has strong structural framing and the attachment is designed for the expected wind and plant loads. Avoid securing tall, heavy trellises only to thin wooden side boards. Independent posts anchored in firm ground may provide better support.
Where should a trellis go in a raised garden bed?
In many Northern Hemisphere gardens, the northern edge of the raised bed is a practical location because it can reduce shading of shorter vegetables to the south. However, access, nearby structures, and the actual sunlight pattern should guide the final placement.
What is the best material for a raised-bed trellis?
Outdoor-rated garden netting with sturdy posts works well for lighter climbing crops. Galvanized welded-wire mesh and cattle panels are useful for stronger, more permanent supports. Wood is suitable for custom frames when properly braced and anchored.
Can you build a raised-bed trellis with cattle panels?
Yes. A cattle panel can be mounted vertically or bent into an arch between two raised beds. A typical arch uses a rigid 16-foot livestock panel and securely installed steel posts. Use a helper during bending and fasten the panel carefully because it stores spring force.
Do cucumbers grow better on a trellis in raised beds?
Trellising can help cucumber vines use space more efficiently, keep fruits off the soil, improve access for harvesting, and increase airflow. However, plants still require suitable sunlight, water, nutrients, and spacing. Choose a support strong enough for the mature vines and developing cucumbers.

I’m Maya L. Greenwood, a lifelong plant lover who believes anyone can grow something beautiful with the right guidance. After years of testing soil mixes, pruning methods, irrigation tricks, and pest-safe solutions, I started EasyGardenTips.com to turn hard-won lessons into step-by-step advice. From seed starting and container gardens to composting and seasonal checklists, my goal is to make gardening simple, sustainable, and fun.