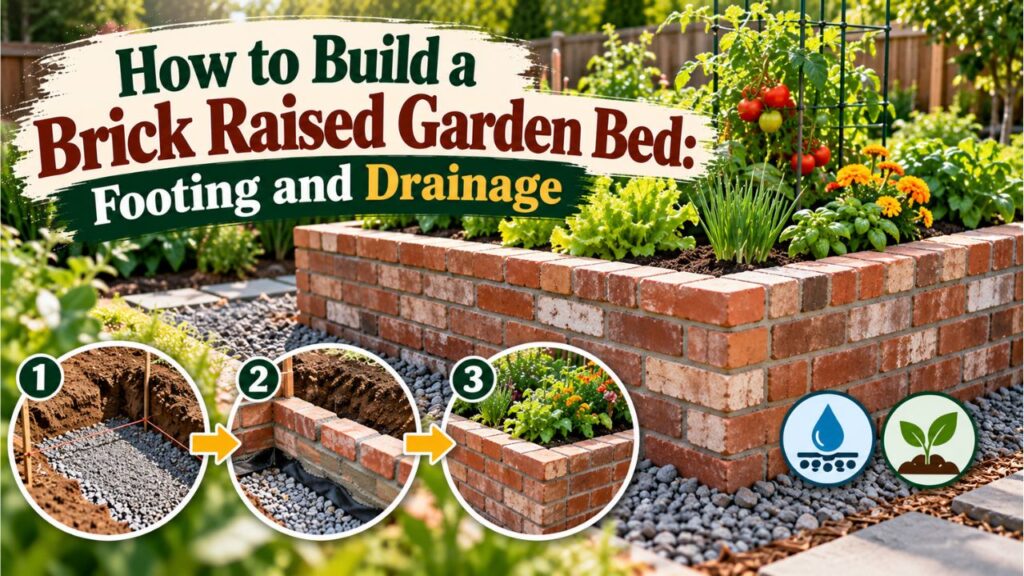
How to Build a Brick Raised Garden Bed: Footing and Drainage
To build a brick raised garden bed, choose a level location, prepare a stable foundation, lay suitable outdoor bricks with mortar, provide adequate drainage, and fill the structure with healthy garden soil. A properly constructed brick bed can provide a durable growing area for vegetables, herbs, and flowers.
Unlike wooden frames, brick walls require careful attention to their foundations and structural stability. Wet soil pushes outward against the walls, while changing temperatures and ground movement can cause poorly supported masonry to crack or shift. Simply stacking several rows of ordinary bricks without suitable support isn’t a reliable way to create a permanent raised bed.
The best construction method also depends on the bed’s height, soil conditions, local climate, and whether it sits on natural ground or a paved surface. A shallow decorative border is much simpler than a tall brick planter.
In this article, I cover the materials and tools needed, how to plan and construct the foundation and brick walls, proper drainage methods, brick and soil quantity calculations, common building mistakes, and ways to maintain a sturdy raised garden bed.
Plan Your Brick Raised Garden Bed Before Building
A successful brick raised bed starts with selecting the right location, dimensions, and construction method.
Brick is a permanent landscaping material. Once the walls are mortared onto a foundation, changing the size or position becomes difficult.
Plan the growing area and masonry structure together rather than deciding the details after purchasing bricks.
Choose the Right Location
Select a reasonably level area with stable ground and suitable sunlight.
Most common vegetables, including tomatoes, peppers, and squash, grow best with at least six hours of direct sunlight daily.
Some leafy vegetables and shade-tolerant flowers can grow with less sunlight.
Look for a location that provides:
- Adequate sunlight for the intended plants.
- Well-drained ground without frequent standing water.
- Convenient access to a water source.
- Enough space to reach the planting area from outside.
- Stable soil capable of supporting the masonry foundation.
- Suitable distance from building foundations, buried utilities, and major tree roots.
Avoid placing a brick raised bed where roof runoff or hillside drainage regularly collects.
Before excavating, request underground utility markings. In the United States, contact 811 or the appropriate local utility-location service.
Decide the Length, Width, and Height
A common raised garden bed measures approximately 4 feet wide and 8 feet long.
This size provides a useful growing area while allowing most adults to reach the center from both sides.
However, brick walls are thicker than ordinary wooden boards.
Always distinguish between the inside planting dimensions and the outside dimensions of the finished structure.
For example, a bed with an outside width of 4 feet will have less than 4 feet of usable planting width after accounting for the brick walls.
Consider the following starting dimensions:
| Garden bed type | Practical inside width | Typical intended soil depth |
| Small herb bed | 2–3 feet | 8–12 inches |
| Vegetable bed | 3–4 feet | 12–18 inches |
| Flower bed | 2–4 feet | 8–18 inches |
| Deep-rooted vegetable bed | 3–4 feet | 12–24 inches or more |
| Accessible raised planter | Based on comfortable reach | Based on crops and planter design |
These depths are general planning ranges, not structural wall-height recommendations.
For an open-bottom bed, roots may grow into the native soil beneath the raised bed.
An enclosed brick planter must provide the full rooting depth within its structure.
Taller brick walls require greater attention to wall thickness, reinforcement, and soil pressure.
Choose Between a Low Brick Border and a Mortared Raised Bed
There are two common approaches.
Low brick edging: A shallow border using one course of bricks can define a planting area without creating a substantial soil-retaining wall. It is simpler to install and may be suitable for decorative beds.
Permanent mortared brick bed: Multiple courses of masonry form a rigid wall supported by an appropriate foundation. This is better suited to a permanent raised garden bed with meaningful soil depth.
For the main construction process below, the focus is a permanent mortared brick raised bed.
The required wall thickness, footing dimensions, and reinforcement depend on the final height and site conditions. Have these details specified by a qualified mason or structural professional when the wall retains substantial soil.
Materials and Tools for a Brick Raised Garden Bed
Using suitable masonry materials improves durability and reduces the risk of early cracking or deterioration.
Ordinary decorative bricks aren’t always suitable for prolonged contact with moisture and soil.
Materials Needed
Prepare the following materials according to the planned design:
- Exterior-rated clay bricks suitable for the local climate.
- Concrete for the continuous wall footing.
- Reinforcement if required by the foundation design.
- Exterior masonry mortar compatible with the bricks.
- Masonry ties or structural reinforcement where specified.
- Suitable drainage outlets or weep-hole components.
- Approved drainage material where needed.
- An optional masonry-compatible sidewall moisture barrier.
- Coping bricks or suitable wall caps.
- Quality loamy topsoil.
- Finished compost.
- Organic mulch for the planting surface.
For regions with freezing winters, choose bricks rated for severe weather exposure and freeze-thaw conditions.
The Brick Industry Association’s technical guidance identifies Grade SW brick under applicable ASTM specifications as suitable for severely weather-exposed masonry.
Avoid using unidentified salvaged bricks without confirming their condition and suitability.
Tools Needed
Useful tools include:
- Measuring tape.
- Wooden stakes and mason’s string.
- Spirit level.
- Carpenter’s square.
- Shovel and digging tools.
- Masonry trowel.
- Mortar mixing equipment.
- Brick jointer.
- Rubber mallet.
- Masonry cutting equipment.
- Wheelbarrow or suitable material containers.
- Work gloves and eye protection.
Cutting masonry can create hazardous respirable crystalline silica dust.
Use appropriate wet-cutting or dust-control equipment and respiratory protection when required. Avoid uncontrolled dry cutting.
How to Build a Brick Raised Garden Bed Step by Step
A permanent brick raised bed is built in stages, starting with site preparation and foundation construction.
The wall should be designed to resist the outward pressure of the growing soil, especially when the soil becomes wet.
These steps explain the construction sequence for a modest residential bed. They don’t replace a site-specific masonry design for wall thickness, footing size, reinforcement, or drainage.
Step 1: Mark the Brick Raised Bed Layout
Begin by identifying the outside dimensions of the planned structure.
Drive stakes into the ground at the corners and connect them with string.
For a rectangular bed:
- Measure the desired length and width.
- Mark the outside wall positions.
- Check the corners using a carpenter’s square.
- Compare the diagonal measurements.
- Adjust the strings until the layout is square.
- Mark the proposed footing location.
For a true rectangle, the two diagonal measurements should match.
Remember that the concrete footing may need to extend beyond the brick walls, depending on the structural design.
Mark the footing footprint separately from the planting area.
Step 2: Excavate for the Brick Wall Foundation
A permanent mortared brick wall needs an appropriate foundation.
Don’t build a substantial soil-retaining brick wall directly on loose topsoil, uncompacted fill, or an unverified patio surface.
Excavate along the planned wall perimeter to the required footing depth.
The correct excavation dimensions depend on:
- Wall height and thickness.
- Soil-bearing capacity.
- Local frost depth.
- Groundwater conditions.
- Structural loads.
- Local building requirements.
In freezing climates, conventional masonry footings generally require appropriate frost protection, often by extending below the local frost line.
The required depth is not identical across the United States.
For an open-bottom raised bed, the continuous footing normally supports the perimeter walls while leaving the central growing area open to the underlying ground.
Safety Note: If the proposed bed is tall, located on a slope, near a structure, or intended to retain substantial soil, obtain a suitable footing and wall design before excavation. A brick planter can act as a retaining structure, not just decorative garden edging.
Step 3: Prepare and Pour the Concrete Footing
The footing distributes the wall’s weight and helps support the masonry.
Once the excavation has reached suitable bearing ground, prepare the base according to the specified construction design.
The process generally involves:
- Removing loose material from the excavation.
- Checking that the base is stable and at the correct elevation.
- Installing forms where needed.
- Placing required reinforcement.
- Pouring the specified concrete mixture.
- Leveling the top surface.
- Allowing the concrete to gain sufficient strength before masonry construction.
Avoid guessing the footing width or thickness from a small decorative garden wall example.
A heavier brick planter may require a wider or reinforced footing.
Concrete also needs suitable curing conditions.
Follow the approved design and concrete product requirements before loading the footing with brickwork.
Step 4: Arrange the First Course of Bricks
The first course is the bottom horizontal row of bricks.
It establishes the alignment for the entire wall.
Before applying mortar, place the bricks on the prepared footing to check the layout.
This temporary arrangement is called a dry layout.
Check where bricks will meet at the corners and whether cuts are needed.
Plan for consistent mortar joints and a suitable bonding pattern.
Avoid finishing one side with an awkwardly narrow piece simply because the layout wasn’t checked beforehand.
Once the arrangement is satisfactory, remove the dry-laid bricks and prepare for mortaring.
Step 5: Mix the Masonry Mortar
Use an exterior masonry mortar specified for the brick type and wall design.
Mortar choice affects bonding, durability, and how the wall responds to weather exposure.
Follow the manufacturer’s mixing instructions.
A suitable mortar mixture should be workable enough to spread and bond the bricks without becoming excessively watery.
Avoid adding extra water simply to make the mixture easier to handle.
Mix manageable batches rather than preparing more mortar than can be used within its allowable working time.
Do not attempt to restore mortar that has exceeded its working time by repeatedly adding water.
Keep the bricks and masonry surfaces prepared according to the product instructions and weather conditions.
Step 6: Lay the First Brick Course
Start at a corner and establish a straight reference line.
Apply mortar to the foundation where the bricks will sit.
Position the first brick and gently press it into the mortar bed.
Then:
- Apply mortar to the end joint of the next brick.
- Place it beside the first brick.
- Check alignment with the mason’s string.
- Check the top surface with a level.
- Adjust the brick before the mortar begins to stiffen.
- Continue along the wall.
- Recheck the corners and alignment.
Keep the mortar joints consistent with the selected masonry system.
Avoid allowing gaps or poorly filled joints to develop.
A straight, level first course makes the remaining brickwork easier to install.
Step 7: Build Additional Brick Courses
After the first course, continue laying bricks according to the specified bonding pattern.
A common approach is a running bond, where vertical joints are offset between successive courses.
This creates a staggered appearance rather than continuous vertical joints.
However, a running-bond pattern alone doesn’t guarantee that a soil-retaining brick wall is structurally adequate.
Depending on the design, the wall may need multiple brick wythes, proper masonry bonding, ties, reinforcement, or thicker sections.
A wythe is a continuous vertical layer of masonry units.
A single thin wythe may be unsuitable for a raised bed containing a significant depth of soil.
As the wall rises:
- Check that the sides remain straight.
- Check corners for plumb.
- Maintain appropriate mortar joints.
- Install structural reinforcement and ties where specified.
- Follow the approved design at corners and intersections.
- Remove excess mortar before it hardens.
Don’t increase the wall height beyond its planned design.
The soil placed inside the bed will exert pressure against the walls even when nobody is standing on them.
Step 8: Install Drainage Features During Construction
A mortared brick raised bed must have a reliable way to release excess water.
This is especially important because continuous mortar joints can restrict water movement through the walls.
The Brick Industry Association’s guidance on brick planting boxes recommends adequate drainage through weep holes or other suitable outlets. It also emphasizes protecting masonry against moisture and designing walls to withstand lateral soil pressure.
A weep hole is an intentional opening that allows collected water to leave a masonry structure.
Depending on the wall and drainage design, this may involve:
- Weep openings near the base of the wall.
- Free-draining material directly behind the wall where needed.
- A suitable drainage pipe or outlet for enclosed structures.
- Moisture protection compatible with the masonry.
- An unobstructed route for water to leave the structure.
Weep holes should discharge above the surrounding exterior ground level and remain clear of soil and debris.
Do not create random openings in a completed wall without considering the masonry layout and structural design.
For an open-bottom bed on well-drained natural soil, water can also move downward into the ground.
However, the open bottom doesn’t automatically solve drainage problems caused by compacted clay or poor site conditions.
Step 9: Finish the Top of the Brick Wall
The top of the wall is exposed to rainfall, irrigation water, and temperature changes.
A suitable coping or cap can help protect the masonry and provide a finished appearance.
Common options include:
- Appropriate coping bricks.
- Precast concrete caps.
- Natural stone coping.
- Other weather-resistant masonry caps.
The selected cap should be compatible with the wall design.
Where appropriate, an overhanging cap with drip detailing helps direct rainwater away from the wall face.
Secure the caps using the specified mortar or fixing system.
Avoid leaving loose bricks along the top where they could fall during gardening.
Allow the masonry to cure and gain the required strength before filling the bed with soil.
The exact waiting period depends on the mortar, weather, and structural requirements.
Step 10: Prepare the Ground Inside the Brick Bed
Once the masonry is ready to receive soil, inspect the growing area.
For an open-bottom brick raised bed:
- Remove weeds, debris, and large stones.
- Check for compacted native soil.
- Loosen suitable ground with a garden fork.
- Avoid damaging the foundation or drainage components.
- Confirm that the planting area drains adequately.
- Prepare to add the growing mixture.
Loosening compacted native soil helps improve the connection between the raised bed and the ground underneath.
Roots may eventually grow into the original soil if conditions are suitable.
Avoid placing an impermeable plastic sheet across the bottom of an ordinary open-bottom raised bed.
If ground contamination is suspected, the bed requires a separate soil safety and barrier plan.
Step 11: Fill the Brick Raised Bed With Soil
Once the structure is complete, fill it with a suitable growing medium.
For many open-bottom raised beds, a mixture of quality loamy topsoil and finished compost provides a practical starting point.
A simple recipe is:
- 2 parts loamy topsoil.
- 1 part finished compost.
The University of Maryland Extension’s raised bed construction guidance identifies compost and garden soil or purchased topsoil mixtures in ratios of approximately 1:2 or 1:1 as possible growing media.
Actual proportions should reflect the quality and existing organic matter content of the soil.
Add the mixture in manageable amounts.
Spread it evenly without pressing it down heavily.
Leave some space beneath the top edge for mulch and irrigation.
Water gently to settle the growing medium.
Avoid filling the bed before the wall has gained adequate strength.
Step 12: Plant Vegetables, Herbs, or Flowers
After the soil settles, the raised bed is ready for planting.
Select plants based on sunlight, available rooting space, and seasonal temperatures.
A brick raised bed can accommodate:
- Tomatoes and peppers.
- Lettuce and spinach.
- Carrots and radishes.
- Basil, parsley, and other herbs.
- Marigolds and zinnias.
- Suitable perennial flowers.
Follow each plant’s spacing and planting-depth requirements.
Apply mulch after planting to help maintain soil moisture.
Avoid placing heavy garden equipment on the brick wall unless the structure was specifically designed for that load.
How Many Bricks Do You Need for a Raised Garden Bed?
The number of bricks depends on the outside perimeter, wall height, brick dimensions, joint thickness, wall thickness, and bonding pattern.
A material estimate should be prepared after the structural wall design is established.
Calculate the Brick Bed Perimeter
For a rectangular bed:
Perimeter = 2 × (Length + Width)
For example, consider a bed with outside dimensions of 4 feet by 8 feet.
2 × (4 + 8) = 24 linear feet
This gives the approximate distance around the outside of the frame.
The actual brick quantity must account for the wall layout and corner bonding.
Estimate Bricks Per Course
A common U.S. modular brick has a nominal length of approximately 8 inches when its mortar joint is included.
Using that assumption:
24 feet × 12 = 288 inches
288 ÷ 8 = 36 bricks per course
If the wall has five courses:
36 × 5 = 180 bricks
Allowing an illustrative 10% extra for cuts and breakage gives:
180 × 1.10 = 198 bricks
This is a basic counting example for one row of brickwork, not a complete bill of materials for a structurally adequate raised bed.
A wall with multiple wythes, additional bonding bricks, reinforcement details, or wider corners may require substantially more bricks.
The final material quantity must be based on the actual masonry design.
How Much Soil Does a Brick Raised Garden Bed Need?
Soil volume depends on the inside planting dimensions and intended fill depth.
Measure inside the completed brick walls rather than using the outside footprint.
For a rectangular bed:
Soil volume (cubic feet) = Inside length × Inside width × Fill depth
All measurements must use feet.
| Inside bed size | Fill depth | Soil volume | Cubic yards |
| 2 × 4 ft | 12 inches | 8 cu. ft. | 0.30 |
| 3 × 6 ft | 12 inches | 18 cu. ft. | 0.67 |
| 4 × 4 ft | 12 inches | 16 cu. ft. | 0.59 |
| 4 × 8 ft | 12 inches | 32 cu. ft. | 1.19 |
| 4 × 8 ft | 18 inches | 48 cu. ft. | 1.78 |
| 4 × 8 ft | 24 inches | 64 cu. ft. | 2.37 |
These calculations assume a uniform soil depth and don’t include additional allowances for settling.
For example, a brick bed with inside dimensions of 4 feet by 8 feet and a fill depth of 12 inches requires 32 cubic feet.
If using two parts topsoil to one part compost, the approximate ingredients would be:
- 21.3 cubic feet of topsoil.
- 10.7 cubic feet of compost.
Actual purchased quantities may need adjustment for material volume changes during mixing and settling.
Can You Build a Brick Raised Garden Bed Without Mortar?
Yes, but an ordinary dry-stacked brick border is suitable mainly for shallow decorative applications, not for a tall permanent soil-retaining wall.
Bricks laid without mortar can move when the ground settles or when wet soil pushes against them.
Building a Low Dry-Stacked Brick Border
For a shallow garden border, a single course of suitable bricks may be installed on a prepared, level base.
A basic approach is to:
- Mark the garden bed outline.
- Remove weeds and loose material.
- Excavate a shallow, level setting area.
- Prepare a firm, compacted base appropriate for the edging material.
- Position the bricks closely together.
- Check their alignment.
- Backfill carefully without overloading the border.
This creates a defined planting edge rather than a substantial elevated planter.
If the design requires multiple stacked courses and significant soil retention, ordinary loose bricks aren’t an appropriate substitute for engineered interlocking retaining-wall units or mortared masonry.
Mortared Brick vs. Dry-Stacked Landscaping Blocks
Purpose-made retaining-wall blocks are different from ordinary bricks.
Some landscaping blocks use interlocking shapes, setback features, or manufacturer-specified reinforcement systems.
They may be designed for dry-stacked construction under specified conditions.
Ordinary clay bricks generally don’t provide those interlocking structural features.
Choose the construction method based on the actual product rather than assuming every masonry unit can be stacked in the same way.
How to Handle Drainage in a Brick Raised Bed on Concrete
Building on concrete or another impermeable surface requires a different drainage approach.
An open-bottom garden bed on natural soil can discharge water downward into the ground.
A brick planter on solid pavement may have no downward drainage path.
Check the Existing Concrete Surface
Before constructing the wall, determine whether the existing pavement can support the proposed masonry structure.
A typical patio slab isn’t automatically suitable as a structural footing for a substantial brick planter.
Check the slab’s thickness, condition, underlying support, and intended loads.
A separate foundation or professionally designed support may be necessary.
Avoid building heavy masonry over cracked, settling, or poorly supported pavement.
Provide Suitable Drainage Outlets
A brick planter on concrete needs a reliable outlet for excess water.
This may involve a properly designed base drain, low wall outlets, or an engineered drainage arrangement.
The water must discharge to a suitable location rather than collecting against nearby buildings.
Keep drainage openings protected from blockage by soil particles.
Don’t assume that placing gravel beneath the growing medium will solve drainage problems.
Gravel cannot replace an actual outlet for excess water.
Choose Soil Appropriate for an Enclosed Planter
If the brick structure has a solid bottom, its growing environment resembles a large container.
A suitable container-style growing medium may be more appropriate than dense mineral topsoil alone.
The mixture should provide adequate air space while retaining sufficient moisture.
Choose a soil depth appropriate for the intended plants, especially when roots cannot enter native ground.
For vegetables on hard surfaces, shallow beds may limit root development and require more frequent watering.
How to Protect Brick Raised Bed Walls From Moisture
Brick raised beds experience continuous exposure to soil moisture, irrigation, and outdoor weather.
Correct moisture management helps preserve the wall’s appearance and structural condition.
Prevent Water From Accumulating Behind the Brick
Mortared brickwork can absorb moisture.
If water repeatedly collects against the inside face, it may contribute to staining, deterioration, and freeze-thaw damage in colder climates.
Provide the drainage system specified for the wall.
Where a moisture barrier is used, choose a product compatible with the masonry and the intended garden application.
For edible gardens, don’t assume an ordinary construction waterproofing product is suitable for direct contact with growing soil.
Use appropriate protection and separation as required by the selected product.
Reduce White Stains on Brickwork
White powdery deposits sometimes appear on masonry surfaces.
This is commonly called efflorescence.
It occurs when moisture carries soluble salts toward the brick surface and leaves them behind as water evaporates.
Minor efflorescence may be primarily cosmetic.
However, persistent staining can indicate ongoing moisture movement through the wall.
Check the drainage system before applying cleaning products or surface coatings.
Avoid harsh chemical cleaners that could enter the garden soil.
Protect Brickwork During Freezing Weather
Brick walls in freezing climates can experience damage when absorbed water freezes and expands.
Use appropriately rated exterior bricks and mortar.
Ensure coping and drainage details limit prolonged saturation.
Inspect joints and caps before winter.
Don’t rely on ordinary indoor or decorative brick products for a garden wall exposed to repeated freeze-thaw cycles.
Common Brick Raised Garden Bed Construction Mistakes
Several problems can shorten a brick bed’s lifespan or create avoidable structural hazards.
Building Without a Suitable Foundation
A permanent brick wall placed directly on uneven soil may settle and crack.
The footing must support the wall and distribute its weight.
Choose the foundation design based on local soil and climate conditions rather than copying dimensions from an unrelated project.
Stacking Too Many Bricks Without Structural Bonding
A tall stack of bricks is not automatically a stable retaining wall.
Soil pressure increases as the retained depth increases.
Appropriate bonding, wall thickness, reinforcement, and footing design must work together.
Avoid constructing a tall bed from a single thin wall without verifying its structural capacity.
Forgetting Drainage Openings
A brick planter that traps water can develop both plant-health and masonry problems.
Plan drainage before laying the wall.
Make sure outlets remain open after adding soil and landscaping materials.
Using Unsuitable Reclaimed Bricks
Old bricks can be attractive, but their durability and previous exposure may be unknown.
Some salvaged bricks are too soft or porous for severe outdoor conditions.
Others may have residue from paint, chemicals, or industrial use.
Choose identifiable, suitable materials, particularly for vegetable gardens.
Filling the Bed Before the Mortar Is Ready
Wet garden soil creates substantial outward loads against the brick walls.
Filling a newly built planter before the masonry has gained sufficient strength can damage the structure.
Follow the mortar manufacturer’s instructions and the construction design before backfilling.
Making the Bed Too Wide
A very wide bed forces gardeners to step into the planting soil to reach the center.
Repeated foot traffic causes compaction and can reduce root growth.
Keep the planting area accessible from the outside.
For a bed accessed from only one side, a narrower design is generally more practical.
How to Maintain a Brick Raised Garden Bed
A properly constructed brick garden bed may remain useful for many years, but occasional inspection is still necessary.
Inspect Mortar Joints and Wall Alignment
Check the walls at least periodically and after unusual weather events.
Look for:
- Cracked or missing mortar.
- Loose coping bricks.
- Separation at corners.
- Walls leaning outward.
- Repeated water staining.
- Settlement around the foundation.
- Blocked drainage openings.
Small surface blemishes are different from structural movement.
If the wall develops significant cracking or begins leaning, have it evaluated before continuing to load it with soil.
Maintain Healthy Soil Without Excessive Digging
The brick walls may last much longer than the initial growing medium remains unchanged.
Organic matter gradually decomposes, and soil levels may settle.
Refresh the growing medium according to its condition.
Use finished compost when needed, but avoid adding large quantities every season without assessing nutrient levels.
Keep the soil covered with suitable mulch to help control moisture loss.
Avoid compacting the growing area by stepping into the bed.
Keep Drainage Paths Clear
Inspect weep holes and other outlets for blockage.
Remove soil or debris that interferes with drainage.
Pay attention to water collecting around the outside of the walls after rainfall.
If persistent wetness develops, investigate the drainage problem rather than simply adding more gravel or sealant.
Is a Brick Raised Garden Bed Worth Building?
Brick can be an excellent choice for a permanent garden layout, but it requires more construction effort than most wooden or prefabricated metal beds.
Its main advantages include a finished masonry appearance, resistance to wood decay, and flexibility in creating decorative shapes.
However, brick construction generally involves:
- Higher material weight.
- Foundation preparation.
- Masonry labor and tools.
- Mortar and curing time.
- Drainage detailing.
- Greater difficulty relocating the structure.
A well-built brick bed can complement patios, pathways, and permanent landscape features.
For a temporary vegetable garden or a project with a limited construction budget, wood or a simple metal kit may be more practical.
Brick makes the most sense when the garden layout is established and the owner wants a durable, permanent structure.
Conclusion
Understanding how to build a brick raised garden bed means treating the walls as a properly supported masonry structure rather than simply stacking bricks around a planting area.
Start with a suitable location and clearly defined dimensions. Build the foundation according to the site’s conditions, use appropriate exterior bricks and mortar, and ensure the walls can resist the pressure of wet soil.
Drainage should be planned during construction, not added after problems appear.
Once the masonry has gained adequate strength, fill the growing area with suitable soil and plant according to the available sunlight and rooting depth.
For a shallow decorative border, a simple brick edging project may be sufficient. For a permanent raised bed containing substantial soil, mortared masonry with an appropriately designed foundation provides a more dependable approach.
The best finished bed combines structural stability, reliable drainage, healthy growing soil, and convenient access for everyday gardening.
FAQs About How to Build a Brick Raised Garden Bed
Do You Need a Concrete Foundation for a Brick Raised Garden Bed?
A permanent mortared brick raised bed generally needs an appropriately designed foundation, commonly a concrete footing.
A single-course decorative brick border may be installed differently. The required foundation for a substantial planter depends on the wall height, soil conditions, frost exposure, and local requirements.
Can You Build a Raised Garden Bed With Old Bricks?
Yes, but only if the reclaimed bricks are suitable for the intended outdoor application.
Check their condition, durability, and previous use. Avoid damaged, severely weathered, or potentially contaminated bricks, especially when growing edible crops.
How Tall Can a Brick Raised Garden Bed Be?
There is no universally safe height for every brick raised bed design.
The allowable height depends on wall thickness, bonding, reinforcement, footing construction, soil pressure, and site conditions. Taller beds require more careful structural design.
Do Brick Raised Garden Beds Need Drainage Holes?
Mortared brick planters need adequate drainage, which may include weep holes or other outlets.
Open-bottom beds can also drain into suitable natural soil beneath them. Closed-bottom planters require a dedicated drainage path so excess water doesn’t accumulate around the roots.
Can You Build a Brick Raised Bed Directly on Grass?
A low decorative edging may be installed after properly preparing the ground.
However, a permanent mortared brick raised bed should not be constructed directly on grass or loose topsoil. The foundation must be prepared to support the masonry.
Should You Line a Brick Raised Garden Bed With Plastic?
A sidewall moisture barrier may be appropriate for certain brick planter designs, but an ordinary open-bottom garden bed generally shouldn’t have its entire base sealed with impermeable plastic.
Any barrier must be compatible with the masonry, the growing application, and the drainage system.
Is Brick Better Than Wood for Raised Garden Beds?
Brick is often better for permanent landscaping where durability and masonry appearance are priorities.
Wood is generally easier to build, modify, and repair. It may also cost less initially, particularly when using inexpensive lumber. Both materials can support healthy plants with suitable soil and drainage.

I’m Maya L. Greenwood, a lifelong plant lover who believes anyone can grow something beautiful with the right guidance. After years of testing soil mixes, pruning methods, irrigation tricks, and pest-safe solutions, I started EasyGardenTips.com to turn hard-won lessons into step-by-step advice. From seed starting and container gardens to composting and seasonal checklists, my goal is to make gardening simple, sustainable, and fun.