How to Build a Raised Garden Bed With Stone: Materials and Steps
To build a raised garden bed with stone, choose a suitable location, prepare a level foundation, arrange stable stones into a secure border, and fill the enclosed area with well-draining garden soil. For a low stone border, carefully fitted flat stones may be stacked without mortar, while taller stone walls often require mortar, proper footings, and additional structural support.
Stone raised beds are a durable alternative to wooden garden frames. Natural stone doesn’t rot, requires relatively little maintenance, and can create an attractive planting area for vegetables, herbs, and flowers. However, building with stone involves different challenges than assembling a wooden raised bed.
The weight, shape, and stability of the stones determine how the walls should be constructed. An uneven foundation, poorly fitted rocks, or inadequate drainage can eventually cause the structure to shift or collapse.
The construction method also depends on whether the bed is built directly on soil, over concrete, or on sloping ground.
In this article, I cover the best types of stone for raised garden beds, essential materials and tools, step-by-step construction, dry-stacked versus mortared walls, drainage, soil depth, cost considerations, and practical ways to keep a stone raised bed stable for years.
What Is the Best Stone for a Raised Garden Bed?
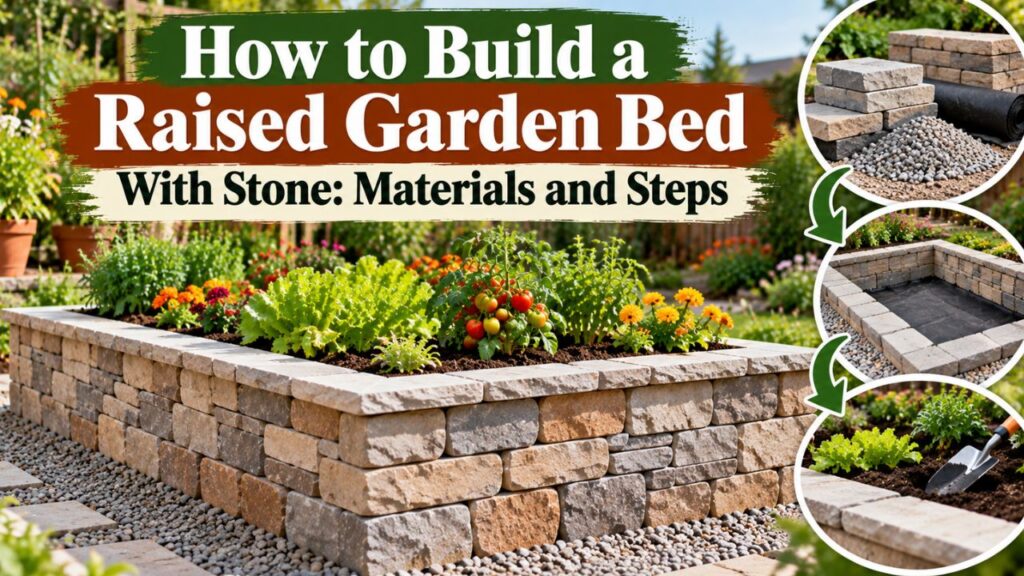
The best stones for raised garden beds are durable, weather-resistant materials with relatively flat surfaces that can form stable walls.
Natural fieldstone, flagstone, granite, and limestone are common choices. Manufactured retaining-wall blocks can also provide a stone-like appearance with more predictable shapes.
The most important consideration is not simply how the stone looks. Its shape, size, and condition determine whether it can be stacked securely.
| Stone material | Main advantages | Important considerations |
| Fieldstone | Natural appearance; often locally available | Irregular shapes require careful fitting |
| Flagstone | Flat surfaces make stacking easier | Thin pieces may need additional support |
| Granite | Hard, durable, and weather-resistant | Heavy and may be expensive |
| Limestone | Attractive and often easy to shape | Quality and weather resistance vary |
| Sandstone | Natural colors and workable shapes | Some varieties are porous or prone to deterioration |
| Manufactured retaining-wall blocks | Consistent sizes and predictable installation | Must follow the manufacturer’s design and height limits |
| Reclaimed building stone | Can reduce material expenses | Must be sound and free from questionable contamination |
Fieldstone for Natural Raised Garden Beds
Fieldstone is a good choice for gardeners who prefer an informal, rustic appearance.
The stones vary in size and shape, creating a border that blends naturally into the surrounding landscape.
However, rounded or extremely irregular pieces can be difficult to stack safely.
Choose fieldstones with at least one reasonably flat bearing surface. Broad, angular pieces are generally easier to position than smooth river rocks.
For a dry-stacked design, stone selection is particularly important because the wall depends on the way the pieces fit together.
Flagstone for Low Garden Borders
Flagstone is commonly used for patios, pathways, and landscape features.
Its relatively flat shape can make it convenient for creating low stone garden borders.
Thicker, sound pieces are generally more suitable for structural stacking than thin decorative paving slabs.
Avoid assuming that every flagstone product can be used as a retaining-wall material.
Thin pieces may crack or shift when subjected to soil pressure or uneven support.
Granite and Limestone for Permanent Stone Beds
Granite is a hard natural stone that performs well in many outdoor environments.
Its strength and weather resistance make it useful for permanent landscape construction.
However, granite blocks can be difficult to cut and move without specialized equipment.
Limestone is another common choice, especially in regions where it is locally available.
It is often easier to shape than granite, although its durability varies by type.
Some limestone can gradually influence soil chemistry where water moves through the material. This may be relevant when growing plants that require strongly acidic soil.
Can You Use River Rocks for a Raised Bed?
River rocks can be used decoratively around a raised garden bed, but smooth, rounded stones are generally poor choices for unsupported stacked walls.
Their curved surfaces provide limited contact between adjoining pieces.
As soil pressure increases, the rocks may shift or roll out of position.
If river rocks are used, they are better suited to a properly designed contained structure or decorative border where they cannot move.
For a simple stone raised bed, choose flatter, more stable materials.
How Deep and Wide Should a Stone Raised Garden Bed Be?
The dimensions should provide enough growing space for plants while keeping the stone walls manageable and stable.
A practical starting design is a rectangular raised bed approximately 3–4 feet wide and 6–8 feet long.
These measurements refer to the usable planting area inside the walls.
Choosing the Right Width
A raised bed should be narrow enough that gardeners can reach the center without stepping onto the soil.
For most backyard gardens:
- 3-foot width: Convenient for smaller spaces and comfortable access.
- 4-foot width: Suitable when both long sides are accessible.
- 2-foot width: Often useful for beds positioned against fences or walls.
Stone walls are usually thicker than wooden boards, so include their thickness when calculating the overall footprint.
For example, a bed with 4 feet of internal planting width and walls 8 inches thick would have an outside width of approximately 5 feet 4 inches.
Choosing the Right Height
A stone raised bed can be relatively shallow when built over healthy, well-draining native soil.
For many vegetable gardens, an added growing depth of approximately 8–12 inches provides a useful starting point.
However, wall height and growing depth are not necessarily the same.
In an open-bottom bed, roots may continue growing into the natural soil underneath.
Taller beds may be useful for accessibility or where existing ground conditions restrict root growth, but stone walls become more complex as height increases.
Important: A low decorative stone border is not structurally equivalent to a tall retaining wall. Higher walls require appropriate foundation design, stone placement, and resistance to soil pressure.
Materials and Tools Needed to Build a Stone Raised Garden Bed
Gather the necessary materials before beginning construction.
Stone is heavy, and having the site prepared before delivery reduces unnecessary handling.
Building Materials
The materials depend on whether the bed will use dry-stacked stones, mortar, or manufactured retaining-wall blocks.
For a simple natural stone bed, you may need:
- Flat, sound natural wall stones
- Suitable compactable crushed stone for a perimeter base, where required
- Approved leveling material
- Quality topsoil
- Finished compost
- Stakes and mason’s string
- Permeable separation fabric, if needed along wall joints
- Mulch
- Drainage components where the site or wall design requires them
Mortared construction may additionally require concrete footings, appropriate mortar, and specified drainage details.
Do not assume a gravel base alone provides the structural support required for every wall.
Essential Tools
Common tools include:
- Measuring tape
- Shovel
- Garden rake
- Carpenter’s level
- Long, straight board
- Hand tamper
- Mason’s string
- Rubber mallet
- Wheelbarrow
- Garden fork
- Work gloves
- Safety glasses
- Protective footwear
A masonry hammer and stone chisel may be useful for fitting certain stones, but cutting or striking stone can produce flying fragments and hazardous dust.
Whenever possible, purchase stones already sized for the intended project.
Wet cutting methods and appropriate dust protection are necessary when cutting products containing respirable crystalline silica.
How to Build a Raised Garden Bed With Stone Step by Step
The following process describes a low, open-bottom raised garden bed built with suitable natural wall stones.
For walls requiring mortar, engineered drainage, or structural footings, the foundation and wall construction must follow an appropriate masonry design.
Step 1: Choose a Suitable Garden Location
Select an area that receives adequate sunlight and has reasonably well-draining ground.
Most vegetables grown for their fruits, including tomatoes and peppers, perform best with approximately 6–8 hours of direct sunlight daily.
Also consider access to water and surrounding walking space.
Before choosing the final location, inspect the ground for:
- Large tree roots
- Uneven or unstable soil
- Standing water after rainfall
- Areas receiving concentrated roof runoff
- Buried utility lines
- Slopes requiring significant excavation
A relatively level location makes stone construction easier.
Avoid placing a heavy stone structure close to underground services or on unstable ground.
Contact the appropriate utility-location service before excavation.
Step 2: Mark the Shape of the Raised Bed
Use stakes and string to outline the planned bed.
A rectangular design is generally easier for beginners because the edges are straight and the corners can be checked for square.
For example, you might choose a bed with an internal growing area measuring 4×6 feet.
Add the planned stone wall thickness to determine the outside dimensions.
Check the layout using a measuring tape.
For a rectangular bed, the two diagonal measurements should be equal when the corners are square.
A flexible garden hose can be used instead of string for curved designs.
However, curved natural stone walls may require additional fitting and planning.
Step 3: Remove Grass and Prepare the Ground
Clear the building area of grass, weeds, loose debris, and unwanted vegetation.
Remove the sod where necessary.
If the raised bed will have an open bottom, leave the natural ground available for plant roots to grow into.
For compacted soil, gently loosen the planting area with a garden fork.
Avoid working heavy clay while it is saturated.
Do not cover the entire bottom with waterproof plastic. An impermeable barrier can trap water inside the raised bed.
If weed control is necessary, address existing perennial weeds before construction.
Step 4: Prepare a Level Foundation for the Stone Walls
The foundation is one of the most important parts of a stable stone raised bed.
Unlike a wooden frame, individual stones can shift when the ground beneath them settles unevenly.
Mark a perimeter strip wide enough to support the planned wall.
For a low dry-stacked border:
- Remove loose topsoil and organic debris from the wall footprint.
- Excavate to firm, stable ground as appropriate for the design.
- Check the perimeter with a carpenter’s level.
- Prepare a suitable compacted base if required by the stone system and site conditions.
- Confirm that the first course will have continuous, stable support.
A shallow trench with a properly compacted crushed-stone base is commonly used for suitable low landscape wall systems.
However, the required base thickness and depth depend on the wall height, ground conditions, stone type, and local frost conditions.
In cold climates, frost movement can shift poorly founded masonry.
Do not apply a single shallow trench specification to every stone wall. Taller masonry walls may require concrete footings extending to an appropriate depth for local conditions.
Step 5: Lay the First Course of Stones
The first layer establishes the stability and alignment of the entire wall.
Choose the largest, broadest, and most stable stones for the bottom course.
Place each stone so it rests firmly on the prepared foundation.
Check its position with a level.
For a low dry-stacked wall, set the stones close together while ensuring they do not rock or move under firm hand pressure.
Position broad bearing surfaces downward whenever possible.
Avoid using small, loose rocks to support large unstable stones.
If individual pieces do not fit securely, rearrange them or select different stones.
The first course should provide a continuous, stable foundation for the layers above.
Step 6: Stack Additional Stone Layers Securely
After placing the base course, arrange the next layer so the joints do not line up directly with those underneath.
This is called staggering the joints.
A staggered pattern helps distribute weight across neighboring stones instead of creating continuous vertical seams.
The Texas A&M AgriLife Extension guide to building raised beds describes several important dry-stone construction principles: overlapping joints, using a wider base, leaning suitable stones slightly inward, and incorporating long tie stones across thick walls.
For a low wall:
- Select stones with stable contact surfaces.
- Place each stone across joints in the course below where practical.
- Avoid creating continuous vertical gaps.
- Keep the wall properly supported across its thickness.
- Check alignment and stability after placing each course.
- Use suitable long stones to connect the wall across its width when the design requires them.
The wall should remain stable without relying on the garden soil to hold loose stones in place.
Safety Note: Do not continue stacking if stones rock, slide, or create an unstable wall. A taller wall should be constructed using an appropriate masonry or retaining-wall design.
Step 7: Build Stable Stone Corners
Corners require careful attention because they connect two walls and help maintain the bed’s shape.
For a rectangular bed, choose stones that can overlap or interlock around the corners.
Avoid simply stacking two separate vertical columns of stones that meet without a stable connection.
Use broad, well-fitted corner pieces.
Check that the adjoining walls remain aligned and that individual stones are firmly supported.
If the natural stones cannot form secure corners, consider using properly designed masonry construction or manufactured corner units.
Step 8: Check Drainage Before Filling
The raised bed must have a suitable path for excess water to escape.
For an open-bottom bed on well-draining ground, water can generally move into the natural soil beneath the structure.
A dry-stacked wall may also allow some water to escape through its joints.
However, the presence of gaps does not guarantee that the entire bed drains properly.
If the surrounding ground stays waterlogged, the soil inside the raised bed may also become saturated.
Mortared walls and beds constructed on hard surfaces need deliberate drainage provisions.
Do not seal every possible drainage outlet without providing an alternative.
Step 9: Add Suitable Raised Bed Soil
Once the stone walls are secure, fill the planting area with an appropriate growing medium.
For many open-bottom vegetable beds, a practical starting mixture is:
- 2 parts quality topsoil
- 1 part finished compost
The exact proportions may require adjustment depending on the existing materials.
Use soil that supports drainage, moisture retention, and healthy root development.
Avoid filling the bed entirely with heavy clay, coarse rubble, or unfinished compost.
Add growing medium gently without pushing stones out of alignment.
Rake the surface evenly and water the soil to allow natural settling.
A finished soil level approximately 1–2 inches below the upper rim provides convenient space for mulch.
Step 10: Inspect the Stone Walls and Plant the Bed
Before planting, inspect the structure again.
Check for stones that moved during filling, unsupported joints, and soil escaping through large openings.
Make any necessary corrections before planting.
Once the walls are stable, the bed can be used for vegetables, herbs, or flowers suited to the available soil depth and sunlight.
Apply an appropriate mulch layer to help retain moisture and reduce weed growth.
Avoid climbing, standing, or sitting on an unengineered dry-stacked wall.
Dry-Stacked vs. Mortared Stone Raised Beds
The choice between dry-stacked and mortared construction affects cost, appearance, installation difficulty, and structural requirements.
Both methods can be appropriate when designed and installed correctly.
| Feature | Dry-stacked stone | Mortared stone |
| Construction | Carefully fitted stones without mortar | Stones bonded with masonry mortar |
| Appearance | Natural and rustic | More formal and finished |
| Installation | Requires careful fitting and stable placement | Requires masonry skills and curing time |
| Foundation | Depends on wall design and site conditions | Usually needs a suitable masonry footing |
| Drainage | Water may move through joints | Drainage openings may be necessary |
| Repairs | Individual stones may be repositioned | Repairs can involve removing mortar |
| Cost | Can be lower for simple low borders | Often higher due to labor and materials |
| Best application | Properly designed low garden borders | Permanent masonry walls requiring bonded construction |
Can You Build a Stone Raised Bed Without Mortar?
Yes. Low stone garden borders can be built without mortar when the stones and construction method provide adequate stability.
Flat, angular stones are generally better suited to this approach than smooth, rounded rocks.
Dry-stacked construction depends on stone shape, overlap, wall thickness, proper foundations, and careful installation.
However, mortar-free construction is not appropriate for every wall height or location.
Even a relatively short wall may require stronger support if it holds back soil on a slope, sits beside a walkway, or experiences significant frost movement.
When Should You Use Mortar and Concrete Footings?
Mortar and structural footings become more important as wall height and retained soil pressure increase.
The Royal Horticultural Society’s raised-bed construction guidance recommends bonding masonry walls taller than approximately 8 inches with mortar and supporting them on suitable concrete footings.
Other masonry guidance allows certain properly constructed low dry-stone walls without mortar. These recommendations are not interchangeable building codes.
The correct construction depends on wall geometry, stone properties, soil conditions, frost exposure, and local requirements.
For a permanent raised bed with a taller stone wall, professional masonry guidance is the safer approach.
A qualified mason or structural professional can determine the necessary foundation, reinforcement, drainage, and construction details.
Are Manufactured Stone Retaining-Wall Blocks Easier?
Manufactured landscape retaining-wall blocks can be easier to assemble than irregular natural stone because they have consistent dimensions.
Some systems use interlocking lips, pins, or other connections to help maintain alignment.
However, these blocks must be installed according to the manufacturer’s instructions.
Base preparation, allowable height, drainage, backfill, and reinforcement requirements vary between products.
Do not substitute ordinary decorative pavers for structural retaining-wall blocks unless the product is specifically suitable for that purpose.
How to Provide Proper Drainage in a Stone Raised Garden Bed
Drainage is important because stone walls can retain water differently depending on how they are constructed.
Waterlogged soil restricts oxygen around plant roots and can also increase pressure behind retaining walls.
Drainage for Open-Bottom Stone Beds
For a bed constructed directly on suitable garden soil, leaving the bottom open generally allows water to move downward.
Before filling, remove major obstructions and gently loosen compacted ground where appropriate.
Avoid placing a continuous waterproof sheet beneath the planting area.
If the soil beneath the bed is poorly drained, improving the site or choosing another location may be necessary.
Drainage for Mortared Stone Walls
Mortared masonry walls can restrict lateral water movement.
Depending on the wall design, drainage may require weep openings, drainage aggregate, and a suitable outlet.
These components should be included in the original construction plan.
A wall built to retain wet soil can experience additional pressure when water cannot escape.
The drainage system must direct water to a suitable discharge location without undermining the wall’s foundation.
Should You Put Gravel at the Bottom of a Stone Raised Bed?
A continuous layer of gravel beneath fine growing soil is not automatically beneficial.
In some situations, differences in particle size can cause water to remain in the finer soil above the gravel rather than draining immediately.
For ordinary open-bottom raised beds, a well-prepared growing mix connected to suitable natural ground is usually preferable.
Gravel used as part of a properly designed wall foundation or drainage system serves a different purpose.
Do not confuse structural drainage material with the soil needed for plant roots.
How to Build a Stone Raised Garden Bed on a Slope
Building on sloped ground is more complicated than constructing a bed on level terrain.
The lower side of the raised bed may need to retain considerably more soil than the upper side.
This creates additional structural demands.
Prepare a Level Area for a Gentle Slope
For a mild slope, some excavation may be sufficient to create a stable, level foundation.
Measure the height difference before choosing the wall design.
Where practical, position the longer dimension of the bed along the contour of the slope.
This can reduce the elevation difference across the structure.
Avoid building the lower wall on loose, unsupported fill.
Use Terracing for Larger Elevation Changes
A terraced garden uses separate level planting areas arranged along a slope.
Stone can be an attractive material for these structures, but a terraced stone wall functions as a retaining wall.
It must resist soil movement, water pressure, and potential foundation settlement.
A steep slope should not be supported using an improvised stack of loose rocks.
For substantial elevation changes, consult a qualified professional and check applicable local requirements before excavation.
Can You Build a Stone Raised Bed on Concrete?
Yes. A stone raised bed can be installed on a suitable concrete surface, but its design must account for drainage, growing depth, and structural loading.
Concrete prevents roots from entering the natural ground below.
Therefore, the bed needs enough growing medium to support the crops entirely within the contained space.
For vegetables, the required depth depends on the crop. Many leafy greens need less growing depth than large tomatoes or squash.
A solid patio may also prevent water from escaping downward.
Provide an appropriate drainage route through or beneath the masonry structure.
Important: Stone, wet soil, and irrigation water create substantial loads. Before building on an elevated deck, rooftop, balcony, or suspended slab, obtain confirmation that the structure can safely support the completed bed.
For ordinary ground-supported patios, also consider existing surface slope, drainage outlets, and possible damage to the paving.
How Much Stone and Soil Do You Need?
Estimating materials before construction helps reduce unnecessary expenses and delivery problems.
Stone quantity depends on the wall’s length, height, thickness, and the size and shape of the selected pieces.
Soil volume depends on the internal growing dimensions.
Calculate the Stone Wall Perimeter
For a rectangular bed:
Perimeter = 2 × (Length + Width)
Suppose the bed has an outside length of 8 feet and an outside width of 4 feet.
The perimeter is:
2 × (8 + 4) = 24 linear feet
This means the stone border must extend around 24 feet of perimeter.
However, 24 linear feet does not indicate the total quantity or weight of stone needed.
A wall built from large, thick stones will require a different quantity than one built from smaller blocks.
Stone suppliers may sell wall stone by weight, pallet, or coverage.
Provide the wall height, thickness, perimeter, and selected material to obtain an accurate estimate.
Calculate the Soil Volume
For a rectangular raised bed:
Soil volume (cubic feet) = Inside length (feet) × Inside width (feet) × Soil depth (feet)
For example, assume the usable planting area measures:
- Length: 6 feet
- Width: 4 feet
- Soil depth: 10 inches
Convert the soil depth into feet:
10 ÷ 12 = 0.833 feet
Calculate the volume:
6 × 4 × 0.833 = approximately 20 cubic feet
Convert to cubic yards:
20 ÷ 27 = approximately 0.74 cubic yards
The bed needs approximately 20 cubic feet of soil at that planned depth, before allowing for settlement.
Measure the internal planting area after accounting for the stone wall thickness.
Using the outside dimensions can significantly overestimate the growing space.
How Much Does It Cost to Build a Stone Raised Garden Bed?
The cost depends on the selected stone, construction method, delivery distance, wall height, and labor.
Natural stone is often more expensive than basic wood framing, especially when masonry work is required.
The largest cost factors include:
- Stone material: Locally available stone may cost less than imported decorative stone.
- Wall thickness and height: Larger walls use more material and require stronger foundations.
- Foundation preparation: Excavation, compacted aggregate, and concrete footings can increase costs.
- Mortar and masonry work: Professional installation may represent a substantial expense.
- Delivery: Heavy stones can carry significant transportation charges.
- Growing soil: Deep beds require more topsoil and compost.
Rather than assuming a fixed price, request estimates based on the actual wall dimensions and selected materials.
How to Build a Stone Raised Bed for Less Money
Several choices may reduce expenses without sacrificing stability.
- Choose a modest bed size instead of building an unnecessarily large structure.
- Compare locally quarried or reclaimed stone with decorative imported materials.
- Use natural stones that already have suitable flat bearing surfaces.
- Avoid complex shapes requiring extensive cutting.
- Prepare the site carefully before stone delivery.
- Purchase growing soil in bulk when the quantity justifies it.
Reclaimed stone may be economical, but it should be sound and suitable for garden use.
Avoid using stones contaminated with industrial chemicals, unknown coatings, or other questionable residues.
Do not reduce costs by omitting necessary foundations or structural support.
How Long Does a Stone Raised Garden Bed Last?
A properly constructed stone raised bed can remain useful for many years.
Stone does not decay like untreated wood and generally requires relatively little routine maintenance.
However, longevity depends on more than the stone itself.
The foundation, wall construction, drainage, and local weather conditions all affect performance.
Prevent Stone Walls From Shifting
Inspect the structure periodically, especially after heavy rain or freezing weather.
Look for:
- Bulging walls
- Loose or displaced stones
- Gaps developing near corners
- Erosion around the foundation
- Soil washing through joints
- Cracked mortar
- Water collecting behind the wall
Small changes may indicate foundation movement or increasing soil pressure.
Do not attempt to push a bulging, loaded stone wall back into position by hand.
If the wall is becoming unstable, keep people away and obtain an appropriate repair assessment.
Maintain the Growing Soil
The growing medium will need more regular attention than the stone walls.
Organic matter gradually decomposes, and the soil surface may settle.
Add suitable growing medium when necessary to maintain adequate rooting depth.
Mulch can reduce evaporation and protect the soil surface during heavy rain.
Avoid overwatering, particularly if the stone bed has restricted drainage.
Protect the Structure From Freeze-Thaw Damage
In regions with freezing winters, water entering joints and foundation materials can freeze and expand.
This may contribute to stone movement, mortar deterioration, or frost heave.
Weather-resistant stones and properly designed foundations reduce these risks.
The appropriate foundation depth and material selection depend on local frost conditions and wall design.
Common Mistakes When Building a Stone Raised Garden Bed
Several construction errors can compromise a stone bed’s stability or growing conditions.
Using Rounded Stones for Unsupported Walls
Smooth river rocks are difficult to stack securely because their rounded surfaces provide limited contact.
Choose stable wall stones rather than relying on decorative rocks for structural support.
Building Directly on Loose Ground
A stone border placed on uncompacted fill or unstable ground may settle unevenly.
Prepare a firm foundation appropriate for the structure before stacking stones.
Aligning Vertical Joints
Continuous joints can create weaker sections in stacked stonework.
Where the design requires it, overlap stones between courses and use suitable ties to connect wall sections.
Building Walls Too High Without Proper Support
Increasing wall height also increases the demands on the structure.
Do not assume a method suitable for a low decorative border can safely support a tall bed.
Use proper masonry construction and professional guidance when necessary.
Blocking Drainage
A sealed stone bed without suitable drainage outlets can develop waterlogged soil and pressure behind the walls.
Plan the drainage before adding the growing medium.
Making the Planting Area Too Wide
Thick stone walls reduce the usable planting width.
Calculate the interior growing area carefully and keep the center within comfortable reach.
Filling the Bed With Poor-Quality Soil
A durable stone enclosure cannot compensate for compacted or unsuitable growing soil.
Use an appropriate soil mixture and check drainage before planting vegetables.
Is a Stone Raised Garden Bed Better Than a Wooden Bed?
Stone and wood both make effective raised garden bed materials, but they offer different advantages.
Stone is often chosen for durability and appearance, while wood is usually easier to install and modify.
| Feature | Stone raised bed | Wooden raised bed |
| Initial cost | Usually higher | Often lower |
| Installation | More demanding because of weight and fitting | Usually easier for DIY construction |
| Durability | Long-lasting with proper construction | Depends on wood type and exposure |
| Maintenance | Mainly structural inspection and joint repairs | May require board replacement |
| Appearance | Natural, permanent landscape feature | Traditional garden frame |
| Relocation | Difficult | Often easier before filling |
| Custom shapes | Possible but may require skilled work | Easier for straightforward rectangular frames |
| Structural requirements | Heavy walls may need masonry foundations | Depends on bed height and framing design |
A stone raised bed is a strong option for gardeners who want a permanent landscape feature.
However, it may not be the best choice for a temporary garden, rented property, or project with a very limited budget.
For a simple beginner vegetable bed, wood can be more practical.
For a permanent garden where appearance and longevity matter, properly constructed stone can justify the additional effort.
Conclusion
Understanding how to build a raised garden bed with stone involves more than arranging rocks around a planting area. The success of the project depends on choosing stable materials, preparing an appropriate foundation, constructing secure walls, and providing reliable drainage.
A low stone border can be a manageable DIY project when the ground is stable and the stones fit together securely. Taller or mortared walls require more advanced construction methods and may need professional support.
For most backyard gardens, a compact rectangular design with an open bottom and quality growing soil provides a practical starting point.
Choose suitable stones, keep the bed within comfortable reach, and prioritize structural stability over decorative details.
With proper construction and maintenance, a stone raised garden bed can provide a durable growing area for vegetables, herbs, and flowers while becoming a permanent feature of the landscape.
FAQs About How to Build a Raised Garden Bed With Stone
Can You Build a Raised Garden Bed With Loose Stones?
Yes. A low raised garden bed can use carefully fitted, dry-stacked stones when the wall is designed for that method.
Choose stable, angular stones with broad bearing surfaces and prepare a suitable foundation. Taller or heavily loaded walls may require mortar, reinforced construction, or professional design.
Do You Need Mortar for a Stone Raised Bed?
Not every stone garden border requires mortar.
Low dry-stacked walls can work when properly constructed, but mortar and appropriate footings may be needed for taller masonry walls.
The correct method depends on stone shape, wall height, soil pressure, ground conditions, and applicable local requirements.
Do Stone Raised Garden Beds Need a Bottom?
Most stone raised beds built directly on suitable garden soil do not need a solid bottom.
An open base allows roots and water to move into the ground beneath the bed.
Beds installed on concrete or other impermeable surfaces require sufficient growing depth and an appropriate drainage system.
Can You Use Landscaping Rocks for a Raised Garden Bed?
Yes, provided the rocks are suitable for the intended construction.
Flat, sound landscape wall stones are generally better for stacking than small decorative gravel or rounded river rocks.
Decorative landscaping rocks should not be assumed suitable for retaining soil without proper containment.
Should You Put Landscape Fabric Inside a Stone Raised Bed?
Permeable landscape fabric may be useful along selected wall joints to help prevent fine soil from escaping, depending on the wall design.
However, covering the entire bottom with a barrier can interfere with root growth or drainage.
For an open-bottom vegetable bed, maintaining contact with suitable natural soil is generally preferable.
How Do You Stop Soil From Falling Between Stone Walls?
Properly fitted stones with staggered joints can reduce large openings.
Where necessary, suitable permeable filter fabric can be positioned along the inside of the wall to help retain fine soil without completely blocking water movement.
Do not use fabric to compensate for a structurally unstable wall.
Can You Build a Stone Raised Bed on Clay Soil?
Yes, but heavy clay can create foundation and drainage challenges.
Clay-rich ground may expand, shrink, or remain saturated depending on moisture conditions.
Prepare the foundation appropriately, evaluate drainage, and avoid building on unstable or waterlogged ground.
A taller masonry wall on problematic clay soil may require professional foundation design.

I’m Maya L. Greenwood, a lifelong plant lover who believes anyone can grow something beautiful with the right guidance. After years of testing soil mixes, pruning methods, irrigation tricks, and pest-safe solutions, I started EasyGardenTips.com to turn hard-won lessons into step-by-step advice. From seed starting and container gardens to composting and seasonal checklists, my goal is to make gardening simple, sustainable, and fun.