
Installing a carbon filter correctly is essential for getting the best odor control from your grow tent ventilation system. A carbon filter can effectively remove unwanted smells, but only when it is properly sized, positioned, and connected with the inline exhaust fan.
Many beginners install carbon filters incorrectly by placing them in the wrong location, reversing airflow direction, or creating air leaks around duct connections. These mistakes can reduce filtration performance and allow odors to escape from the grow tent.
The basic idea is simple: the exhaust fan pulls air through the carbon filter, where activated carbon traps odor molecules before the filtered air leaves the tent. When combined with proper negative pressure, this setup creates an efficient ventilation system that helps maintain a cleaner and more controlled growing environment.
In this guide, I’ll explain how to install a carbon filter in a grow tent step by step, including where to place it, how to connect it with an inline fan, common installation mistakes, and maintenance tips to keep your filtration system working effectively.
What You Need Before Installing a Carbon Filter
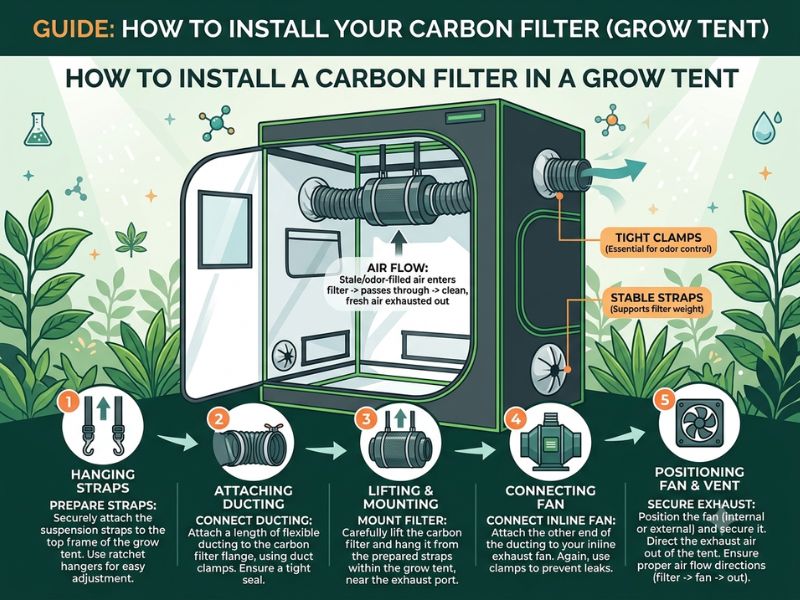
Before installing a carbon filter in your grow tent, gather all the necessary equipment and make sure your ventilation system is properly planned. Having the right components beforehand makes installation easier and helps prevent airflow problems later.
Carbon Filter
The carbon filter is the main component responsible for odor removal. Choose a filter that matches your inline fan size and airflow requirements.
Consider:
- Filter diameter (4-inch, 6-inch, 8-inch, etc.)
- CFM rating
- Amount and quality of activated carbon
- Physical size and weight
A properly matched carbon filter allows efficient airflow while providing better odor control.
Inline Exhaust Fan
A carbon filter works together with an inline exhaust fan. The fan creates airflow by pulling air through the filter and exhausting it outside the tent.
When choosing a fan, make sure:
- The fan size matches the filter diameter.
- The CFM rating is suitable for your grow tent.
- The fan can overcome resistance from the filter and ducting.
Ducting
Ducting carries filtered air from the inline fan to the exhaust location.
For better performance:
- Use ducting with the same diameter as your fan and filter.
- Avoid unnecessary bends.
- Keep the duct run as short as possible.
Too many bends or undersized ducting can reduce airflow and make the fan louder.
Duct Clamps
Duct clamps secure the connections between:
- Carbon filter and fan
- Fan and exhaust ducting
Tight connections prevent air leaks and ensure all exhaust air passes through the carbon filter.
Aluminum Foil Tape
Aluminum foil tape helps seal small gaps around duct connections. Unlike regular tape, it is designed to handle temperature changes and provides a more durable seal.
Use it around:
- Duct joints
- Fan connections
- Filter connections
Hanging Straps or Rope Ratchets
Carbon filters can be heavy, especially larger models. Strong hanging straps or rope ratchets help safely suspend the filter from the top frame of the grow tent.
Proper mounting:
- Prevents vibration noise
- Keeps the filter secure
- Improves airflow positioning
Thermometer and Hygrometer
Although not required for installation, monitoring temperature and humidity helps you confirm that your ventilation system is working properly.
After installation, check:
- Temperature levels
- Humidity levels
- Air movement
- Negative pressure
Plan Your Airflow Direction
Before connecting anything, decide how air will move through your system.
The most common setup is:
Grow Tent → Carbon Filter → Inline Fan → Exhaust Duct
This setup allows the fan to pull air through the filter before exhausting it outside the tent.
Having all components ready and understanding the airflow path will make the installation process faster and help your carbon filter perform at its best. In the next section, we’ll discuss the best location for installing a carbon filter inside a grow tent.
Where Should a Carbon Filter Be Installed in a Grow Tent?
The placement of your carbon filter plays an important role in how effectively it removes odors and how efficiently your ventilation system works. In most grow tent setups, the carbon filter should be installed high inside the tent near the top, where warm and humid air naturally collects.
Why Install the Carbon Filter at the Top?
Warm air rises, and grow lights generate heat that builds up near the upper part of the tent. By placing the carbon filter at the top, the exhaust system can remove the hottest and most humid air first.
Benefits of top placement include:
- Better heat removal
- More efficient air exchange
- Improved humidity control
- Reduced workload on the exhaust fan
This location allows the ventilation system to remove the air that needs filtering the most.
Should the Carbon Filter Be Inside or Outside the Grow Tent?
The most common installation method is placing the carbon filter inside the grow tent.
Carbon Filter Inside the Tent (Recommended)
Typical setup:
Carbon Filter → Inline Fan → Exhaust Duct
Advantages:
- Filters air before it leaves the tent
- Reduces the chance of odor leaks
- Captures warm air directly from the grow area
- Keeps the system compact
This setup is ideal for most home grow tents.
Carbon Filter Outside the Tent
Some growers install the carbon filter outside the tent, usually when interior space is limited.
Example setup:
Grow Tent → Ducting → Carbon Filter → Inline Fan → Exhaust
Advantages:
- Saves space inside the tent
- Easier access for maintenance
- Useful for very small tents
However, this setup requires careful sealing because any leaks before the filter can allow odors to escape.
Push vs Pull Carbon Filter Setup
There are two common ways to connect a carbon filter and inline fan.
Pull Configuration (Most Common)
Carbon Filter → Inline Fan → Exhaust Duct
The fan pulls air through the carbon filter.
Advantages:
- More efficient odor removal
- Better control over airflow
- Helps maintain negative pressure
This is the preferred setup for most grow tents.
Push Configuration
Inline Fan → Carbon Filter → Exhaust Duct
The fan pushes air through the filter.
This can work, but it is generally less preferred because:
- Air may not move evenly through the carbon bed.
- The fan and ducting may become harder to maintain.
- It may reduce filtration efficiency.
Keep the Filter Accessible
Although carbon filters are usually installed high in the tent, make sure you can still access them for maintenance.
You may need to:
- Clean the pre-filter
- Check connections
- Inspect airflow
- Replace the filter later
Avoid placing the filter where it is blocked by plants, lights, or other equipment.
Leave Enough Space Around the Filter
A carbon filter needs unrestricted airflow through its outer surface. Avoid pressing it directly against tent walls or other objects.
Make sure:
- The intake surface is exposed.
- Plants do not block airflow.
- The filter can pull air evenly from all sides.
Bottom Line
For most grow tents, the best placement is inside the tent near the top, connected directly to an inline exhaust fan. This setup allows the filter to capture warm, odor-filled air efficiently while maintaining proper airflow and negative pressure.
In the next section, we’ll go through the complete step-by-step process of installing a carbon filter in your grow tent.
How to Install a Carbon Filter in a Grow Tent
Once you have the right equipment and understand the airflow direction, installing a carbon filter is a straightforward process. The main goal is to create a sealed ventilation path where all exhausted air passes through the filter before leaving the grow tent.
Follow these steps to install your carbon filter correctly.
Step 1: Hang the Carbon Filter Inside the Grow Tent
Start by positioning the carbon filter near the top of the grow tent. Since warm air rises, this location allows the filter to capture hot and humid air more efficiently.
Use strong hanging straps or rope ratchets to secure the filter to the tent frame.
Make sure:
- The filter is supported securely.
- The filter does not touch the tent walls.
- Air can flow freely around the filter.
- The filter is positioned away from grow lights if possible.
Large carbon filters can be heavy, so use strong supports to prevent them from falling.
Step 2: Connect the Carbon Filter to the Inline Fan
Attach the inline fan directly to the carbon filter.
The most common and effective setup is:
Carbon Filter → Inline Fan → Exhaust Duct
This means the fan pulls air through the carbon filter before pushing it outside the tent.
Before connecting the components, check the airflow arrow on the inline fan. The arrow shows the direction air should move.
The fan should pull air from the filter side and push it toward the exhaust duct.
Step 3: Attach the Exhaust Ducting
After connecting the fan, attach ducting to the fan outlet.
The ducting should carry filtered air:
Inline Fan → Ducting → Outside Grow Area
Use duct clamps to secure the connection and prevent air leaks.
For the best airflow:
- Keep ducting as short as possible.
- Avoid sharp bends.
- Do not crush or restrict the duct.
- Use the correct duct diameter.
Poor ducting design can reduce airflow and make the fan louder.
Step 4: Seal All Connections
A carbon filter only works effectively if the ventilation system is properly sealed.
Check all connection points, including:
- Carbon filter to fan
- Fan to ducting
- Duct joints
- Exhaust ports
Use aluminum foil tape around connections to prevent air leaks.
A sealed system ensures that odors cannot escape before the air passes through the carbon filter.
Step 5: Check Airflow Direction
Before turning on the system, confirm that air is moving in the correct direction.
The correct airflow path should be:
Grow Tent Air → Carbon Filter → Inline Fan → Exhaust
If the fan is installed backward, the system will not filter air properly.
You can test airflow by:
- Feeling air movement at the exhaust outlet.
- Checking the fan airflow arrow.
- Observing whether the tent walls pull inward.
Step 6: Turn On the Fan and Test Negative Pressure
Once everything is connected, turn on the inline fan.
A properly installed system should create slight negative pressure.
Signs of correct negative pressure:
- Grow tent walls pull inward slightly.
- Air enters through intake vents.
- No air escapes through zippers or openings.
Avoid creating excessive suction. The goal is controlled airflow, not maximum pressure.
Step 7: Monitor Temperature and Humidity
After installation, monitor your grow tent conditions for several hours.
Check:
- Temperature
- Humidity
- Airflow
- Noise level
A properly installed carbon filter should not significantly reduce ventilation if it is correctly sized for your fan.
If temperatures rise or humidity remains high, your fan may not provide enough airflow, or the filter may be too restrictive.
Bottom Line
Installing a carbon filter correctly requires proper placement, correct airflow direction, secure connections, and good sealing. The ideal setup for most growers is:
Carbon Filter Inside Tent → Inline Fan → Exhaust Outside
When installed properly, your carbon filter will provide effective odor control while allowing your ventilation system to maintain a stable growing environment.
Carbon Filter Installation Setup Examples
There are several ways to install a carbon filter in a grow tent, but some setups are more efficient than others. The best configuration depends on your available space, tent size, and ventilation requirements.
Below are the most common carbon filter installation setups.
Setup 1: Carbon Filter Inside Tent (Most Common)
Airflow Path:
Grow Tent → Carbon Filter → Inline Fan → Exhaust Duct → Outside
This is the most popular setup for home growers because it provides efficient odor control and simple installation.
How It Works
- The carbon filter hangs near the top of the tent.
- The exhaust fan pulls warm, humid air through the filter.
- The filter removes odor molecules.
- The fan pushes filtered air outside the growing area.
Advantages
- Best odor control performance
- Easy to maintain negative pressure
- Efficient removal of hot air
- Compact setup
This configuration works well for most small and medium-sized grow tents.
Setup 2: Inline Fan Inside Tent, Carbon Filter Outside
Airflow Path:
Grow Tent → Inline Fan → Carbon Filter → Exhaust Duct
Some growers use this setup when they don’t have enough space inside the tent.
Advantages
- Saves interior tent space
- Easier access to the filter
- Useful for small tents
Disadvantages
- Requires careful sealing
- Less common for odor-sensitive setups
- Any leaks before the filter can release odors
If you choose this setup, make sure all duct connections between the tent and filter are completely sealed.
Setup 3: Fan and Filter Mounted Together Outside the Tent
Airflow Path:
Grow Tent → Ducting → Carbon Filter → Inline Fan → Outside
This setup is common for larger grow rooms where equipment is mounted outside the growing area.
Advantages
- Saves grow space
- Easier equipment maintenance
- Reduces heat inside the tent
Disadvantages
- Requires more ducting
- More opportunities for airflow restrictions
- Needs proper sealing
This setup works best when you have enough room outside the tent for equipment placement.
Setup 4: Recirculating Carbon Filter Setup
In some setups, growers use a carbon filter to continuously clean the air inside the growing area.
Airflow Path:
Grow Room → Carbon Filter → Fan → Back Into Room
This type of setup does not replace an exhaust system. It is mainly used as an additional odor-control method.
A recirculating filter:
- Does not remove heat.
- Does not remove humidity.
- Does not provide fresh air exchange.
For grow tents, an exhaust-based system is usually more effective.
Push vs Pull Configuration: Which Is Better?
Between the two main installation methods, the pull configuration is generally preferred.
Pull Configuration
Carbon Filter → Inline Fan → Exhaust
The fan pulls air through the carbon filter.
Benefits:
- Better odor control
- More consistent airflow
- Efficient filtration
Push Configuration
Inline Fan → Carbon Filter → Exhaust
The fan pushes air through the filter.
While this can work, it is usually less efficient because airflow may not distribute evenly through the carbon bed.
Best Setup for Most Grow Tents
For most home growers, the recommended setup is:
Carbon Filter (inside top of tent) → Inline Fan → Exhaust Duct → Outside
This arrangement provides:
- Maximum odor control
- Efficient airflow
- Better negative pressure
- Easier maintenance
A properly installed carbon filter setup ensures that every bit of exhaust air is filtered before leaving the grow tent, creating a cleaner and more controlled growing environment.
Common Carbon Filter Installation Mistakes
Even with a high-quality carbon filter and exhaust fan, incorrect installation can reduce odor control and ventilation performance. Avoiding these common mistakes will help your filtration system work efficiently and last longer.
Installing the Carbon Filter Backward
One of the most common mistakes is installing the filter or fan in the wrong airflow direction.
A carbon filter has a specific airflow path. If the fan pushes air in the wrong direction, the air may not pass through the activated carbon properly.
Always check:
- The airflow arrow on the inline fan
- The manufacturer’s instructions
- The direction of duct connections
The ideal airflow path for most setups is:
Grow Tent → Carbon Filter → Inline Fan → Exhaust
Choosing the Wrong Carbon Filter Size
A filter that is too small for your exhaust fan can create problems.
Common issues include:
- Reduced airflow
- Poor odor removal
- Increased fan workload
- Higher noise levels
The carbon filter should match your inline fan diameter and have enough CFM capacity to handle your ventilation system.
For example, a powerful 6-inch fan paired with a small 4-inch filter will restrict airflow and reduce performance.
Placing the Filter in the Wrong Location
Installing the carbon filter too low inside the tent reduces efficiency because heat and humidity collect near the top.
The ideal location is:
- Near the ceiling of the grow tent
- Away from blocked areas
- Positioned where warm air naturally accumulates
Top placement allows the ventilation system to remove hot and humid air more effectively.
Leaving Air Leaks Around Connections
A carbon filter only works when air passes through the activated carbon. Any leaks before the filter can allow untreated air to escape.
Common leak points include:
- Loose duct clamps
- Unsealed duct connections
- Open ventilation ports
- Damaged ducting
Use duct clamps and aluminum foil tape to create airtight connections.
Running Without Negative Pressure
A carbon filter works best in a grow tent with slight negative pressure.
If your tent has positive pressure, air can escape through small gaps instead of passing through the carbon filter.
Signs of proper negative pressure:
- Tent walls pull inward slightly
- Air enters through intake vents
- No air escapes through seams or zippers
Using Too Much Restrictive Ducting
Poor duct design can reduce airflow and make the exhaust system louder.
Avoid:
- Long unnecessary duct runs
- Multiple sharp bends
- Crushed flexible ducting
- Incorrect duct diameter
A shorter, smoother airflow path allows the fan and filter to operate more efficiently.
Ignoring Carbon Filter Maintenance
Although carbon filters require little maintenance, they still need attention.
Common maintenance tasks include:
- Cleaning the outer pre-filter
- Checking airflow regularly
- Inspecting duct connections
- Replacing the filter when odor control decreases
A clogged or exhausted filter can reduce airflow and allow odors to pass through.
Hanging the Filter Incorrectly
Carbon filters are often heavy, especially larger models. Poor mounting can create safety issues and increase vibration noise.
Avoid:
- Weak straps
- Loose attachments
- Placing weight on tent poles not designed for it
Use strong rope ratchets or proper hanging supports to keep the filter secure.
Bottom Line
Most carbon filter problems come from incorrect airflow direction, poor sizing, air leaks, or improper placement. A properly installed system should have a sealed airflow path, slight negative pressure, and a filter size that matches the exhaust fan.
Taking time to install the filter correctly will improve odor control, reduce noise, and help your grow tent ventilation system perform at its best.
How to Maintain a Carbon Filter
A carbon filter requires very little daily maintenance, but proper care can extend its lifespan and help it continue removing odors effectively. Over time, dust, moisture, and continuous airflow can reduce filter performance.
Regular inspection and simple maintenance keep your ventilation system working efficiently.
Clean the Pre-Filter Regularly
Most carbon filters include a removable fabric pre-filter around the outside. This layer captures dust, hair, and larger particles before they reach the activated carbon.
A dirty pre-filter can restrict airflow and make your exhaust fan work harder.
Maintenance steps:
- Remove the outer fabric cover.
- Wash it according to the manufacturer’s instructions.
- Allow it to dry completely.
- Reinstall it before running the system.
Cleaning the pre-filter every few months helps maintain proper airflow.
Keep Humidity Under Control
High humidity can reduce the effectiveness of activated carbon over time. Moist air can interfere with the carbon’s ability to trap odor molecules.
To protect your filter:
- Maintain proper humidity levels inside the grow tent.
- Avoid exposing the filter to excessive moisture.
- Ensure your exhaust system removes humid air efficiently.
A properly sized exhaust fan helps prevent moisture buildup.
Check Airflow Performance
A reduction in airflow can indicate problems with the ventilation system.
Regularly check:
- Air movement at the exhaust outlet
- Fan performance
- Duct connections
- Filter condition
If airflow becomes noticeably weaker, inspect the filter and ducting for restrictions.
Monitor Odor Control
One of the easiest ways to know if a carbon filter is still working is to monitor odors around the grow area.
If you notice increasing smells outside the tent, possible causes include:
- The filter is reaching the end of its lifespan.
- The filter is too small for the setup.
- Air is escaping through leaks.
- The fan is not creating enough airflow.
Before replacing the filter, check the entire ventilation system for installation issues.
Keep the Filter Away From Water and Direct Moisture
Carbon filters are designed to handle normal grow tent conditions, but direct exposure to water can damage the filter media.
Avoid:
- Spraying water near the filter.
- Placing humidifiers directly underneath it.
- Allowing condensation to collect on the filter.
Keeping the filter dry improves its effectiveness and lifespan.
Replace the Carbon Filter When Needed
Activated carbon becomes less effective after prolonged use. Once the carbon is saturated, cleaning will not restore its odor-removing ability.
Signs it may be time to replace the filter include:
- Odors escaping despite proper installation.
- Reduced filtration performance.
- The filter has been used continuously for an extended period.
Most quality carbon filters last approximately 12–24 months, depending on airflow, humidity, and odor levels.
Inspect Duct Connections
A carbon filter may appear to stop working when the real problem is an air leak.
Regularly check:
- Duct clamps
- Tape seals
- Fan connections
- Exhaust ports
A small gap can allow unfiltered air to escape and reduce the effectiveness of the entire system.
Bottom Line
Maintaining a carbon filter is simple: clean the pre-filter, monitor airflow, control humidity, inspect connections, and replace the filter when performance decreases.
A well-maintained carbon filter provides better odor control, reduces strain on your ventilation system, and helps your grow tent maintain a cleaner and more controlled environment throughout the growing cycle.
Frequently Asked Questions
Should a carbon filter be inside or outside a grow tent?
A carbon filter is usually installed inside the grow tent near the top because warm, humid air naturally rises and collects there. This allows the filter to capture the air that needs filtering most.
The most common setup is:
Grow Tent → Carbon Filter → Inline Fan → Exhaust Outside
However, placing the filter outside the tent can be useful when interior space is limited or when working with a larger ventilation system.
Does the fan go before or after the carbon filter?
In most grow tent setups, the inline fan should be installed after the carbon filter.
The preferred airflow direction is:
Carbon Filter → Inline Fan → Exhaust Duct
The fan pulls air through the activated carbon, allowing odors to be removed before the air leaves the tent.
Which way should air flow through a carbon filter?
Air should flow from the outside of the carbon filter through the activated carbon layer and then toward the fan.
The correct airflow path is:
Grow Tent Air → Carbon Filter → Inline Fan → Outside
Always check the airflow arrow on your inline fan to confirm the correct direction.
How high should a carbon filter be mounted in a grow tent?
A carbon filter should usually be mounted near the top of the grow tent.
This location works best because:
- Hot air rises.
- Humid air collects near the ceiling.
- The exhaust system can remove heat more efficiently.
Make sure the filter is securely supported and does not block airflow around the tent.
Can you run a carbon filter without an exhaust fan?
A carbon filter by itself will not effectively clean air because it needs airflow through the activated carbon.
The inline exhaust fan provides the necessary airflow by pulling air through the filter.
A complete system requires:
Carbon Filter + Inline Fan + Proper Ducting
Does a carbon filter reduce airflow?
Yes, a carbon filter creates some resistance because air must pass through the activated carbon material. However, a properly sized filter should only have a small effect on airflow.
Problems usually occur when:
- The filter is too small.
- The fan is too powerful.
- The carbon bed is clogged.
- Ducting is restricted.
Matching the filter and fan correctly prevents major airflow reduction.
How long should a carbon filter last in a grow tent?
Most carbon filters last around 12–24 months, but lifespan depends on:
- Amount of odor produced
- Airflow rate
- Humidity levels
- Filter quality
- How often the exhaust fan runs
Replacing the filter when odor control decreases ensures continued performance.
Conclusion
Installing a carbon filter correctly is essential for effective odor control in a grow tent. The best setup for most growers is placing the filter high inside the tent, connecting it directly to an inline exhaust fan, and maintaining a sealed ventilation system with slight negative pressure.
A properly installed carbon filter does more than reduce odors—it improves the overall efficiency of your ventilation system and helps create a cleaner, more controlled growing environment. By choosing the right filter size, maintaining proper airflow, and performing regular maintenance, you can maximize the performance and lifespan of your carbon filtration system.

I’m Maya L. Greenwood, a lifelong plant lover who believes anyone can grow something beautiful with the right guidance. After years of testing soil mixes, pruning methods, irrigation tricks, and pest-safe solutions, I started EasyGardenTips.com to turn hard-won lessons into step-by-step advice. From seed starting and container gardens to composting and seasonal checklists, my goal is to make gardening simple, sustainable, and fun.