How to Build a Self Watering Raised Garden Bed With a Reservoir
To build a self watering raised garden bed, construct a sturdy garden frame, line the bottom with waterproof material, create a water reservoir, install a fill pipe and overflow drain, and add a growing medium that draws moisture upward. This design is commonly called a wicking bed because it uses capillary action to deliver stored water to plant roots.
Unlike a traditional raised bed that depends on frequent surface watering, a self-watering bed stores water beneath the growing medium. Moisture gradually moves upward as the soil begins to dry, reducing the need for repeated watering.
The system does not require electricity, pumps, or complicated irrigation equipment. However, the reservoir, overflow height, and connection between the water and soil must be constructed correctly.
A poorly designed reservoir may leave the growing medium too wet, while an unsuitable soil mixture can prevent moisture from reaching plant roots.
This guide explains the materials, dimensions, construction steps, water reservoir design, soil requirements, and maintenance practices needed to build a functional self-watering raised garden bed for vegetables, herbs, and flowers.
How Does a Self Watering Raised Garden Bed Work?
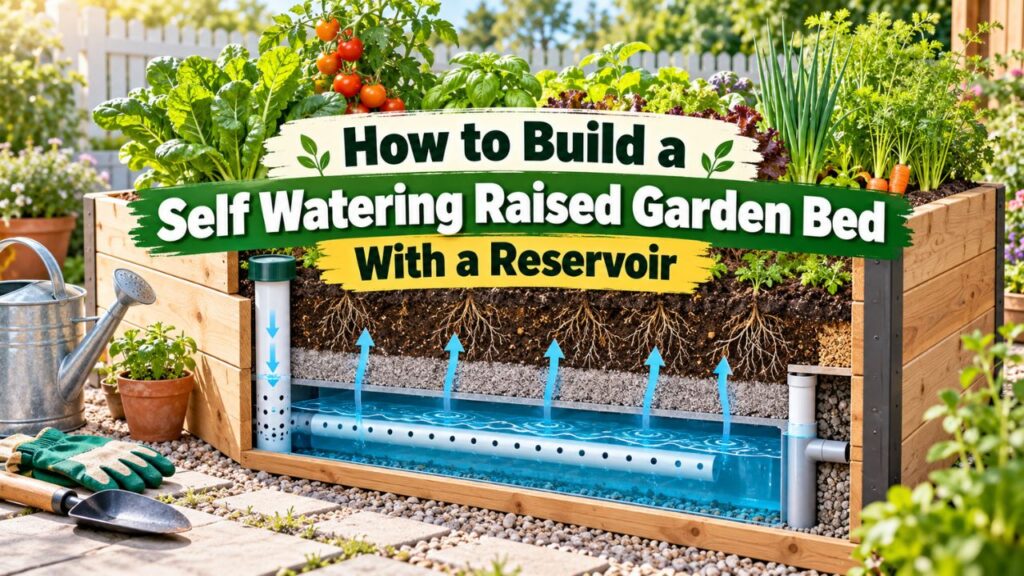
A self-watering raised garden bed uses a reservoir beneath the planting area to supply moisture from below.
Water moves upward through the growing medium by capillary action, which allows moisture to travel through small connected spaces between soil particles.
As plant roots absorb water and the surrounding growing medium becomes drier, moisture moves from wetter areas toward those with less available water.
The University of Kentucky Cooperative Extension’s Raised Wicking Beds guide explains how a reservoir, porous growing medium, fill pipe, and overflow outlet work together to support this process.
Main Parts of a Self-Watering Raised Bed
A typical wicking bed contains five essential components:
- Raised bed frame: Supports the soil and holds the reservoir assembly.
- Waterproof liner: Prevents stored water from escaping through the bottom and lower walls.
- Water reservoir: Stores water below the main growing medium.
- Fill pipe: Allows water to be added directly to the reservoir.
- Overflow drain: Releases excess water before the growing area becomes waterlogged.
A suitable growing medium connects the reservoir to the plant root zone.
The most important requirement is continuous moisture movement between the stored water and the soil. A reservoir separated from the growing medium by an impermeable barrier cannot provide effective bottom-up watering.
Self-Watering Raised Bed Layer Arrangement
A practical wicking bed has the following arrangement, from top to bottom:
| Layer | Purpose |
| Mulch and planting surface | Reduces evaporation and supports plants |
| Growing medium | Holds nutrients, moisture, and plant roots |
| Wicking connection | Transfers moisture from reservoir to growing medium |
| Water reservoir | Stores water beneath the soil |
| Waterproof liner | Prevents uncontrolled water loss |
| Stable supporting ground | Supports the entire bed and its weight |
The overflow outlet is positioned near the upper edge of the reservoir, below the main growing zone.
This allows excess water to escape rather than continuously saturating the root zone.
Materials Needed to Build a Self-Watering Raised Garden Bed
A straightforward DIY project can use a wooden frame with a waterproof liner and perforated drainage pipes to create the reservoir.
The following materials are suitable for a typical ground-supported installation.
Self-Watering Raised Bed Materials List
| Material | Purpose |
| Cedar or other suitable framing lumber | Construct the raised bed |
| Exterior-rated screws and brackets | Secure the frame |
| Durable waterproof pond liner | Create the water-holding basin |
| Protective underlayment | Protect the liner from punctures |
| 4–6-inch perforated drainage pipe | Form water-storage channels |
| 1½–2-inch PVC fill pipe | Add water to the reservoir |
| Overflow pipe and sealed fitting | Release excess water |
| Water-permeable landscape fabric | Retain growing medium where needed |
| Suitable potting or wicking medium | Move moisture toward roots |
| Finished compost | Contribute organic matter and nutrients |
| Organic mulch | Reduce surface evaporation |
You may also need a drill, saw, measuring tape, level, utility knife, shovel, and scissors.
Important: Choose a liner intended for long-term water containment. For edible gardens, seek manufacturer information confirming suitability for the intended gardening or water-contact application.
Avoid reusing plastic, barrels, or containers with unknown chemical histories.
What Size Should a Self-Watering Raised Bed Be?
A practical starting size is approximately 4 feet wide and 8 feet long.
A 4-foot width allows many gardeners to reach the middle from either side without stepping inside the bed.
The total height must accommodate the water reservoir, growing medium, and some space below the top rim.
For a DIY bed with approximately 20 inches of usable interior height, a possible arrangement is:
- 6 inches: Water reservoir.
- 12 inches: Growing medium.
- 2 inches: Space below the upper rim.
This arrangement is an example, not a universal construction requirement.
If you want a deeper growing area, increase the frame height while keeping the reservoir and wicking arrangement suitable for the chosen medium.
The reservoir should not occupy so much space that the plants lack an adequate root zone.
How to Build a Self Watering Raised Garden Bed Step by Step
The construction process involves building the frame, installing a watertight reservoir, adding the plumbing, and preparing a growing medium that can wick moisture.
The following method uses perforated drainage pipes to create water-storage spaces beneath the planting area.
Step 1: Choose a Level Location
Select an area that receives enough sunlight for the plants you intend to grow.
Most sun-loving vegetables grow best with approximately 6–8 hours of direct sunlight, although leafy greens and certain herbs may tolerate less.
The site should also be:
- Relatively level.
- Accessible for planting and harvesting.
- Close enough to a water source for convenient filling.
- Away from frequent flooding or concentrated runoff.
- Strong enough to support the filled raised bed.
A self-watering bed stores more water than a conventional raised bed, so the supporting surface must handle the combined weight of the structure, saturated growing medium, and reservoir.
For a large bed, placement directly on stable ground is generally simpler than installing it on a deck or balcony.
Step 2: Construct the Raised Garden Bed Frame
Measure and cut the framing materials to your desired dimensions.
For a rectangular wooden raised bed:
- Cut the side and end boards to the planned measurements.
- Arrange the boards on a level surface.
- Secure the corners using suitable screws and supports.
- Add intermediate bracing to long walls where necessary.
- Check that the frame is square and stable.
- Position it in the prepared location.
If the frame uses multiple boards stacked vertically, secure each course properly.
Wet soil creates outward pressure against the walls. Taller beds and longer spans require stronger construction than shallow frames.
Before adding the liner, inspect the inside of the frame for exposed screw tips, sharp corners, or rough edges.
Remove anything that might puncture the waterproof material.
Step 3: Install the Waterproof Liner
The liner creates the water-holding basin.
Without a watertight lower section, reservoir water could escape directly into the ground before plants can use it.
To install the liner:
- Remove sharp stones and debris from the bottom.
- Place a suitable protective underlayment over rough surfaces.
- Spread the waterproof liner across the bottom.
- Gently press the material into the corners.
- Extend the liner up the walls above the planned reservoir level.
- Secure the liner according to the manufacturer’s recommendations.
Avoid stretching the material tightly across corners.
Leave enough slack to accommodate water pressure and movement of the reservoir components.
A continuous liner is preferable to several unsealed plastic sheets.
Common Mistake: Thin plastic sheeting can tear or deteriorate with exposure and age. A failed liner may empty the reservoir and defeat the purpose of the system.
Step 4: Install the Overflow Drain
The overflow drain is one of the most important components of a self-watering raised bed.
It prevents the reservoir from filling high enough to keep the entire growing zone saturated.
For a 6-inch-deep reservoir, position the overflow inlet close to the intended maximum water level, generally near the top of the reservoir layer.
Installation involves:
- Marking the planned maximum reservoir water level.
- Selecting a suitable outlet location on the side wall.
- Drilling an opening for the overflow fitting.
- Making a corresponding opening in the liner.
- Installing a compatible sealed bulkhead or other appropriate watertight fitting.
- Connecting the outlet pipe.
- Directing discharged water away from vulnerable surfaces.
The fitting must seal against the liner without tearing it.
Avoid relying on an unsealed hole through the liner, particularly in a bed intended for long-term use.
Keep the outlet accessible so blockages can be removed.
Important: The overflow must discharge below the main growing zone. Positioning it too high can allow excess water to saturate the soil.
Step 5: Create the Water Reservoir
Perforated drainage pipes can form the water-storage section.
Their hollow interiors provide space for water, while the pipe walls help support the material above.
For a 6-inch reservoir, 6-inch perforated drainage pipes are a practical option.
Arrange the pipes horizontally along the bottom of the lined frame.
Keep them reasonably close together while leaving suitable spaces for the wicking medium to connect with the reservoir.
The pipes should:
- Sit securely on the protected liner.
- Have openings that allow water to enter and leave.
- Provide support for the growing medium above.
- Connect hydraulically through the surrounding reservoir space.
- Remain below the designed overflow level.
Cut the pipes to fit the interior dimensions without forcing sharp edges against the liner.
Where necessary, use suitable filter material to keep excessive growing medium from entering the pipe openings.
Do not completely seal the pipes away from the surrounding moist material.
A wicking bed needs both water storage and a path for moisture to enter the growing medium.
Step 6: Install the Water Fill Pipe
The fill pipe provides direct access to the reservoir.
A PVC pipe approximately 1½–2 inches in diameter is convenient for adding water using a hose or watering can.
Position it vertically near one end of the bed.
Connect the lower opening to the reservoir, preferably through or directly into a perforated water-storage pipe.
The fill pipe should:
- Extend above the finished soil surface.
- Remain accessible after plants mature.
- Allow water to flow freely into the reservoir.
- Have a removable cap.
- Be positioned away from the overflow outlet when practical.
Make sure the lower end is not blocked by the liner or growing medium.
A detachable cap helps prevent debris from entering and reduces access for mosquitoes.
The fill pipe can also provide access for checking reservoir water levels if its design permits.
Step 7: Create the Wicking Connection
A self-watering raised bed must have a continuous path that allows moisture to move upward.
If the growing soil is completely separated from the stored water, the reservoir will not effectively supply the plants.
One method involves placing premoistened, absorbent growing medium in spaces between the perforated reservoir pipes.
Suitable materials can include:
- Moist peat-based growing medium.
- Properly prepared coconut coir.
- Suitable compost-containing potting mix.
The material should extend into the wet reservoir area and connect directly with the growing medium above.
Avoid packing it tightly enough to eliminate air spaces.
Where permeable fabric is used to keep soil out of the reservoir, arrange the system so the wicking medium maintains effective contact with the water.
A rigid, impermeable divider without dedicated wicking openings will block the intended moisture movement.
Key Takeaway: The reservoir stores the water, but the absorbent material connecting it to the planting area makes the self-watering system work.
Step 8: Add the Raised Bed Growing Medium
Once the reservoir and wicking connections are installed, add the planting mixture.
A self-watering bed needs a growing medium that can move moisture upward while still providing air for the roots.
Suitable ingredients may include:
- Quality potting mix.
- Finished compost.
- Peat moss or coconut coir.
- Aged bark or other appropriate structural materials.
The best proportions depend on the ingredients already present in the commercial products.
Avoid filling the growing layer entirely with dense clay soil.
Heavy, compacted soil can remain excessively wet near the reservoir and restrict root aeration.
Add the growing medium gradually, maintaining contact with the wicking sections.
Gently level each portion without forcefully compacting it.
Leave approximately 1–2 inches below the rim for watering and mulching.
Step 9: Fill and Test the Water Reservoir
Before planting, test the system carefully.
Begin by adding clean water through the fill pipe.
Observe the following:
- Water enters the reservoir without backing up immediately.
- The liner does not leak below the intended overflow level.
- The reservoir fills progressively.
- Excess water eventually exits through the overflow pipe.
- Water drains away from the bed without collecting against the structure.
Once water begins exiting the overflow, the reservoir has reached its intended maximum level.
Check the entire lower perimeter for leaks.
If water escapes from an unintended opening, correct the liner or fitting before proceeding.
Also examine the wicking medium after the reservoir has remained filled long enough for moisture to begin moving upward.
A dry connection between the reservoir and growing medium indicates that the wicking pathway needs attention.
Step 10: Water the Soil From Above and Plant
Although the bed is designed for bottom-up watering, new seeds and seedlings still need moisture near the surface.
Water the growing medium gently from above before planting or transplanting.
The Oklahoma State University Extension’s wicking-container instructions demonstrate a similar reservoir-based system using an overflow opening, fill pipe, and soil-filled wicking section.
Newly planted seeds do not have roots extending into the deeper moisture zone.
Therefore:
- Keep the seed-starting area appropriately moist.
- Water young transplants from above initially.
- Allow roots to establish in the growing medium.
- Continue monitoring moisture as the system begins supplying water from below.
As roots develop, established plants can make greater use of the stored reservoir water.
How Much Soil and Water Does a Self-Watering Raised Bed Need?
The amount of growing medium depends on the bed’s length, width, and planting depth.
Calculate soil separately from the reservoir because the two sections serve different functions.
Calculate the Growing Medium Volume
For a rectangular bed:
Growing medium (cubic feet) = Length (feet) × Width (feet) × Growing depth (feet)
For example, a 4-by-8-foot bed with 12 inches of growing medium requires:
4 × 8 × 1 = 32 cubic feet
That equals approximately 1.19 cubic yards.
If purchasing 2-cubic-foot bags, the calculated requirement is 16 bags.
Soil Requirements for Common Wicking Bed Sizes
The following examples assume 12 inches of growing medium above a 6-inch-deep reservoir.
| Bed size | Growing medium | Gross reservoir space |
| 3 × 4 feet | 12 cu. ft. | 6 cu. ft. |
| 3 × 6 feet | 18 cu. ft. | 9 cu. ft. |
| 4 × 4 feet | 16 cu. ft. | 8 cu. ft. |
| 4 × 8 feet | 32 cu. ft. | 16 cu. ft. |
The gross reservoir space is not the actual water-storage capacity.
Pipes, aggregate, wicking material, and other components occupy some of that volume.
Actual water capacity depends on how the reservoir is constructed.
How Much Water Can the Reservoir Hold?
Water capacity depends on the open spaces available inside the reservoir.
For example, a reservoir constructed using hollow perforated pipes stores water inside the pipe openings and available connected spaces.
A reservoir filled with gravel stores water only in the gaps between stones.
Therefore, two reservoirs with identical outside dimensions may hold very different amounts of water.
To estimate usable capacity, measure the volume required to fill the installed reservoir from a known starting water level until water reaches the overflow.
For conversion:
1 cubic foot of water = approximately 7.48 US gallons.
Do not calculate the actual storage capacity simply by multiplying the entire reservoir dimensions without accounting for displaced space.
What Is the Best Soil Mix for a Self-Watering Raised Bed?
The soil mixture must allow water to travel upward from the reservoir without remaining excessively saturated.
This makes its physical properties particularly important.
Use a Moisture-Retaining but Well-Aerated Mixture
A self-watering bed generally works well with a suitable container-style growing medium that contains a balance of fine, absorbent ingredients and components that maintain air spaces.
Peat moss and coconut coir can help maintain moisture movement.
Finished compost supplies organic matter and may contribute plant nutrients.
Commercial potting mix can provide a convenient foundation if it is suitable for growing vegetables.
Avoid using a mixture dominated by extremely coarse bark or gravel in the main growing zone because it may provide poor capillary continuity.
Likewise, dense clay-rich soil can become too wet near the reservoir.
Should You Add Perlite to a Wicking Bed?
Perlite can help preserve aeration in a growing mixture.
However, excessive amounts may reduce the medium’s ability to maintain continuous moisture movement.
If the selected potting mix already contains perlite, additional material may not be necessary.
The goal is not maximum drainage. It is a balance between moisture transport, water retention, and root aeration.
Can You Use Regular Raised-Bed Soil?
Yes, some prepared raised-bed mixtures can work, but their ingredients matter.
A topsoil-heavy mixture intended for conventional open-bottom beds may behave differently inside a lined wicking bed.
Look for a product with suitable porosity and moisture-holding properties.
If the mixture contains substantial clay, it may be difficult to manage in a contained reservoir system.
For a new self-watering bed, an appropriate potting or soilless growing medium with finished compost is often easier to manage than heavy garden topsoil.
How to Water a Self-Watering Raised Garden Bed After Planting
A self-watering raised bed reduces the frequency of manual watering, but it still requires regular observation.
The reservoir supplies water from below while the plants use moisture from the growing medium.
How Often Should You Fill the Reservoir?
There is no fixed refill interval suitable for every self-watering raised bed.
The frequency depends on:
- Reservoir storage capacity.
- Number and size of plants.
- Temperature and sunlight.
- Wind and evaporation.
- Plant maturity.
- Rainfall.
- Growing medium composition.
A large reservoir supporting small plants may last considerably longer than the same reservoir supporting mature tomatoes during hot weather.
Check the water level regularly during the first few weeks.
Once you understand how quickly the plants use the stored water, you can develop a more appropriate filling routine.
How Do You Know When the Reservoir Needs Water?
A simple way to check is to insert a suitable water-level indicator through the fill pipe.
A lightweight float attached to a visible indicator can also show whether the reservoir is close to full or nearly empty.
Alternatively, a clean, narrow measuring stick may be usable when the pipe provides direct access to the water level.
Do not rely only on the surface appearance of the soil.
The upper growing medium can appear relatively dry while moisture remains available deeper around established roots.
Should You Always Keep the Reservoir Full?
Not necessarily.
An overflow prevents water from rising beyond the intended reservoir level, but continuously topping up the water is not always required.
Allowing some storage space before expected rainfall can reduce unnecessary overflow and nutrient loss.
However, avoid letting the growing medium dry excessively, particularly when plants are young or the wicking connection is not fully established.
Use the reservoir level and actual soil moisture together to guide watering.
Can You Build a Self-Watering Raised Bed Without Gravel?
Yes. Gravel is not required for a wicking bed.
Perforated drainage pipes, purpose-designed reservoir cells, and other strong water-storage components can create the necessary space for stored water.
A pipe-based reservoir may provide more usable water-storage space per unit of reservoir volume than one packed with solid stones.
It also avoids adding the substantial weight associated with gravel.
Gravel Reservoir vs. Pipe Reservoir
| Feature | Gravel reservoir | Perforated pipe reservoir |
| Water storage | Water fills gaps between stones | Water fills hollow pipes and connected spaces |
| Weight | Relatively heavy | Often lighter |
| Installation | Requires transporting and spreading gravel | Requires cutting and positioning pipes |
| Support | Depends on aggregate arrangement | Pipe walls support the upper material |
| Wicking connection | Moist material must contact reservoir water | Moist material must connect through openings or designated wick zones |
Gravel can be part of a correctly constructed wicking reservoir, but it is not an automatic improvement.
Important: A deliberate gravel-filled water reservoir is different from putting gravel beneath an ordinary raised bed to improve drainage. A wicking reservoir is lined and connected to the soil through a moisture-transfer system.
Common Problems When Building a DIY Self-Watering Raised Bed
Most problems result from an incorrect reservoir design, poor moisture transfer, or inadequate overflow drainage.
Identifying the cause early can prevent plants from struggling after the bed is filled.
Water Leaks From the Reservoir
If stored water disappears quickly while the soil remains dry, inspect the liner and overflow fittings.
Possible causes include punctures, damaged seams, or poorly sealed pipe connections.
A small leak near the bottom may empty the reservoir before the growing medium receives sufficient moisture.
Test the reservoir before adding the full amount of soil whenever possible.
Repair liners using materials and methods approved by the liner manufacturer.
The Soil Surface Stays Dry
A dry surface is not automatically a problem once plants are established.
However, very young plants may not have roots deep enough to access the moisture supplied by the reservoir.
Continue light surface watering as needed.
If the deeper growing medium also stays dry, inspect the wicking connection.
A large air gap or an impermeable separating layer may prevent moisture from moving upward.
The Growing Medium Becomes Waterlogged
Persistent waterlogging may indicate:
- An overflow outlet positioned too high.
- A blocked overflow pipe.
- A growing medium containing excessive fine clay.
- Insufficient root-zone aeration.
- A reservoir that is not separated properly from the growing area.
Check the overflow height first.
The intended water level should remain below the main growing zone.
If the medium itself is dense and poorly aerated, changing the soil composition may be necessary.
Water Runs Out of the Overflow Immediately
If water escapes almost immediately after filling begins, check the reservoir’s initial water level and plumbing arrangement.
A reservoir that is already full will naturally discharge additional water.
However, a poorly arranged fill pipe may deliver water directly toward the overflow without distributing it effectively.
Ensure that the reservoir components are connected properly and that water can move through the storage area.
The fill and overflow points should be separated when practical.
Mosquitoes Appear Around the Fill Pipe
Exposed standing water can attract mosquitoes.
Keep the fill pipe covered with a suitable cap and protect accessible overflow openings with appropriate screening.
Do not allow water to collect in uncovered trays or containers beside the raised bed.
Avoid using pesticide products directly in the water reservoir without confirming that they are specifically approved for the intended edible-gardening application.
How to Maintain a Self-Watering Raised Garden Bed
A properly built wicking bed can remain functional for many growing seasons, but it requires occasional inspection.
The main maintenance tasks involve keeping the water-storage system clean, monitoring nutrients, and protecting the growing medium.
Check the Reservoir and Overflow
Inspect the fill and overflow openings regularly.
Remove leaves, roots, or debris that could block water movement.
Ensure that water can still leave the overflow when the reservoir reaches its intended maximum level.
Inspect visible liner edges and fittings for signs of damage.
Monitor Fertilizer and Salt Buildup
A self-watering bed does not flush excess nutrients as frequently as a conventional freely draining planter.
Repeated fertilizer applications can contribute to soluble salt buildup in the growing medium.
Avoid adding fertilizer automatically every time you refill the reservoir.
Use appropriate soil or growing-media testing when plant growth or nutrient conditions raise concerns.
If salt accumulation becomes significant, a controlled flushing process may be necessary, provided the reservoir has a suitable drainage arrangement.
Refresh the Growing Medium
Organic materials gradually decompose and settle.
Check the soil level before each growing season.
Add compatible growing medium when necessary, but avoid covering established plant crowns.
If the mixture has become severely compacted, refresh the affected area without damaging the liner or plumbing underneath.
Prepare the Bed for Winter
In climates where freezing temperatures occur, protect the reservoir components.
Standing water can freeze and expand, potentially damaging pipes or fittings.
Drain the system before hard freezes when the design and local conditions require it.
Check the liner and connections before refilling the following spring.
Is a Self-Watering Raised Garden Bed Worth Building?
A self-watering raised bed can be a practical choice when frequent watering is inconvenient or when vegetables grow in a location that dries out quickly.
The built-in reservoir allows established plants to access stored moisture without requiring an electrical irrigation system.
It can be particularly useful for:
- Vegetable gardens exposed to hot summer weather.
- Raised beds installed on patios.
- Gardeners who cannot water several times during the day.
- Locations where controlling irrigation is important.
- Beds containing thirsty crops such as tomatoes and peppers.
However, construction requires more planning than an ordinary open-bottom raised bed.
The waterproof liner, reservoir components, fill pipe, and overflow must all function together.
The system also needs occasional water-level checks, especially during hot weather.
For gardeners who prefer a simple raised bed with minimal construction, a conventional garden frame with drip irrigation may be easier to install.
A wicking bed becomes more attractive when the ability to store water beneath the growing medium is worth the additional setup.
Conclusion
Understanding how to build a self watering raised garden bed begins with creating a reliable water reservoir and ensuring that moisture can travel from the stored water into the growing medium.
A practical DIY design uses a sturdy frame, waterproof liner, perforated reservoir pipes, fill tube, overflow outlet, and a suitable wicking mixture.
The overflow prevents excess water from flooding the root zone, while the fill pipe makes the reservoir easy to replenish.
For a 4-by-8-foot bed, approximately 6 inches of reservoir space and 12 inches of growing medium provide a workable starting arrangement when the wicking connection is correctly designed.
Water new seeds and transplants from above until their roots can use the deeper moisture supply.
A successful self-watering raised bed stores water without keeping plant roots continuously submerged. With proper construction and occasional maintenance, this system can provide consistent moisture while reducing the effort required for regular garden watering.
FAQs About How to Build a Self Watering Raised Garden Bed
Can You Convert an Existing Raised Bed Into a Self-Watering Bed?
Yes, an existing raised bed can be converted if its frame is deep and strong enough to accommodate a lined water reservoir and sufficient growing medium.
The conversion usually requires removing the soil, installing a waterproof liner, adding reservoir components and plumbing, and refilling the bed.
Check the frame’s condition and structural capacity before making modifications.
How Deep Should a Self-Watering Raised Bed Be?
A practical DIY design can use approximately 6 inches for the reservoir and 12 inches for the growing medium, plus additional space below the rim.
This requires around 20 inches of usable interior height.
Different designs may use other dimensions, but the root zone must remain deep enough for the selected crops and suitable for capillary moisture movement.
Do Self-Watering Raised Beds Need Drainage Holes?
They need a controlled overflow or drainage outlet, but they should not have unrestricted holes through the bottom of the water reservoir.
The liner must retain water until it reaches the planned overflow level.
If the bottom contains ordinary drainage holes, stored water may escape before the wicking system can supply it to plants.
Can You Grow Tomatoes in a Self-Watering Raised Bed?
Yes. Tomatoes can grow in a properly constructed self-watering bed with enough rooting space, nutrients, and moisture.
Choose a growing medium that remains aerated and avoid allowing water to saturate the entire root zone.
Large tomato plants may use substantial amounts of water, so monitor the reservoir frequently during hot weather.
Do Self-Watering Raised Beds Need Electricity?
No. A basic wicking bed operates without electricity.
Water moves upward through the growing medium by capillary action, and the reservoir is filled manually through a pipe.
An electric pump or automated filling system is optional rather than necessary.
Can You Use Regular Garden Soil in a Wicking Bed?
Some mineral soil can be incorporated into suitable growing mixtures, but dense clay-rich garden soil is generally a poor choice for the entire growing zone.
A wicking bed needs consistent moisture movement and sufficient air spaces around plant roots.
A suitable potting or soilless growing medium combined with finished compost is often easier to manage.
How Long Does Water Last in a Self-Watering Raised Garden Bed?
Reservoir water may last several days or longer, depending on storage capacity, plant size, temperature, and weather.
There is no dependable refill interval that applies to every design.
Measure how quickly your plants use water during the first few weeks, and check the reservoir more often during hot, dry conditions.

I’m Maya L. Greenwood, a lifelong plant lover who believes anyone can grow something beautiful with the right guidance. After years of testing soil mixes, pruning methods, irrigation tricks, and pest-safe solutions, I started EasyGardenTips.com to turn hard-won lessons into step-by-step advice. From seed starting and container gardens to composting and seasonal checklists, my goal is to make gardening simple, sustainable, and fun.