How to Build an Elevated Raised Garden Bed With a Sturdy Base
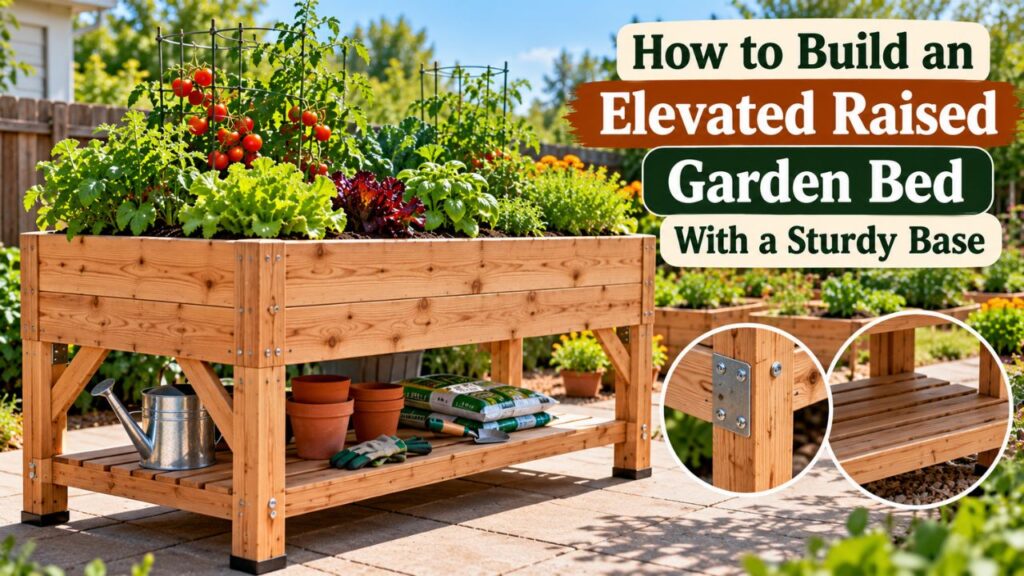
To build an elevated raised garden bed, construct a sturdy wooden planter box, support it with reinforced legs, install a strong bottom with drainage openings, and fill it with a suitable growing mix. A compact planter measuring about 4 feet long, 2 feet wide, and 32 inches high is a practical starting point for growing herbs, lettuce, and other small vegetables.
Unlike traditional raised beds that rest directly on the ground, elevated raised garden beds stand on legs. This brings the planting surface closer to waist height, making it easier to plant, water, and harvest without repeated bending or kneeling.
The main construction challenge is supporting the weight of the growing medium, especially after watering. Weak leg connections, unsupported bottom boards, and poor drainage can cause serious problems.
A properly built planter needs stable legs, reinforced framing, a supported base, and enough soil depth for the intended plants. Careful planning also helps prevent unnecessary lumber costs and difficult repairs.
This guide explains how to choose dimensions, gather materials, assemble the frame, support the bottom, install drainage, and prepare an elevated garden bed for planting.
Plan the Size and Design of Your Elevated Raised Garden Bed
Before buying lumber, decide how large the elevated planter should be and where it will stand.
The design should match the available space, your comfortable working height, and the vegetables or flowers you intend to grow.
A small wooden planter is generally easier to construct and support than a long, heavily loaded structure.
Recommended Elevated Raised Garden Bed Dimensions
The following dimensions provide useful starting points for a raised planter supported by legs.
| Design Feature | Suggested Starting Size |
| Length | 3–4 feet |
| Width | 18–24 inches |
| Overall working height | Approximately 30–34 inches |
| Planter box depth | 10–12 inches |
| Usable soil depth | Approximately 9–11 inches |
| Number of main legs | Four for a suitably engineered small planter |
| Bottom support | Structural rails, crossmembers, and a draining base |
These are planning dimensions, not structural load ratings. Longer or wider planters may require additional legs, stronger framing, or different connections.
The University of Georgia Extension’s raised garden bed dimensions guidance explains that elevated planters can reduce bending and soil requirements. It also emphasizes that their bottoms must support the weight of wet soil while allowing water to drain.
Choose a Comfortable Working Height
For a standing gardener, a planting surface approximately 30–34 inches above the ground may provide convenient access.
However, the ideal height depends on the gardener’s body measurements and preferred working position.
A taller person may prefer a higher bed, while a shorter gardener may find the same structure uncomfortable.
Before cutting the legs, place a measuring tape against a worktable or similar surface to estimate the most comfortable planting height.
If the planter is intended for wheelchair use, measure the user’s seated reach and necessary knee clearance. A standard waist-high design may not provide enough space beneath the growing box.
Keep the Planter Narrow Enough to Reach Across
An elevated bed should allow you to reach plants without leaning heavily against the sides.
A width of approximately 2 feet is practical for a planter accessible from one or both long sides.
For wider beds, confirm that the center remains within comfortable reach.
Avoid building a tall, wide planter that requires standing on a step or stretching across the growing area.
Select a Suitable Location
Choose a relatively level location with adequate sunlight and convenient access to water.
Most fruiting vegetables, including tomatoes and peppers, perform best with at least 6–8 hours of direct sunlight, although individual crop requirements vary.
Leafy greens and certain herbs can tolerate somewhat less direct sun.
Before finalizing the location, check that:
- The ground or patio is stable and reasonably level.
- Water can drain away without collecting near buildings.
- The planter will not block pathways or doors.
- You can reach the planting area comfortably.
- The supporting surface can safely carry the filled bed.
Safety Note: Elevated planters containing wet growing medium can be extremely heavy. Before installing one on a balcony, raised deck, or other elevated structure, verify its load-bearing capacity and any applicable building requirements.
Materials and Tools for Building an Elevated Raised Garden Bed
A wooden planter with four sturdy legs is a practical DIY option.
Cedar is a common choice because it has natural resistance to decay. Other suitable outdoor lumber may also work, provided the material and fastening system are appropriate for the intended application.
Avoid unknown reclaimed wood or lumber previously treated with hazardous chemicals.
Materials for a 4 × 2-Foot Elevated Planter
The following list describes an example planter box with outside dimensions of approximately 48 inches long and 24 inches wide.
Two rows of nominal 2×6 boards produce sidewalls approximately 11 inches deep.
| Material | Purpose |
| Four 4×4 wooden posts | Main supporting legs |
| Four 2×6 boards, 48 inches long | Two stacked boards for each long side |
| Four 2×6 boards, 21 inches long | Two stacked boards for each short end |
| Exterior-rated 2×4 lumber | Underframe rails, cross supports, and bracing |
| Exterior-rated wooden slats | Supported bottom platform |
| Suitable structural connectors and bolts | Transfer planter weight into the legs |
| Exterior-grade corrosion-resistant screws | Fasten sideboards and supported components |
| Water-permeable landscape fabric | Keep growing medium from escaping through bottom gaps |
| Suitable potting or raised-planter mix | Growing medium |
| Optional exterior wood finish | Protect appropriate exposed wood surfaces |
The 21-inch end boards fit between the two 48-inch-long sides when using standard nominal 2×6 lumber, which has an actual thickness of approximately 1½ inches.
The illustrated box therefore has an interior measuring approximately 45 inches long by 21 inches wide.
Important: This is a dimensional example, not a tested load-rated construction plan. Select structural rails, brackets, bolts, and bottom supports for the expected saturated weight of your finished planter. The actual leg and support arrangement must follow the chosen connector system’s installation requirements.
Tools Needed for the Project
Prepare the following tools before beginning construction:
- Measuring tape and pencil
- Circular saw, miter saw, or handsaw
- Power drill and suitable drill bits
- Driver bits or screwdriver
- Carpenter’s square
- Spirit level
- Clamps
- Socket wrench for bolts
- Staple gun for landscape fabric
- Sandpaper or sanding block
- Safety glasses, hearing protection, and work gloves
If you don’t have suitable cutting equipment, many lumber suppliers can cut boards to specified lengths.
Check every measurement before cutting, particularly when using purchased brackets with specific spacing requirements.
How to Build an Elevated Raised Garden Bed Step by Step
The following process uses a rectangular wooden planter with a supported bottom and four legs.
It focuses on the construction sequence and important support details rather than treating one fastener arrangement as suitable for every lumber species, soil load, and planter size.
Step 1: Measure and Cut the Wooden Boards
Start with the boards that form the planter box.
For the example design, cut:
- Four long sideboards measuring 48 inches each
- Four end boards measuring 21 inches each
- Four 4×4 leg posts sized for the chosen working height
- Additional 2×4 framing members to fit the final underframe layout
If the leg posts extend from ground level to the upper rim, they can be cut to approximately the intended overall height. Their final placement and attachment details determine the exact dimensions.
Measure the cross-support lengths after the box and main rails are assembled.
Mark cuts with a square to keep the ends straight.
After cutting, sand sharp corners and splintered edges that could cause injury during assembly.
Wear appropriate eye and hearing protection when using power tools.
Step 2: Assemble the Rectangular Planter Box
Place two 48-inch boards parallel to each other on a flat working surface.
Position two 21-inch boards between their ends to create a rectangular frame.
Check the corners with a carpenter’s square.
Clamp the boards, predrill where appropriate, and connect the corners using suitable exterior-grade fasteners.
Repeat with the second set of boards to form the upper row.
Join the two rows using appropriate corner reinforcement and fastening.
The completed box should have sidewalls approximately 11 inches high.
Check that the assembled structure remains square and that the upper edges are reasonably level.
Practical Tip: Measure diagonally from opposite corners. Matching diagonal measurements indicate that the rectangular frame is square, assuming the sides are straight.
Step 3: Build the Structural Support Frame
An elevated planter needs more than a decorative wooden box.
Its bottom and growing medium must be carried by a structural frame that transfers the weight into the legs.
For this example, use exterior-rated 2×4 lumber to construct an underframe beneath the planter box.
A practical arrangement includes:
- Two lengthwise support rails
- Crossmembers beneath the base
- Appropriate structural connections to the legs
- Additional bracing to resist side-to-side movement
The rails should support the planter along its length.
Crossmembers help distribute the load across the bottom rather than leaving long boards unsupported.
The number and spacing of structural supports depend on the selected lumber, planter dimensions, wet soil load, and connectors.
Do not rely on a few ordinary screws driven into the sides of the leg posts to carry the entire weight of the filled planter.
Use a verified load-bearing connection system, such as properly specified structural brackets, supported joints, or bolted connections designed to transfer the load safely into the legs.
Step 4: Attach the Legs Securely
Position the four 4×4 posts at the designated corners of the supporting frame.
Clamp the posts temporarily and check that they are straight.
Attach them using the selected structural connectors and fasteners according to the manufacturer’s requirements.
The load-bearing rails should have a secure path into the legs rather than depending solely on the withdrawal strength of screws.
After attaching the legs, inspect the structure from several directions.
Check that:
- Each leg is aligned correctly.
- The top frame is level.
- The joints are secure.
- The legs stand on stable supporting surfaces.
- The frame does not twist excessively.
Add appropriate horizontal or diagonal bracing to resist racking, especially if the planter will stand on an exposed patio or be moved occasionally.
Racking occurs when a rectangular frame shifts sideways and becomes distorted.
A planter can have strong vertical legs and still be unstable if its frame lacks adequate lateral support.
Step 5: Install the Elevated Raised Bed Bottom
The bottom must support the growing medium while allowing water to escape.
For a wooden elevated planter, one option is to install exterior-rated slats over the supported underframe.
Arrange the slats so the load transfers into the crossmembers and structural rails.
Leave small, consistent gaps between suitable slats for drainage.
Make sure the slats are secured against movement and that their spans are appropriate for the expected load.
Another option is a properly supported exterior-rated bottom panel with drainage holes.
Iowa State University Extension’s guide to elevated and tabletop gardens describes drilling ½-inch drainage holes approximately every 6 inches in a solid base and lining the bottom with water-permeable landscape fabric.
The appropriate drainage arrangement depends on the base material and design.
Don’t assume a thin sheet of plywood or unsupported fence boards can safely hold the weight of saturated soil.
Step 6: Line the Bottom With Landscape Fabric
Once the bottom is installed, add a water-permeable fabric layer if the base has gaps or openings through which growing medium could escape.
Cut landscape fabric large enough to cover the interior bottom and extend a short distance up the sides.
Position it smoothly without pulling it tightly over unsupported spaces.
Secure it around the upper edge of the bottom area with suitable staples or fasteners.
The fabric is intended to retain loose growing medium while allowing water to pass through.
Landscape fabric is not a structural bottom. It cannot replace wooden slats, support rails, or other load-bearing components.
Avoid laying waterproof plastic across the base unless the planter is specifically designed with suitable drainage outlets.
A continuously sealed plastic bottom can trap water around the roots.
Step 7: Protect the Wooden Frame
Before filling the planter, inspect the exterior wood surfaces.
Depending on the lumber, a suitable exterior finish may help reduce weathering.
If using a wood preservative, stain, or coating, select a product appropriate for the application and follow the manufacturer’s instructions concerning curing and contact with growing media.
A sidewall liner may also reduce direct contact between damp soil and wood.
However, it should not block bottom drainage.
Pay particular attention to exposed end grain and joints where moisture can remain after rainfall.
Don’t use unknown chemical treatments on wood intended for food-growing applications.
Step 8: Place the Bed in Its Final Position
Move the empty structure to the planned location before adding soil.
Once filled, it may be too heavy to move safely without dismantling or removing material.
Position the planter on stable, level ground.
For outdoor installation, suitable pavers or footings may help keep wooden legs away from persistently damp soil.
Confirm that every leg bears securely on its support.
If the planter is tall, narrow, exposed to strong winds, or likely to be leaned on, appropriate anchoring may be necessary.
Do not place a heavily loaded elevated planter on a weak deck or uncertain supporting surface.
Step 9: Fill the Planter With Growing Medium
After checking the frame, bottom support, drainage, and stability, add the growing medium.
A lightweight, well-aerated mix suitable for raised planters or large containers is generally preferable to dense, unamended backyard soil.
Add the mixture gradually and distribute it evenly.
Avoid pressing it into tightly compacted layers.
Leave approximately 1 inch below the top edge for easier watering and mulch, provided the remaining depth is suitable for your intended plants.
Water gently and check whether excess moisture drains through the bottom.
Inspect the frame and connections for unexpected movement or deflection while the load increases.
If you notice bowing, loosened joints, instability, or unusual movement, stop filling and correct the structural issue before continuing.
Step 10: Plant Vegetables, Herbs, or Flowers
Once the bed is stable and drainage is working, the planting area is ready.
Choose plants that match the available soil depth and growing space.
Small herbs, lettuce, spinach, and compact flowers are convenient choices for a moderately shallow elevated bed.
Larger vegetables may need deeper soil, more root volume, and additional structural support for their mature growth.
Follow the crop’s spacing and watering requirements rather than crowding plants into the box.
How Much Soil Does an Elevated Raised Garden Bed Need?
Calculate the required soil quantity using the inside dimensions of the planter rather than its outside measurements.
For a rectangular box:
Soil Volume (cubic feet) = Inside Length (feet) × Inside Width (feet) × Fill Depth (feet)
The frame thickness and any interior structural components reduce the usable growing volume.
Example Soil Calculation for a 4 × 2-Foot Planter
The example wooden box has approximate interior dimensions of:
- Inside length: 45 inches
- Inside width: 21 inches
- Soil fill depth: 10 inches
Convert these values to feet and multiply:
(45 ÷ 12) × (21 ÷ 12) × (10 ÷ 12) = 5.47 cubic feet
Therefore, the planter requires approximately 5.5 cubic feet of growing medium, or 155 liters.
These calculations assume the stated internal dimensions remain unobstructed.
For comparison, a full 48-by-24-inch interior with a 10-inch fill would require approximately 6.67 cubic feet. Measuring the inside prevents overbuying.
Soil Volume for Different Elevated Bed Sizes
| Interior Size | Soil Fill Depth | Soil Volume |
| 2 × 2 feet | 10 inches | 3.33 cu. ft. |
| 3 × 2 feet | 10 inches | 5 cu. ft. |
| 4 × 2 feet | 10 inches | 6.67 cu. ft. |
| 4 × 2 feet | 12 inches | 8 cu. ft. |
| 4 × 3 feet | 12 inches | 12 cu. ft. |
The figures assume the dimensions are the usable inside measurements.
Account for the Weight of Wet Soil
Soil volume is only one part of the construction calculation.
The weight of a filled planter depends on the growing medium’s density and moisture content.
A dense mineral-soil mixture can weigh considerably more than a lightweight container mix of the same volume.
The structure must support the saturated growing medium, the planter itself, plants, and any other expected loads.
Don’t estimate structural safety from the dry weight of soil bags alone.
For larger planters or projects where structural capacity cannot be confidently verified, use a tested planter design or have the support system reviewed by a qualified professional.
What Soil Should You Put in an Elevated Raised Garden Bed?
An elevated raised garden bed with a supported bottom behaves more like a large container than a conventional open-bottom garden bed.
Its roots cannot extend into the natural ground, and excess water must escape through the base.
The growing medium therefore needs to retain useful moisture while maintaining adequate air spaces.
Choose a Lightweight, Well-Draining Growing Mix
A quality commercial raised-planter or container potting mix is often a convenient choice.
Depending on the product, it may contain:
- Coconut coir or peat-based materials
- Composted bark
- Mature compost
- Perlite or similar drainage-supporting materials
- A starter fertilizer
Check the product’s ingredients and intended application.
Some bags labeled garden soil contain dense mineral topsoil and may not be appropriate for a relatively shallow elevated planter.
Heavy soil can increase the load on the frame and create drainage problems when contained.
Can You Use Regular Garden Soil?
Regular garden soil is not always suitable for a planter with a bottom.
Even productive soil from an in-ground vegetable garden can become compacted inside a container.
If you intend to use mineral soil, the planter must be designed for its saturated weight, and the mixture needs suitable drainage and structure.
A lightweight commercial growing mix is generally the simpler choice for a compact elevated bed on legs.
Should You Put Rocks at the Bottom?
A gravel layer is not necessary for ordinary elevated planters with appropriate drainage openings.
Rocks take up space that could otherwise support plant roots and do not correct problems caused by an unsuitable growing mix or blocked drainage.
Use a properly supported base, appropriate outlets, and a suitable growing medium.
What Can You Grow in an Elevated Raised Garden Bed?
Elevated beds are particularly useful for plants that don’t require unusually large root volumes.
The best crops depend on the planter’s soil depth, size, and local growing conditions.
Vegetables and Herbs for a Shallow Elevated Bed
For a planter with approximately 10–12 inches of growing depth, consider:
- Loose-leaf lettuce
- Spinach
- Radishes
- Green onions
- Chives
- Parsley
- Basil
- Compact annual flowers
Select varieties whose root systems and mature sizes fit the available space.
Some larger herbs and vegetables may still need more volume than a small elevated bed provides.
Can You Grow Tomatoes and Peppers?
Yes, but the planter must provide enough rooting volume and structural capacity for the selected varieties.
Compact pepper plants and certain dwarf tomatoes may be more manageable than large indeterminate tomatoes.
Larger plants often need deeper growing media and sturdy supports.
Remember that a trellis or stake can place additional forces on the planter during wind or when carrying heavy crops.
Don’t attach tall plant supports to weak sideboards without adequate reinforcement.
Can You Grow Root Vegetables?
Yes, provided the growing medium is loose and deep enough.
Radishes and short carrot varieties can be useful choices for moderately shallow planters.
Long carrots, parsnips, and other deep-rooted vegetables may need greater soil depth.
The root must have enough unobstructed growing space to reach its expected mature length.
How to Make an Elevated Raised Garden Bed Stable and Safe
Structural stability is particularly important because the entire growing medium sits above ground level.
A planter may look solid when empty but behave differently after it has been filled and watered.
Prevent the Legs From Wobbling
Wobbling can indicate weak connections, insufficient bracing, or an uneven foundation.
Check that the frame remains square and the legs are securely connected to the load-bearing rails.
Add properly designed bracing when necessary.
Avoid trying to fix serious instability simply by tightening decorative screws.
The structure should resist normal gardening forces without relying on the growing medium to hold it together.
Provide Strong Support Beneath the Soil
A supported planter bottom should distribute weight across the structural members.
Avoid leaving long, thin boards spanning large distances without intermediate support.
If the bottom begins sagging, don’t simply add more screws to the liner or sideboards.
Determine whether the framing, supporting members, or connections need reinforcement.
Keep Drainage Water Away From Structures
Elevated planters release water from their bottoms after irrigation or heavy rain.
Position the bed so water doesn’t repeatedly soak wooden decking, building siding, or the foundation area.
If using a collection tray, empty it when needed to prevent standing water.
Don’t block the drainage openings to keep the surrounding area dry.
Avoid Unsafe Wood and Hardware
Choose lumber appropriate for outdoor use.
Use corrosion-resistant fasteners compatible with the selected wood, especially when working with treated lumber.
Unknown reclaimed wood and old chemically treated materials may be unsuitable for vegetable planters.
Where structural hardware is used, follow its published installation instructions, including requirements for fastener types, quantities, edge distances, and support conditions.
Common Mistakes When Building an Elevated Raised Garden Bed
Several construction mistakes can make a planter difficult to use or shorten its service life.
Building the Planter Too Large
Increasing the length, width, or depth significantly increases the amount of growing medium.
A larger box also places additional loads on the bottom and support system.
For a first project, a compact bed is often easier to construct and maintain.
Using Weak Legs or Connections
Four legs do not automatically make a planter strong enough.
Support capacity depends on lumber dimensions, connections, braces, frame design, and expected loads.
Avoid relying on ordinary screws in unsupported joints to carry the soil.
Installing an Unsupported Bottom
Thin boards or plywood may bend when exposed to the weight of saturated growing medium.
Provide appropriate structural rails and crossmembers beneath the bottom.
Landscape fabric should only retain the soil, not carry its weight.
Forgetting Drainage
An elevated bed needs openings that allow excess water to leave the growing medium.
Waterlogged conditions can stress roots even when the planting mix contains plenty of organic matter.
Confirm drainage before planting.
Making the Growing Box Too Shallow
A tall planter doesn’t necessarily provide deep soil.
For example, a bed standing 34 inches high may contain only 8 inches of growing medium.
Choose the box depth according to the crops, not the overall height of the structure.
Placing the Bed on an Unstable Surface
A planter on uneven ground may rock or shift.
Soft ground can also settle unevenly beneath individual legs.
Prepare suitable supports and verify stability before filling the structure.
How to Maintain a Wooden Elevated Raised Garden Bed
Once the bed is built, routine maintenance helps keep both the wooden structure and the growing medium in good condition.
Inspect the Frame Every Growing Season
Check for:
- Loose bolts or fasteners
- Cracks around structural connections
- Rot or softened wood
- Sagging bottom boards
- Corrosion or damaged hardware
- Movement in the legs or braces
Repair structural damage before adding more soil or continuing to use an unstable planter.
Keep Drainage Open
Inspect drainage openings periodically.
Fine particles, roots, and debris can restrict water movement.
If the growing medium remains saturated for long periods, check for blocked outlets or a compacted mix.
Maintain the Growing Medium
Container-style growing media may settle as their organic ingredients decompose.
Top up with a suitable mix when needed.
Monitor nutrient availability and follow fertilizer recommendations appropriate for the selected crops and growing medium.
Avoid replacing the entire mix unnecessarily when the existing material remains healthy and workable.
Protect the Wood From Repeated Moisture
Keep wooden legs out of constantly wet ground where practical.
Inspect exposed end grain and vulnerable joints.
Use appropriate exterior finishes according to product instructions, and repair deteriorating wood before structural strength is affected.
Conclusion
Understanding how to build an elevated raised garden bed starts with designing a stable structure that can support wet growing medium and drain properly.
A compact wooden planter with sturdy legs, reinforced framing, a supported bottom, and an appropriate growing depth is a practical starting point for gardening above ground level.
The most important construction decisions involve support connections, bottom strength, drainage, and comfortable working height.
For a beginner-friendly project, a planter approximately 4 feet long and 2 feet wide provides useful growing space without becoming unnecessarily large.
Choose materials suited to outdoor conditions, verify the load-bearing design, and use a lightweight growing mix appropriate for contained planting.
A carefully planned elevated bed can provide convenient access to herbs, leafy greens, and other compact crops while reducing the need to bend or kneel during everyday gardening.
FAQs About How to Build an Elevated Raised Garden Bed
How High Should an Elevated Raised Garden Bed Be?
An overall height of approximately 30–34 inches is a practical starting point for many standing gardeners. However, the most comfortable height depends on personal reach and mobility needs. For seated or wheelchair gardening, adjust the design to provide adequate knee clearance and accessible reach.
What Size Wood Should I Use for the Legs?
Sturdy 4×4 lumber is commonly used for the main legs of small wooden elevated planters. However, leg size alone does not establish structural capacity. The connections, cross supports, overall dimensions, and saturated soil weight must also be considered.
How Deep Should an Elevated Raised Garden Bed Be?
Approximately 10–12 inches of growing depth can support many leafy greens and compact vegetables. Larger or deeper-rooted crops may require additional depth and soil volume. Remember that an elevated bed has a bottom, so roots cannot extend into the ground beneath it.
Does an Elevated Raised Garden Bed Need a Bottom?
Yes. A bed supported on legs needs a structurally adequate bottom to hold the growing medium. The bottom can use properly supported slats or another suitable construction system, but it must provide an effective path for excess water to drain.
Should I Put Plastic or Landscape Fabric at the Bottom?
Water-permeable landscape fabric is often useful for keeping growing medium from escaping through drainage gaps. Waterproof plastic should not seal the bottom unless the planter has a specifically designed drainage system. Fabric alone cannot support the weight of the soil.
Can I Build an Elevated Raised Bed Without Power Tools?
Yes, it is possible to build a small elevated planter using precut lumber, a handsaw when needed, manual fastening tools, and suitable structural connectors. However, the construction still needs secure load-bearing joints, proper alignment, and enough support for saturated soil.
Can I Put an Elevated Raised Garden Bed on a Deck?
Possibly, but first verify that the deck can safely support the planter’s full saturated weight and any additional loads. Position the bed so drainage water cannot damage the decking or nearby structures. For large planters or uncertain structural capacity, seek professional guidance before installation.

I’m Maya L. Greenwood, a lifelong plant lover who believes anyone can grow something beautiful with the right guidance. After years of testing soil mixes, pruning methods, irrigation tricks, and pest-safe solutions, I started EasyGardenTips.com to turn hard-won lessons into step-by-step advice. From seed starting and container gardens to composting and seasonal checklists, my goal is to make gardening simple, sustainable, and fun.