
A grow tent gives indoor plants the ideal environment for healthy growth, but controlling unwanted odors can be one of the biggest challenges for indoor growers. As plants mature, natural aromas can become stronger and may spread outside the growing area if the ventilation system is not properly designed.
While no grow tent can be completely 100% smell-proof, you can make it nearly odor-free by using the right combination of activated carbon filtration, negative air pressure, proper airflow, and airtight sealing. These methods help ensure that air leaving the tent is filtered before entering your home or surrounding space.
In this guide, I’ll explain how to make a grow tent smell proof, including the equipment you need, how to set up your ventilation system correctly, and the common mistakes that reduce odor control effectiveness. Whether you have a small indoor grow tent or a larger setup, these techniques can help you manage smells more effectively.
Can You Really Make a Grow Tent Smell Proof?
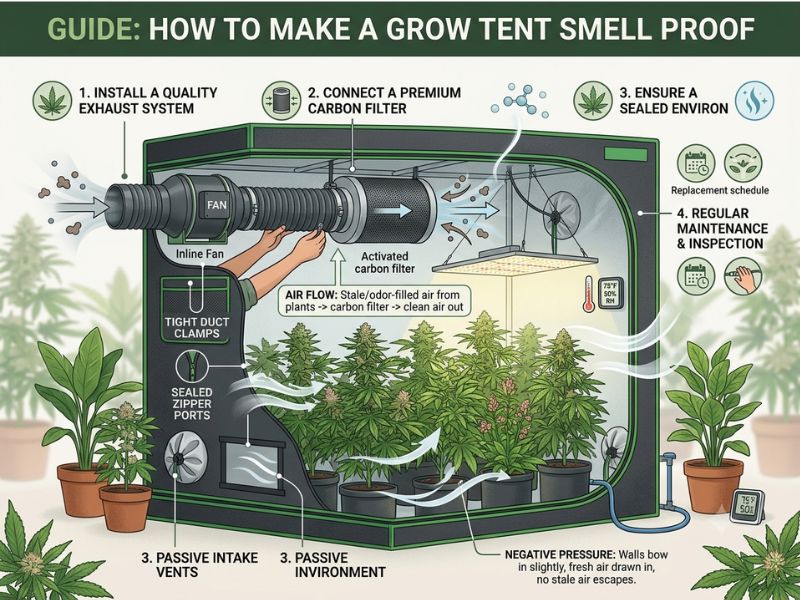
Many indoor growers wonder if it is possible to make a grow tent completely smell proof. The reality is that no grow tent can be 100% airtight or permanently odor-proof because tents are made with fabric walls, zippers, ventilation ports, and access openings. Small amounts of air can escape if the setup is not properly designed.
However, a well-built odor control system can make a grow tent nearly smell-free outside the tent. The goal is not to eliminate plant odors completely but to prevent untreated air from escaping into your room or home.
Effective odor control depends on three main factors:
1. Proper Air Filtration
The exhaust air leaving your grow tent should pass through an activated carbon filter. Carbon filters trap odor molecules before the air exits the growing area.
A high-quality filter with enough carbon depth and the correct airflow rating can remove most unwanted smells when paired with the right exhaust fan.
2. Negative Air Pressure
Your grow tent should operate under negative air pressure, meaning the exhaust fan removes air faster than fresh air enters.
This creates a slight inward pull on the tent walls and ensures that air leaves only through the filtered exhaust system instead of leaking through zippers or seams.
3. Air Leak Prevention
Even the best carbon filter will not work properly if unfiltered air escapes from the tent. Small gaps around duct openings, vents, zippers, and seams can allow odors to spread.
Sealing these areas and maintaining proper airflow direction are essential for effective smell control.
A properly configured grow tent with a quality carbon filter, correctly sized exhaust fan, and sealed openings can significantly reduce odors and keep the surrounding area much fresher. The next step is choosing and installing the right carbon filter system, which is the foundation of grow tent odor control.
Use a High-Quality Carbon Filter for Odor Control
The most important component for making a grow tent smell proof is a carbon filter. An activated carbon filter works by trapping odor-causing molecules as air passes through the filter media. Instead of allowing strong smells to escape with the exhaust air, the carbon absorbs and holds those compounds before the air leaves the tent.
A properly installed carbon filter can remove most unwanted odors, but its effectiveness depends on choosing the correct size and matching it with your exhaust fan.
Choose the Right Carbon Filter Size
A common mistake is buying a carbon filter based only on the physical size of the grow tent. The filter must also match the airflow capacity of your inline fan.
Important factors to consider include:
- Grow tent volume – Larger tents require more airflow and larger filters.
- Fan CFM rating – The carbon filter should support the airflow produced by your exhaust fan.
- Carbon bed thickness – A deeper carbon layer generally provides better odor absorption.
- Filter quality – Higher-quality activated carbon typically performs better and lasts longer.
If air moves too quickly through a small filter, the carbon has less time to capture odor molecules, reducing the filter’s effectiveness.
Install the Carbon Filter Correctly
The best location for a carbon filter is usually inside the grow tent near the top, because warm, humid, and odor-filled air naturally rises.
A typical installation setup looks like this:
Carbon Filter → Inline Fan → Exhaust Duct → Outside the Growing Area
This arrangement pulls air through the carbon filter first, removes odors, and then pushes clean air out through the ducting.
Some growers install the fan before the filter (filter → fan → duct), while others use a setup where the fan pulls air through the filter. Both can work, but placing the fan after the filter often helps reduce odor leakage because all air leaving the tent has already passed through filtration.
Maintain Your Carbon Filter
Even the best carbon filter will lose effectiveness over time. Dust buildup, high humidity, and continuous use can reduce the carbon’s ability to trap odors.
To keep performance high:
- Keep humidity levels under control.
- Avoid exposing the carbon filter to unnecessary moisture.
- Clean the pre-filter regularly.
- Replace the filter when odors begin escaping.
A properly sized and maintained carbon filter is the foundation of any effective grow tent odor-control system. However, it works best when combined with negative air pressure and proper tent sealing.
Create Negative Air Pressure Inside the Grow Tent
Negative air pressure is one of the most important factors when trying to make a grow tent smell proof. Even a powerful carbon filter cannot control odors effectively if air is escaping from the tent through unfiltered openings.
A grow tent has negative air pressure when the exhaust fan removes more air than the intake system brings in. This creates a slight vacuum effect, causing the tent walls to pull inward.
When this happens, any air leaving the tent is forced to pass through the carbon filter instead of escaping through small gaps, zippers, or ventilation openings.
Why Negative Pressure Helps Control Smells
Maintaining negative pressure provides several benefits:
- Prevents untreated air from leaking outside the tent
- Forces all exhaust air through the carbon filter
- Improves odor removal efficiency
- Helps maintain stable temperature and humidity levels
Without negative pressure, strong smells can escape even when you have a high-quality carbon filter installed.
How to Check if Your Grow Tent Has Negative Pressure
You can perform a simple visual test:
- Turn on your exhaust fan.
- Close all tent doors and vents.
- Observe the tent walls.
- If the walls slightly pull inward, your airflow setup is working correctly.
If the walls expand outward or stay completely loose, your intake airflow may be too strong, or your exhaust fan may not be powerful enough.
How to Increase Negative Pressure
If your grow tent is not maintaining negative pressure, try these adjustments:
- Increase the exhaust fan speed.
- Reduce passive intake openings.
- Use a properly sized inline fan.
- Check for blocked ducting or dirty filters.
- Reduce unnecessary air leaks around the tent.
The goal is to create a gentle inward pull, not a strong vacuum. Excessive negative pressure can restrict airflow and make it harder for your plants to receive fresh air.
A balanced negative pressure system ensures that odor-filled air is always captured and filtered before leaving the grow tent. After achieving proper airflow control, the next step is sealing potential odor leaks around the tent structure.
Seal All Grow Tent Air Leaks
Even with a high-quality carbon filter and proper negative pressure, small air leaks can allow odors to escape from your grow tent. Grow tents are not completely airtight because they include zippers, ventilation ports, cable openings, and access flaps that can create small gaps.
To improve odor control, you need to make sure that any air leaving the tent passes through your filtration system.
Check Common Leak Points
Start by inspecting areas where air can escape, including:
- Tent zippers – Zippers are one of the most common weak points because they do not create a perfect seal.
- Ducting ports – Loose duct openings can allow untreated air to leak around the edges.
- Cable openings – Small holes designed for electrical cords can release odors if they are not properly closed.
- Unused ventilation sleeves – Open vents that are not being used can bypass the carbon filter.
- Stitching and seams – Low-quality tents may have small gaps along the seams.
Improve the Seal Around Openings
You can reduce air leaks by:
- Closing unused ventilation ports tightly.
- Using duct clamps or strong tape around duct connections.
- Keeping cable ports closed around wires.
- Replacing damaged zipper covers or tent parts.
- Choosing a high-quality grow tent with durable fabric and reinforced seams.
Avoid blocking necessary intake openings completely because your plants still need fresh air circulation. The goal is to control where air enters and exits, not to make the tent completely sealed.
Use the Exhaust System as the Main Exit Point
The ideal airflow path should be:
Fresh Air Intake → Grow Tent → Carbon Filter → Exhaust Fan → Outside Area
This ensures that odor-containing air has only one controlled exit route. If air can escape from multiple points, the carbon filter cannot capture all odors.
Proper sealing works together with negative pressure. When your tent is slightly under negative pressure and all possible leaks are minimized, almost all outgoing air is forced through the carbon filter, greatly improving odor control.
Install Proper Ducting for Better Odor Control
The ducting system plays an important role in keeping a grow tent odor controlled. Even with a powerful carbon filter, poor duct installation can reduce airflow efficiency and allow smells to escape before the air is properly filtered.
A well-designed duct system ensures that odor-filled air travels directly through the carbon filter and exits safely through the exhaust route.
Use the Correct Ducting Size
Your duct diameter should match your inline fan and carbon filter size. Using ducting that is too small can restrict airflow, reduce fan performance, and make odor removal less effective.
Common duct sizes include:
- 4-inch ducting for smaller grow tents
- 6-inch ducting for medium-sized tents
- 8-inch ducting for larger growing areas
Always follow the airflow rating of your fan and filter when selecting ducting.
Keep Duct Runs Short and Straight
Long or complicated duct routes create resistance and reduce airflow. For better performance:
- Use the shortest possible duct path.
- Avoid unnecessary bends and sharp turns.
- Keep ducting stretched tightly instead of allowing it to collapse.
- Remove any blockages inside the duct.
Every bend in the ducting reduces airflow efficiency, which can lower the amount of air passing through your carbon filter.
Secure All Duct Connections
Loose connections are a common reason odors escape. Make sure every connection between the carbon filter, fan, and exhaust duct is properly sealed.
Use:
- Duct clamps for secure connections
- Aluminum foil tape for sealing gaps
- Quality ducting materials that do not easily tear
Avoid relying only on regular tape because it can lose adhesion over time due to heat and humidity.
Avoid Exhausting Filtered Air Back Into the Room
The final exhaust location matters. If filtered air is released directly back into the same small room, odors may gradually build up, especially in enclosed spaces.
Whenever possible, direct exhaust air into a well-ventilated area where remaining odors can disperse.
A properly installed duct system helps your carbon filter and exhaust fan work together efficiently. Once airflow is optimized, the next step is choosing the correct exhaust fan size to maintain effective odor control.
Choose the Right Exhaust Fan Size for Your Grow Tent
Your exhaust fan is the engine that moves air through the carbon filter and removes odor-filled air from your grow tent. If the fan is too weak, air may not pass through the filter effectively, allowing smells to escape. If it is too powerful, it can reduce the contact time between air and carbon, lowering filtration performance.
Choosing the correct exhaust fan size helps maintain proper airflow, temperature, humidity, and odor control.
Calculate Your Grow Tent Airflow Requirements
Exhaust fans are usually measured in CFM (Cubic Feet per Minute), which indicates how much air the fan can move.
A basic calculation is:
Grow Tent Volume = Length × Width × Height
For example, a 4 ft × 4 ft × 6.5 ft grow tent has:
4 × 4 × 6.5 = 104 cubic feet
Most indoor growers aim to exchange the air inside the tent about once every 1–3 minutes. However, factors like heat from grow lights, humidity, and carbon filter resistance can increase airflow needs.
Consider Carbon Filter and Ducting Resistance
Your exhaust fan loses efficiency when air passes through:
- Carbon filters
- Duct bends
- Long duct runs
- Protective screens and vents
Because of this resistance, you usually need a fan with more capacity than the basic tent volume calculation suggests.
For example, if your tent requires around 100 CFM, choosing a fan rated slightly higher can help maintain proper airflow after adding a carbon filter and ducting.
Use a Variable Speed Inline Fan
A speed-controlled inline fan gives you better control over your grow tent environment.
Benefits include:
- Adjusting airflow based on plant growth stage
- Maintaining consistent negative pressure
- Reducing unnecessary noise
- Improving carbon filter performance
A fan running at the correct speed is more effective than an oversized fan running inefficiently.
Balance Intake and Exhaust Airflow
Your exhaust fan should move slightly more air than your intake system provides. This creates the negative pressure needed for odor control.
A properly balanced system ensures:
- Fresh air enters through controlled openings
- Odor-filled air exits through the carbon filter
- Smells do not leak through gaps or seams
The right exhaust fan size is essential for a smell-controlled grow tent. After setting up proper airflow, managing odors inside the tent with additional techniques can further improve results.
Control Odors Inside the Grow Tent
A carbon filter and exhaust system are the foundation of odor control, but managing the environment inside the grow tent can also help reduce strong smells. Factors like humidity, plant health, airflow movement, and cleanliness all affect how noticeable odors become.
By keeping the grow environment balanced, you can reduce odor intensity and help your filtration system work more efficiently.
Maintain Proper Humidity Levels
High humidity can reduce carbon filter performance and create a more noticeable smell inside the growing area. Moist air makes it harder for activated carbon to effectively capture certain odor compounds.
To improve odor control:
- Monitor humidity with a digital hygrometer.
- Prevent excessive moisture buildup.
- Use a dehumidifier if humidity remains too high.
- Ensure proper air circulation inside the tent.
Stable humidity also helps prevent mold and improves overall plant health.
Improve Air Circulation Inside the Tent
An oscillating fan helps distribute air evenly throughout the grow tent. While it does not remove odors directly, it prevents stagnant air pockets where strong smells and excess moisture can accumulate.
Good internal airflow helps:
- Move odor-filled air toward the exhaust area.
- Maintain consistent temperature and humidity.
- Reduce stagnant areas around plants.
Make sure fans are positioned to move air around the plants without causing excessive stress.
Keep the Grow Tent Clean
Organic material, spilled nutrients, dead leaves, and standing water can create additional odors that your carbon filter must handle.
Regular maintenance includes:
- Removing dead plant material.
- Cleaning spills quickly.
- Emptying drainage trays.
- Keeping the tent floor clean.
- Checking for mold or mildew growth.
A clean growing environment reduces unnecessary odors and helps your filtration system focus on plant-related smells.
Avoid Overloading the Ventilation System
Adding too many plants or using equipment that produces excessive heat can increase odor levels and make your ventilation system work harder.
Make sure your:
- Carbon filter matches your tent size.
- Exhaust fan provides enough airflow.
- Ventilation system can handle heat and humidity loads.
Good odor control comes from a complete system rather than a single product. A clean environment, proper airflow, and effective filtration work together to keep your grow tent as odor-controlled as possible.
Maintain Your Carbon Filter for Long-Term Odor Control
A carbon filter is the most important part of a grow tent odor-control system, but it does not work forever. Over time, the activated carbon inside the filter becomes less effective as it captures more odor molecules, dust, and moisture.
Regular maintenance helps extend the life of your filter and ensures that your grow tent continues to control smells effectively.
Clean the Carbon Filter Pre-Filter Regularly
Most quality carbon filters include a removable fabric pre-filter around the outside. This layer captures dust, dirt, and airborne particles before they reach the carbon bed.
A dirty pre-filter can restrict airflow and reduce filtration performance.
To maintain it:
- Remove the pre-filter carefully.
- Wash it according to the manufacturer’s instructions.
- Allow it to dry completely before reinstalling.
- Check it regularly for dust buildup.
Keeping the pre-filter clean helps maintain proper airflow through the carbon.
Control Humidity Around the Filter
Moisture is one of the biggest factors that can reduce carbon filter performance. When activated carbon becomes exposed to excessive humidity, water molecules can occupy the adsorption sites that would normally capture odor compounds.
To protect your filter:
- Keep grow tent humidity at an appropriate level.
- Avoid placing the filter directly near sources of moisture.
- Ensure proper ventilation throughout the growing area.
A dry and clean carbon filter will generally perform better and last longer.
Replace the Carbon Filter When Performance Drops
The lifespan of a carbon filter depends on several factors, including:
- Filter quality
- Carbon amount
- Odor intensity
- Humidity levels
- Daily operating hours
Many carbon filters last around 12–24 months under typical indoor growing conditions, but heavily used systems may require replacement sooner.
Signs that your carbon filter may need replacement include:
- Odors becoming noticeable outside the tent.
- The filter no longer removes smells effectively.
- Reduced airflow due to clogged media.
- Visible damage to the filter housing.
Do Not Rely on an Old Filter
A common mistake is continuing to use a carbon filter long after its useful life. Even if the exhaust fan is working properly, an exhausted carbon filter cannot capture odors effectively.
Replacing the filter before odor problems appear helps maintain consistent performance.
A properly maintained carbon filter is the core of a smell-controlled grow tent. Combined with good airflow, sealing, and negative pressure, it creates a much more effective odor management system.
Common Mistakes That Make a Grow Tent Smell
Even with a carbon filter and exhaust fan, many growers experience odor problems because of small setup mistakes. A grow tent odor-control system only works properly when every part of the ventilation setup is installed and maintained correctly.
Understanding these common mistakes can help you improve your setup and prevent unwanted smells from escaping.
Using an Undersized Carbon Filter
One of the most common mistakes is choosing a carbon filter that is too small for the grow tent or exhaust fan.
A small filter may not contain enough activated carbon to remove odors effectively. In addition, if the fan pushes too much air through the filter, the air may move too quickly for proper odor absorption.
Always match your:
- Carbon filter size
- Exhaust fan CFM
- Grow tent size
- Duct diameter
for the best results.
Installing the Carbon Filter Incorrectly
The position and airflow direction of the carbon filter matter. If air does not pass through the carbon properly, odors can escape.
Common installation problems include:
- Placing the filter outside the tent without proper airflow design.
- Connecting ducting incorrectly.
- Leaving gaps around filter connections.
- Allowing unfiltered air to exit through other openings.
The goal is to make sure all exhaust air passes through the carbon filter before leaving the tent.
Running the Tent Without Negative Pressure
A grow tent that is not under negative pressure can leak odors through zippers, seams, and unused ports.
If your tent walls are pushing outward, air is likely escaping without filtration.
Adjusting fan speed, reducing unnecessary intake openings, or improving the exhaust setup can help restore proper airflow balance.
Ignoring Small Air Leaks
Many odor problems come from small leaks that are easy to overlook.
Check areas such as:
- Cable openings
- Unused duct ports
- Loose zipper areas
- Damaged tent fabric
- Poorly sealed duct connections
Even a small leak can allow noticeable odors to escape over time.
Neglecting Carbon Filter Replacement
A carbon filter loses effectiveness as the activated carbon becomes saturated. Continuing to use an old filter can create the impression that your ventilation system is failing when the actual problem is the exhausted carbon media.
Regularly inspect your filter and replace it when odor control performance decreases.
Poor Ventilation Maintenance
Dust buildup, blocked ducting, dirty fans, and restricted airflow can reduce the efficiency of your entire system.
Regular maintenance helps ensure:
- Better airflow
- Longer equipment life
- More consistent odor control
Avoiding these mistakes will significantly improve your grow tent’s ability to contain odors. A properly designed system is not just about buying expensive equipment—it is about installing, balancing, and maintaining everything correctly.
Final Checklist to Make a Grow Tent Smell Proof
Creating a smell-controlled grow tent requires multiple odor-control methods working together. A carbon filter alone is not enough if your ventilation system has leaks, poor airflow, or incorrect installation.
Use this checklist to improve your grow tent odor control:
✅ Install a Proper Carbon Filter
- Choose a carbon filter that matches your grow tent size and exhaust fan.
- Use a high-quality activated carbon filter with enough carbon depth.
- Replace the filter when odor removal performance decreases.
✅ Maintain Negative Air Pressure
- Make sure the exhaust fan removes air faster than fresh air enters.
- Check that tent walls slightly pull inward when the fan is running.
- Adjust fan speed or intake openings if air escapes from the tent.
✅ Seal Potential Air Leaks
Inspect and secure:
- Zippers
- Duct openings
- Cable ports
- Unused ventilation sleeves
- Damaged seams
Remember, filtered air should be the only air leaving your grow tent.
✅ Optimize Your Ventilation System
- Match your inline fan size with your carbon filter.
- Keep ducting short and avoid unnecessary bends.
- Secure all duct connections with proper clamps and sealing tape.
- Clean fans and vents regularly.
✅ Control the Growing Environment
- Keep humidity levels under control.
- Use internal circulation fans to prevent stagnant air.
- Remove dead leaves and organic waste.
- Keep the grow area clean.
✅ Monitor Odor Performance
Regularly check:
- Whether smells are noticeable outside the tent.
- Whether the carbon filter is still effective.
- Whether airflow has decreased.
- Whether any new air leaks have developed.
A completely 100% smell-proof grow tent is difficult to achieve because tents are not designed to be perfectly airtight. However, with a correctly sized carbon filter, proper ventilation, negative pressure, and good maintenance, you can reduce odors to a very low level.
By treating odor control as a complete system rather than relying on one piece of equipment, you can maintain a cleaner, more controlled indoor growing environment.
Frequently Asked Questions About Making a Grow Tent Smell Proof
Can a grow tent be completely smell proof?
No, a grow tent cannot be completely 100% smell proof because fabric tents have zippers, seams, vents, and access openings where small amounts of air can escape. However, a properly designed ventilation system with a quality carbon filter, negative air pressure, and sealed openings can reduce odors significantly.
What is the best way to remove smell from a grow tent?
The most effective method is using an activated carbon filter connected to an inline exhaust fan. The filter captures odor molecules before air leaves the tent. For the best results, combine carbon filtration with proper airflow, negative pressure, and regular maintenance.
Do I need a carbon filter for a grow tent?
A carbon filter is not always required for every indoor grow setup, but it is the most reliable solution for controlling strong odors. If odor management is important, a properly sized carbon filter is usually the best investment.
How do I stop grow tent smells from escaping?
To prevent odors from escaping:
- Use a properly sized carbon filter.
- Maintain negative air pressure.
- Seal unused openings and duct connections.
- Ensure all exhaust air passes through the filter.
- Replace an old or ineffective carbon filter.
How long does a carbon filter last in a grow tent?
Most carbon filters last around 12–24 months, depending on usage, humidity, odor intensity, and filter quality. High-humidity environments or heavy odor loads may shorten the lifespan.
Can I make a grow tent smell proof without a carbon filter?
It is very difficult to control strong odors without a carbon filter. Sealing leaks and improving ventilation may reduce smells, but they do not remove odor molecules from exhausted air. Carbon filtration is the most effective odor-control method.
Why does my grow tent still smell with a carbon filter?
If odors are escaping despite having a carbon filter, check for:
- Incorrect filter size
- Weak exhaust fan
- Lack of negative pressure
- Air leaks around zippers or ports
- Old carbon filter media
- Poor duct installation
Finding and fixing the weakest part of the ventilation system usually solves the problem.
Conclusion
Making a grow tent smell proof requires more than installing a single piece of equipment. The most effective odor-control setup combines a properly sized carbon filter, efficient exhaust fan, negative air pressure, sealed openings, and regular system maintenance.
While complete odor elimination is difficult, a well-designed grow tent ventilation system can keep most smells contained and prevent them from spreading outside your growing area. By maintaining proper airflow and replacing equipment when needed, you can create a cleaner and more controlled indoor growing environment.

I’m Maya L. Greenwood, a lifelong plant lover who believes anyone can grow something beautiful with the right guidance. After years of testing soil mixes, pruning methods, irrigation tricks, and pest-safe solutions, I started EasyGardenTips.com to turn hard-won lessons into step-by-step advice. From seed starting and container gardens to composting and seasonal checklists, my goal is to make gardening simple, sustainable, and fun.