Do You Need an Intake Fan in a Grow Tent? Complete Guide
If you’re setting up an indoor grow tent, one of the most common questions is whether you need an intake fan. The answer isn’t always straightforward. While some grow tents thrive with nothing more than a properly sized exhaust fan and passive air vents, others require an active intake fan to maintain healthy temperatures, humidity levels, and a steady supply of fresh air.
The right choice depends on several factors, including your tent size, grow lights, exhaust fan capacity, room temperature, and overall ventilation. Installing an intake fan when you don’t need one can add unnecessary cost and noise, while skipping it in a larger or hotter setup can lead to poor airflow and reduced plant performance.
In this guide, you’ll learn what an intake fan does, when passive intake is sufficient, when an active intake fan becomes necessary, and how to determine the best ventilation setup for your grow tent.
What Does an Intake Fan Do in a Grow Tent?
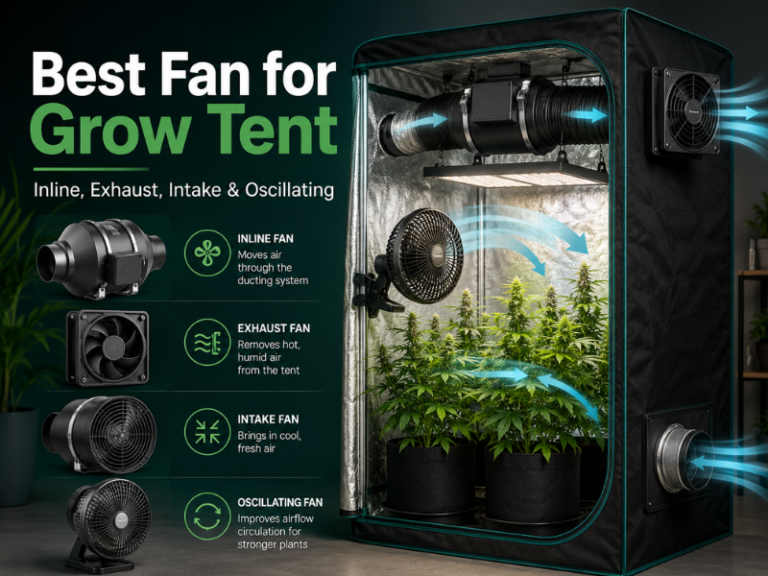
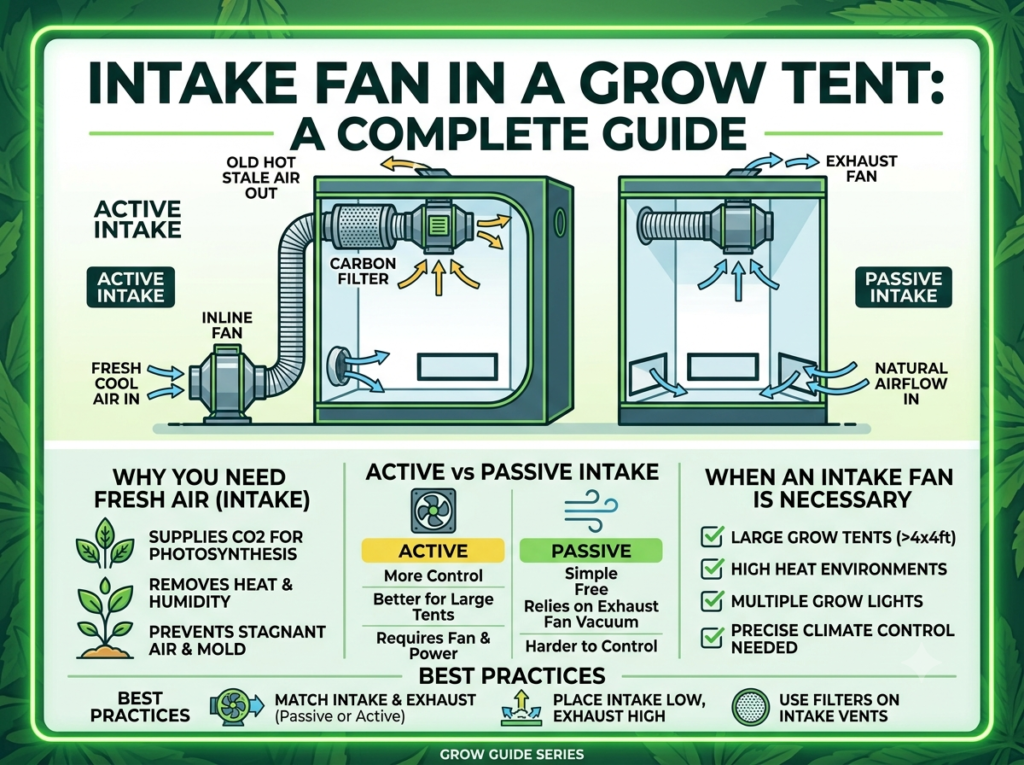
An intake fan supplies fresh air to your grow tent, helping create the stable environment plants need to thrive. While the exhaust fan removes hot, stale air from the top of the tent, the intake fan brings cooler, oxygen- and carbon dioxide-rich air inside. Together, they maintain continuous air exchange that supports healthy growth throughout the plant’s life cycle.
Whether you use an active intake fan or rely on passive intake vents, understanding the role of incoming airflow is essential before deciding if your grow tent actually needs an intake fan.
Brings Fresh Air Into the Tent
Plants rely on carbon dioxide (CO₂) for photosynthesis. As they consume CO₂, the concentration inside a closed grow tent gradually decreases. An intake fan continuously introduces fresh air from outside the tent, replenishing CO₂ levels and preventing the air from becoming stale.
Fresh air also helps maintain a healthier growing environment by reducing the buildup of heat, moisture, and odors. Without adequate air exchange, plant growth can slow, especially in tightly sealed grow spaces.
Helps Control Temperature
Grow lights, especially high-powered LEDs and HID lights, generate heat that can quickly raise the temperature inside a grow tent. An intake fan brings in cooler outside air while the exhaust fan removes warm air, helping maintain a consistent temperature.
Stable temperatures reduce plant stress and allow crops to grow more efficiently. If the air entering the tent is significantly cooler than the air inside, an intake fan can make temperature management much easier.
Helps Manage Humidity
Plants release moisture through transpiration, causing humidity levels to rise inside the tent. High humidity can create favorable conditions for mold, mildew, and fungal diseases, particularly during the flowering stage.
A steady supply of fresh air helps remove excess moisture and keeps humidity within the ideal range for your plants. This creates a healthier environment and reduces the likelihood of moisture-related problems.
Maintains Proper Air Exchange
An intake fan works with the exhaust fan to create continuous airflow throughout the grow tent. Fresh air enters near the bottom, moves upward through the plant canopy, and exits through the exhaust system at the top.
This constant air exchange prevents stagnant air pockets, distributes heat more evenly, and supports stronger plant growth. Proper airflow also improves the effectiveness of oscillating fans, ensuring that every part of the tent receives fresh, moving air.
Do You Actually Need an Intake Fan?
The short answer is no—not every grow tent needs an intake fan.
In many home grow setups, a properly sized exhaust fan and passive intake vents provide enough fresh air to maintain healthy temperatures, humidity, and CO₂ levels. This is known as passive intake, where the exhaust fan creates negative pressure that naturally pulls fresh air into the tent through open intake vents.
However, passive intake isn’t suitable for every situation. Larger grow tents, high-heat lighting systems, or rooms with poor ventilation may require an active intake fan to deliver enough fresh air. The key is understanding your growing environment rather than assuming every tent needs the same ventilation setup.
Situations Where You May Not Need an Intake Fan
Many indoor growers never install an intake fan because their setup doesn’t require one. Passive intake is often sufficient when the following conditions apply:
You Have a Small Grow Tent
Smaller tents, such as 2×2, 2×4, or 3×3 feet, contain less air volume, making them easier to ventilate. A quality exhaust fan can usually replace the air inside these tents without assistance.
You’re Using Efficient LED Grow Lights
Modern LED grow lights produce much less heat than traditional HID or HPS lighting. With lower heat output, the exhaust fan can usually keep temperatures under control while drawing fresh air through passive vents.
Your Grow Room Stays Cool
If the room surrounding your grow tent has good ventilation and moderate temperatures, fresh air can easily flow into the tent without the help of an intake fan.
Your Exhaust Fan Creates Proper Negative Pressure
One sign that passive intake is working correctly is slight negative pressure. The tent walls should pull inward slightly while the exhaust fan is running. This indicates that fresh air is entering through the intake vents as intended.
If temperatures, humidity, and plant health remain stable under these conditions, adding an intake fan is unlikely to provide significant benefits.
Situations Where You Do Need an Intake Fan
While passive intake works for many growers, some setups demand more airflow than passive vents can provide.
You Have a Large Grow Tent
Large tents, such as 4×8, 5×5, or larger, require much more air exchange. Passive vents may not supply enough fresh air to match the exhaust fan’s capacity, making an active intake fan a worthwhile upgrade.
Your Grow Lights Produce Significant Heat
High-powered LEDs, HID, MH, and HPS lights generate considerable heat. If your exhaust fan struggles to maintain the desired temperature, an intake fan can increase airflow and improve cooling.
You Grow in a Hot Climate
When the surrounding room is already warm, passive airflow may not deliver enough cool air into the tent. An active intake fan helps move larger volumes of air through the growing space, reducing heat buildup.
Your Ducting Restricts Airflow
Long duct runs, multiple bends, carbon filters, or silencers can reduce the effectiveness of an exhaust system. If airflow is restricted, an intake fan helps compensate by supplying fresh air more efficiently.
You’re Running a High-Performance Grow
Growers aiming for maximum yields often install active intake systems to maintain consistent environmental conditions. Better airflow can improve temperature stability, humidity control, and overall plant performance, especially in densely planted tents.
In these situations, an intake fan isn’t just an optional accessory—it can become an important part of maintaining an optimal growing environment.
Passive Intake vs. Active Intake
When deciding whether you need an intake fan, it’s important to understand the two main ways fresh air enters a grow tent: passive intake and active intake. Both methods serve the same purpose—bringing fresh air into the tent—but they work differently and are suited to different growing conditions.
For most home growers, passive intake is the simpler and more cost-effective option. However, active intake can provide better airflow and environmental control in larger or more demanding setups.
What Is Passive Intake?
Passive intake relies on your exhaust fan to draw fresh air into the grow tent. As the exhaust fan removes warm, stale air, it creates slight negative pressure inside the tent. This pressure difference naturally pulls fresh air through the tent’s lower intake vents.
No additional fan is required. Most grow tents are designed with screened intake ports specifically for passive ventilation.
Advantages of Passive Intake
- Lower equipment cost since no intake fan is needed.
- Quieter operation with fewer moving parts.
- Uses less electricity.
- Easier to install and maintain.
- Works well for most small and medium-sized grow tents.
Disadvantages of Passive Intake
- Airflow depends entirely on the exhaust fan.
- Less effective in large grow tents.
- May struggle to keep temperatures down in hot environments.
- Provides less control over the volume of incoming air.
What Is Active Intake?
Active intake uses a dedicated intake fan to push fresh air into the grow tent. Instead of relying solely on negative pressure, the fan actively delivers outside air, increasing the overall air exchange rate.
This setup is commonly used in larger tents, commercial grow rooms, or environments where passive airflow isn’t sufficient.
Advantages of Active Intake
- Delivers a higher volume of fresh air.
- Improves cooling in hot grow environments.
- Helps stabilize humidity levels.
- Supports larger tents and more powerful lighting systems.
- Reduces the workload on the exhaust fan.
Disadvantages of Active Intake
- Higher upfront cost.
- Increased electricity consumption.
- More equipment to install and maintain.
- Can create positive pressure if the intake fan is too powerful, allowing odors to escape around zippers or seams.
Which One Is Better?
For most hobby growers using tents up to 3×3 or 4×4 feet, passive intake is usually all that’s needed. A properly sized exhaust fan can maintain adequate airflow, temperature, and humidity without the added expense of an intake fan.
An active intake becomes a better choice when:
- Your grow tent is large.
- Heat builds up despite a strong exhaust fan.
- Passive vents can’t supply enough fresh air.
- Your ducting significantly restricts airflow.
- You’re aiming for maximum environmental control and higher yields.
Regardless of which system you choose, the goal is the same: maintain a steady supply of fresh air while allowing stale, warm air to leave the tent efficiently. Matching your ventilation system to your tent size and growing conditions will produce better results than simply adding more fans.
Signs Your Grow Tent Needs an Intake Fan
If you’re unsure whether passive intake is enough, your grow tent will often show clear signs when it isn’t getting sufficient fresh air. High temperatures, excessive humidity, or poor plant growth can all indicate that your current ventilation system isn’t keeping up.
Before purchasing an intake fan, check for the following symptoms. If you notice one or more of these issues despite having a properly functioning exhaust fan, upgrading to an active intake system may help.
Temperatures Stay Too High
One of the most common signs is consistently high temperatures inside the grow tent. If the temperature remains above the ideal range even with the exhaust fan running at full speed, passive intake may not be supplying enough cool air.
This is especially common when using high-powered grow lights or growing in a warm room. An intake fan can increase airflow, helping replace hot air with cooler air more quickly.
Humidity Is Difficult to Control
Plants naturally release moisture through transpiration. If humidity stays too high despite good exhaust ventilation, your tent may not be exchanging air fast enough.
Excess humidity can lead to problems such as:
- Mold and mildew
- Bud rot during flowering
- Fungal diseases
- Slower drying of the growing environment
An intake fan increases the amount of fresh, drier air entering the tent, making humidity easier to manage.
Tent Walls Are Excessively Sucked In
A slight inward pull on the tent walls is normal and indicates proper negative pressure. However, if the walls are heavily collapsing inward, the exhaust fan may be pulling more air out than the passive vents can supply.
This excessive negative pressure can reduce airflow efficiency and put unnecessary strain on the exhaust fan. Adding an intake fan—or opening additional intake vents—can help balance the airflow.
Plants Show Signs of Poor Air Exchange
Poor ventilation affects more than just temperature and humidity. Plants may also show symptoms such as:
- Slow or stunted growth
- Weak stems
- Drooping leaves
- Reduced vigor
- Lower yields than expected
While these symptoms can have multiple causes, inadequate fresh air is one possibility, especially if environmental conditions are also difficult to maintain.
The Exhaust Fan Can’t Keep Up
If your exhaust fan runs continuously but the grow tent still feels hot, humid, or stuffy, it may simply not be receiving enough replacement air.
This often happens in:
- Large grow tents
- Tents with long duct runs
- Systems using carbon filters that reduce airflow
- Grow rooms with limited fresh air circulation
In these situations, an active intake fan can improve the overall efficiency of the ventilation system by ensuring the exhaust fan always has enough incoming air to work with.
Don’t Forget to Check Other Factors
Before concluding that you need an intake fan, make sure the rest of your ventilation system is working properly. A dirty carbon filter, blocked intake vents, undersized exhaust fan, or poor room ventilation can cause many of the same symptoms.
If those issues have been addressed and airflow is still insufficient, installing an intake fan is often the next logical step.
How to Tell if Passive Intake Is Working Properly
Not every grow tent needs an active intake fan, so it’s worth checking whether your passive intake system is already doing its job. A few simple observations can help you determine if enough fresh air is entering the tent and whether your plants are growing under stable conditions.
If the following checks all look good, there’s a good chance your passive intake is providing sufficient airflow.
Check Tent Temperature
Start by monitoring the temperature inside your grow tent using a reliable thermometer or digital hygrometer.
While the ideal temperature depends on the plant species and growth stage, the important factor is consistency. If temperatures remain within your target range while the lights are on and off, your passive intake is likely supplying enough fresh air.
If temperatures regularly climb above your target despite a properly sized exhaust fan, passive airflow may not be enough.
Monitor Humidity Levels
Humidity is another good indicator of how well your ventilation system is performing.
When passive intake is working correctly, humidity should stay relatively stable and appropriate for your plants’ growth stage. If moisture levels remain excessively high or fluctuate dramatically, your tent may not be exchanging air quickly enough.
Using a digital hygrometer with temperature and humidity readings makes it easy to track changes throughout the day.
Observe Tent Wall Pressure
One of the simplest tests requires no tools at all.
Turn on your exhaust fan and look at the tent walls:
- Slight inward movement indicates healthy negative pressure and proper passive intake.
- No inward movement may suggest air leaks around zippers or seams.
- Severe inward collapse often means the exhaust fan is pulling more air than the intake vents can provide.
The goal is a slight inward pull—not excessive suction.
Watch Airflow Around the Plants
Healthy airflow should gently move leaves without causing them to flap violently.
You can check this by observing the plants while your oscillating fans and ventilation system are running. Air should circulate evenly throughout the canopy without creating stagnant areas.
If some parts of the tent feel noticeably warmer or more humid than others, improving ventilation may be necessary.
Monitor Plant Health and Growth
Ultimately, your plants are one of the best indicators of whether passive intake is working.
Healthy plants typically show:
- Strong, upright growth
- Firm stems
- Consistent leaf color
- Vigorous new growth
- Normal flowering or fruit development
If environmental conditions remain stable and your plants continue growing well, your passive intake system is likely providing enough fresh air.
Use Environmental Monitors for Greater Accuracy
For growers who want more precise control, environmental monitors can provide valuable data on temperature, humidity, and airflow trends. Some advanced systems can even automate ventilation based on sensor readings.
While these tools aren’t essential for most home growers, they can help identify ventilation issues before they begin affecting plant health.
By regularly monitoring your grow tent, you can confidently determine whether passive intake is meeting your plants’ needs or if it’s time to upgrade to an active intake fan.
What Size Intake Fan Do You Need?
If you’ve determined that your grow tent would benefit from an active intake system, the next step is choosing the right fan size. An intake fan that’s too small won’t provide enough fresh air, while one that’s too powerful can create positive pressure, reducing the effectiveness of your exhaust fan and allowing odors to escape.
In most cases, the intake fan should support your exhaust fan—not overpower it.
Match the Intake Fan to the Exhaust Fan
A common rule of thumb is to use an intake fan with a slightly lower airflow (CFM) than your exhaust fan. This helps maintain slight negative pressure inside the grow tent, which is ideal for proper ventilation and odor control.
For example:
- If your exhaust fan is rated at 200 CFM, an intake fan in the 150–180 CFM range is often a good match.
- If both fans have adjustable speed controllers, you can fine-tune airflow to maintain balanced ventilation.
Keeping the exhaust fan slightly stronger ensures stale air continues to leave the tent efficiently.
Common Intake Fan Sizes
The duct size of your intake fan should generally match your exhaust system.
4-Inch Intake Fan
A 4-inch fan is suitable for:
- 2×2 grow tents
- 2×4 grow tents
- 3×3 grow tents
- Small LED grow setups
These fans typically provide enough airflow for compact indoor gardens.
6-Inch Intake Fan
A 6-inch fan is a good choice for:
- 4×4 grow tents
- 4×8 grow tents
- Medium-sized grow rooms
- Higher-powered lighting systems
This size offers significantly greater airflow while remaining relatively quiet.
8-Inch Intake Fan
An 8-inch intake fan is usually reserved for:
- Large grow tents
- Commercial grow rooms
- High-heat lighting systems
- Multi-light installations
For most home growers, an 8-inch intake fan is larger than necessary.
Intake Fan CFM Recommendations
Although every grow setup is different, these general guidelines work well for many indoor gardens:
| Grow Tent Size | Recommended Intake |
| 2×2 ft | Passive intake or 4-inch fan |
| 2×4 ft | Passive intake or 4-inch fan |
| 3×3 ft | Passive intake or 4-inch fan |
| 4×4 ft | 4-inch or 6-inch fan (if needed) |
| 4×8 ft | 6-inch intake fan |
| 5×5 ft and larger | 6-inch or 8-inch fan, depending on airflow needs |
These are starting points rather than strict rules. Factors such as grow light heat output, duct length, carbon filters, and room temperature can all affect the airflow required.
Don’t Oversize Your Intake Fan
Bigger isn’t always better. An oversized intake fan can force more air into the tent than the exhaust fan can remove, creating positive pressure. This may cause odors to leak through small openings and reduce the efficiency of your ventilation system.
If you’re unsure which size to choose, it’s generally better to select an intake fan with adjustable speed control. This allows you to increase or decrease airflow as your grow environment changes without replacing the fan.
How to Set Up an Intake Fan in a Grow Tent
Installing an intake fan correctly is just as important as choosing the right size. Proper placement and airflow balance help maintain stable temperatures, control humidity, and ensure fresh air reaches your plants without disrupting the effectiveness of the exhaust system.
Follow these best practices when setting up an active intake fan.
Position the Intake Fan Near the Bottom of the Tent
Fresh air should enter the grow tent from the lower intake ports. Since cool air naturally settles near the floor, placing the intake fan at the bottom allows it to push cooler air upward through the plant canopy.
Avoid mounting the intake fan near the top of the tent, as this can interfere with the natural flow of air and reduce ventilation efficiency.
Keep the Exhaust Fan at the Top
Warm air naturally rises, making the roof of the grow tent the ideal location for the exhaust fan.
With the intake fan at the bottom and the exhaust fan at the top, air moves in a continuous upward path:
- Fresh air enters through the intake fan.
- Air circulates around the plants.
- Warm, humid air rises.
- The exhaust fan removes stale air from the top of the tent.
This airflow pattern helps maintain a more consistent growing environment.
Maintain Slight Negative Pressure
Your intake and exhaust fans should work together rather than compete.
Ideally, the exhaust fan should move slightly more air than the intake fan. This creates gentle negative pressure, which:
- Improves odor control.
- Prevents stale air from lingering.
- Encourages continuous fresh-air exchange.
- Helps carbon filters work more effectively.
If your intake fan has a speed controller, adjust it until the tent walls pull inward slightly without collapsing excessively.
Add Dust and Insect Filters
Fresh air can carry dust, pollen, insects, and other contaminants into your grow tent.
Installing a filter over the intake fan or intake vent helps:
- Keep the grow space cleaner.
- Reduce pest problems.
- Protect equipment from dust buildup.
- Improve overall air quality.
Clean or replace filters regularly to prevent airflow restrictions.
Test Airflow After Installation
Once everything is connected, run both fans and check that the system is working properly.
Look for these signs:
- The tent walls pull inward slightly.
- Air flows evenly throughout the canopy.
- Temperature remains stable.
- Humidity stays within your target range.
- Leaves move gently from circulating air.
If temperatures remain high or airflow seems weak, inspect your ducting for sharp bends, obstructions, or leaks. You may also need to adjust fan speeds to achieve better balance.
Fine-Tune Your Ventilation Over Time
Every grow environment is different. As plants grow larger or seasonal temperatures change, you may need to adjust your intake fan speed or ventilation schedule.
Regularly monitor temperature and humidity, especially after adding new equipment or changing your lighting setup. Small adjustments can make a noticeable difference in maintaining an ideal environment throughout the growing cycle.
Common Intake Fan Mistakes to Avoid
An intake fan can improve your grow tent’s environment, but only when it’s installed and used correctly. Choosing the wrong fan size or setting up your ventilation system improperly can reduce airflow efficiency and create new problems instead of solving existing ones.
Here are some of the most common mistakes growers make and how to avoid them.
Using an Intake Fan That’s More Powerful Than the Exhaust Fan
One of the biggest mistakes is installing an intake fan that pushes more air into the tent than the exhaust fan can remove.
This creates positive pressure, which can:
- Reduce the effectiveness of your exhaust system.
- Allow odors to escape through zippers and seams.
- Make carbon filters less effective.
- Disrupt proper airflow.
To avoid this, keep your exhaust fan slightly more powerful than your intake fan so the tent maintains gentle negative pressure.
Blocking Intake Vents
Even if you use an active intake fan, your intake vents should remain unobstructed unless they’re intentionally sealed.
Avoid placing boxes, walls, furniture, or other equipment directly in front of intake openings. Restricted airflow forces the fans to work harder while reducing the amount of fresh air entering the tent.
If you’re relying on passive intake, keeping vents fully open is even more important.
Ignoring Negative Pressure
Some growers focus only on fan size without checking whether the ventilation system is actually balanced.
A healthy grow tent should show slight inward movement of the walls while the exhaust fan is running. If the walls don’t move at all, you may have air leaks. If they collapse dramatically inward, your intake airflow is probably too limited.
Checking tent pressure regularly helps identify ventilation issues before they affect plant growth.
Poor Duct Routing
Long duct runs and multiple sharp bends reduce airflow significantly.
To improve ventilation efficiency:
- Keep ducting as short as possible.
- Minimize unnecessary bends.
- Use smooth, gradual curves instead of tight angles.
- Check ducts for kinks or obstructions.
Better duct routing allows both intake and exhaust fans to move air more efficiently.
Forgetting to Filter Incoming Air
Fresh air doesn’t always mean clean air.
Without an intake filter, your grow tent can collect:
- Dust
- Pollen
- Insects
- Pet hair
- Airborne debris
Over time, these contaminants can affect plant health and increase maintenance requirements. Installing a simple intake filter helps keep the growing environment cleaner while protecting your equipment.
Running Fans at Full Speed All the Time
Many modern inline fans include variable speed controllers, but some growers leave them running at maximum speed continuously.
Higher fan speeds aren’t always necessary and can:
- Increase electricity usage.
- Produce more noise.
- Lower humidity more than desired.
- Shorten fan lifespan.
Instead, adjust fan speeds based on your grow tent’s temperature and humidity. Running fans only as fast as needed creates a more stable environment and improves energy efficiency.
By avoiding these common mistakes, you’ll get better performance from your ventilation system and create healthier conditions for your plants throughout every stage of growth.
Alternatives to Installing an Intake Fan
If your grow tent isn’t maintaining the ideal environment, installing an active intake fan isn’t your only option. In many cases, you can improve airflow, reduce heat, and control humidity with a few simple adjustments to your existing ventilation system.
Before spending money on another fan, consider these alternatives.
Increase Passive Intake Openings
The easiest solution is to improve passive airflow.
Most grow tents have multiple screened intake vents near the bottom. If only one vent is open, try opening an additional vent to allow more fresh air into the tent.
Just be sure the intake vents remain clean and unobstructed so air can flow freely.
Upgrade Your Exhaust Fan
Sometimes the problem isn’t a lack of intake—it’s an undersized exhaust fan.
If your current exhaust fan can’t remove enough warm, humid air, replacing it with a higher-capacity model may solve the issue without adding an intake fan.
When selecting an exhaust fan, consider factors such as:
- Grow tent size
- Heat output from your grow lights
- Carbon filter resistance
- Duct length and bends
A properly sized exhaust fan often provides enough negative pressure for passive intake to work effectively.
Improve Room Ventilation
Remember that your grow tent can only pull in the air that’s available in the surrounding room.
If the room is hot, humid, or poorly ventilated, the tent will continuously draw in low-quality air. Improving the room itself can make a noticeable difference.
Simple ways to improve room ventilation include:
- Opening a window when weather permits.
- Running a room exhaust fan.
- Using an air conditioner during hot weather.
- Adding a dehumidifier if humidity is consistently high.
Creating a cooler, fresher environment outside the tent helps the ventilation system perform more efficiently.
Use Oscillating Fans for Better Air Circulation
Oscillating fans don’t bring fresh air into the grow tent, but they play an important role in air movement.
By circulating air throughout the canopy, they help:
- Eliminate stagnant air pockets.
- Distribute heat more evenly.
- Strengthen plant stems.
- Reduce moisture buildup on leaves.
For best results, use oscillating fans alongside a properly functioning exhaust system.
Optimize Your Grow Tent Layout
The placement of equipment inside the tent can also affect airflow.
Avoid overcrowding plants or blocking air pathways with large pots, equipment, or hanging accessories. Leave enough space between plants for air to circulate freely around the canopy.
A well-organized grow tent allows both fresh and exhaust air to move more efficiently.
When an Intake Fan Is Still the Best Solution
While these alternatives can solve many airflow issues, they aren’t always enough.
If you’ve already:
- Opened additional intake vents,
- Upgraded your exhaust fan,
- Improved room ventilation,
- Optimized airflow inside the tent,
and you’re still dealing with excessive heat, humidity, or poor air exchange, installing an active intake fan is likely the most effective long-term solution.
For many small home grow tents, however, these simple improvements are enough to achieve a healthy growing environment without the added cost and complexity of an intake fan.
Alternatives to Installing an Intake Fan
If your grow tent isn’t maintaining the ideal environment, installing an active intake fan isn’t your only option. In many cases, you can improve airflow, reduce heat, and control humidity with a few simple adjustments to your existing ventilation system.
Before spending money on another fan, consider these alternatives.
Increase Passive Intake Openings
The easiest solution is to improve passive airflow.
Most grow tents have multiple screened intake vents near the bottom. If only one vent is open, try opening an additional vent to allow more fresh air into the tent.
Just be sure the intake vents remain clean and unobstructed so air can flow freely.
Upgrade Your Exhaust Fan
Sometimes the problem isn’t a lack of intake—it’s an undersized exhaust fan.
If your current exhaust fan can’t remove enough warm, humid air, replacing it with a higher-capacity model may solve the issue without adding an intake fan.
When selecting an exhaust fan, consider factors such as:
- Grow tent size
- Heat output from your grow lights
- Carbon filter resistance
- Duct length and bends
A properly sized exhaust fan often provides enough negative pressure for passive intake to work effectively.
Improve Room Ventilation
Remember that your grow tent can only pull in the air that’s available in the surrounding room.
If the room is hot, humid, or poorly ventilated, the tent will continuously draw in low-quality air. Improving the room itself can make a noticeable difference.
Simple ways to improve room ventilation include:
- Opening a window when weather permits.
- Running a room exhaust fan.
- Using an air conditioner during hot weather.
- Adding a dehumidifier if humidity is consistently high.
Creating a cooler, fresher environment outside the tent helps the ventilation system perform more efficiently.
Use Oscillating Fans for Better Air Circulation
Oscillating fans don’t bring fresh air into the grow tent, but they play an important role in air movement.
By circulating air throughout the canopy, they help:
- Eliminate stagnant air pockets.
- Distribute heat more evenly.
- Strengthen plant stems.
- Reduce moisture buildup on leaves.
For best results, use oscillating fans alongside a properly functioning exhaust system.
Optimize Your Grow Tent Layout
The placement of equipment inside the tent can also affect airflow.
Avoid overcrowding plants or blocking air pathways with large pots, equipment, or hanging accessories. Leave enough space between plants for air to circulate freely around the canopy.
A well-organized grow tent allows both fresh and exhaust air to move more efficiently.
When an Intake Fan Is Still the Best Solution
While these alternatives can solve many airflow issues, they aren’t always enough.
If you’ve already:
- Opened additional intake vents,
- Upgraded your exhaust fan,
- Improved room ventilation,
- Optimized airflow inside the tent,
and you’re still dealing with excessive heat, humidity, or poor air exchange, installing an active intake fan is likely the most effective long-term solution.
For many small home grow tents, however, these simple improvements are enough to achieve a healthy growing environment without the added cost and complexity of an intake fan.
Conclusion
So, do you need an intake fan in a grow tent? For many home growers, the answer is no. A properly sized exhaust fan combined with passive intake vents is often enough to provide fresh air, regulate temperature, and maintain healthy humidity levels.
However, if you’re growing in a large tent, using high-powered lights, dealing with excessive heat, or struggling to maintain proper airflow, an active intake fan can make a significant difference. It helps improve air exchange, supports more stable environmental conditions, and reduces the workload on your exhaust system.
Before buying an intake fan, evaluate your current setup. Monitor your tent’s temperature, humidity, airflow, and plant health to determine whether passive intake is meeting your needs. If your ventilation system is already performing well, adding another fan may not provide any noticeable benefit. But if airflow is limiting your grow, upgrading to an active intake system can be a worthwhile investment.

I’m Maya L. Greenwood, a lifelong plant lover who believes anyone can grow something beautiful with the right guidance. After years of testing soil mixes, pruning methods, irrigation tricks, and pest-safe solutions, I started EasyGardenTips.com to turn hard-won lessons into step-by-step advice. From seed starting and container gardens to composting and seasonal checklists, my goal is to make gardening simple, sustainable, and fun.