How to Set Up a Grow Tent for Drying: Complete Step-by-Step Guide
Using a grow tent for drying is one of the most effective ways to control the drying environment for harvested plants or herbs. A properly set up drying tent helps maintain stable temperature, humidity, and airflow, which directly affects the quality, aroma, and overall preservation of the final product.
Drying is a sensitive stage. If the environment is too hot, too humid, or has poor airflow, it can lead to mold, uneven drying, or loss of quality. On the other hand, a well-controlled drying space helps preserve essential compounds and ensures a smooth, even drying process.
In this guide, I’ll walk you through how to convert a standard grow tent into a dedicated drying space with the right setup and environmental control.
Read More: how to set up a hydroponic grow tent
Read More: how to set up a normal grow tent
Step 1: Clean and Empty the Grow Tent
Before using your grow tent for drying, make sure it is completely empty and clean.
Remove:
- Plants or leftover organic material
- Pots and trays
- Lights and electrical equipment
- Fans and ducting (unless needed for drying setup)
- Any trellis netting or support structures
Wipe down the interior walls and floor tray using a clean, dry cloth. If needed, use a mild cleaning solution, but make sure everything is fully dry before proceeding.
A clean environment reduces the risk of contamination and unwanted odors during the drying process.
Step 2: Decide on Drying Layout
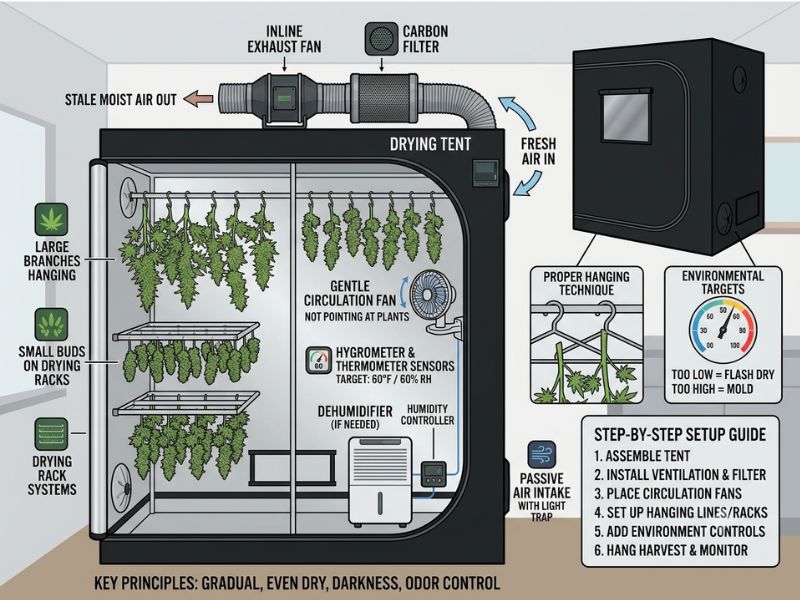
There are several ways to hang material inside a grow tent depending on available space and quantity.
Common drying methods include:
- Hanging branches from the top support bars
- Using drying racks for smaller pieces
- Using hangers or clips for individual items
Make sure there is enough space between each item to allow proper airflow. Overcrowding will slow down drying and increase the risk of mold formation.
As a general rule, the material should never touch or overlap heavily inside the tent.
Step 3: Control Temperature and Humidity
Drying is highly dependent on environmental conditions.
Ideal conditions inside a drying tent are typically:
- Temperature: moderate and stable (not too hot)
- Humidity: controlled and consistent
- No direct light exposure
To maintain proper conditions, use:
- Thermometer and hygrometer
- Inline fan for air exchange
- Optional humidifier or dehumidifier depending on room conditions
The goal is to create a slow and even drying process. Rapid drying can reduce quality, while excessive humidity increases the risk of mold.
Step 4: Set Up Ventilation System
Proper airflow is one of the most important parts of a drying tent setup.
Install:
- An inline fan to extract stale air
- A carbon filter if odor control is needed
- Passive or controlled air intake
- Optional oscillating fan for gentle internal movement
The airflow should be soft and indirect. You should avoid pointing strong airflow directly at drying material, as this can cause uneven drying and reduce quality.
The purpose of ventilation is to slowly exchange air and maintain a stable environment, not to aggressively dry the material.
Step 5: Hang Drying Material Properly
Once your ventilation and environment are ready, you can hang your material inside the tent.
Make sure to:
- Use strong hanging hooks or lines
- Keep enough spacing between each item
- Avoid stacking or overlapping
- Ensure even distribution across the tent
If using multiple levels or racks, make sure airflow can still move freely between each layer.
Proper spacing ensures uniform drying and reduces the chance of moisture pockets forming inside the tent.
Step 6: Manage Airflow Carefully
Air movement inside the drying tent should be gentle and consistent.
Best practices:
- Use low-speed fan settings
- Avoid direct airflow on drying material
- Maintain steady air exchange through exhaust system
- Prevent stagnant air zones inside corners of the tent
Good airflow helps remove moisture slowly without disturbing the natural drying process.
Step 7: Monitor Environment Daily
Once everything is set up, regular monitoring becomes essential.
Check daily:
- Temperature levels
- Humidity stability
- Air circulation
- Signs of uneven drying or moisture buildup
Adjust fan speed or room conditions if necessary. Small changes can have a big impact on final quality.
Consistency is more important than speed during drying.
Step 8: Avoid Common Drying Mistakes
Many beginners make simple mistakes that negatively affect drying quality.
Avoid the following:
- Using too much direct airflow
- Overcrowding the tent
- Drying under bright light exposure
- Ignoring humidity levels
- Allowing stagnant air pockets
- Rushing the drying process
The key is to maintain a balanced environment where drying happens gradually and evenly.
Final Thoughts
A grow tent is one of the best tools for controlled drying because it allows you to manage airflow, humidity, and temperature in a compact space.
When set up correctly, a drying tent helps preserve quality, aroma, and overall structure while reducing the risk of mold or uneven drying.
By focusing on proper spacing, gentle airflow, and stable environmental conditions, you can turn a simple grow tent into a highly effective drying chamber that delivers consistent results every time.

I’m Maya L. Greenwood, a lifelong plant lover who believes anyone can grow something beautiful with the right guidance. After years of testing soil mixes, pruning methods, irrigation tricks, and pest-safe solutions, I started EasyGardenTips.com to turn hard-won lessons into step-by-step advice. From seed starting and container gardens to composting and seasonal checklists, my goal is to make gardening simple, sustainable, and fun.