
A grow tent is a long-term investment, but there are times when you need to take it down. Maybe you’re relocating, upgrading to a larger setup, or simply storing it for the off-season. Whatever the reason, folding and storing it properly is important if you want it to last for years without damage.
Many people rush this process and end up bending poles, damaging fabric, or misplacing parts. With the right approach, you can break down your grow tent cleanly and store it in a compact, organized way that makes future setup much easier.
This guide will walk you through the entire process step by step.
Step 1: Clear Out the Grow Tent Completely
Before you start disassembly, remove everything inside the tent.
This includes:
- Plants
- Pots and trays
- Grow lights
- Inline fans and carbon filters
- Ducting
- Oscillating fans
- Timers and sensors
- Trellis netting or support structures
Take your time during this step. Trying to fold a tent with equipment still attached is one of the most common mistakes and can easily cause damage to both the tent and your gear.
If you’re removing plants, do it gently to avoid spilling soil or damaging roots if you plan to reuse them elsewhere.
Step 2: Disconnect Power and Ventilation Systems
Once the tent is empty, disconnect all electrical and ventilation components.
Make sure to:
- Unplug all lights and fans
- Detach ducting from the inline fan and exhaust ports
- Remove carbon filter carefully (it can be heavy)
- Roll up cables and secure them with ties or straps
If your carbon filter has been used for a long time, it may contain dust or moisture, so handle it carefully to avoid mess.
Step 3: Clean the Inside of the Tent
Before folding, it is a good idea to clean the interior.
Use a soft cloth or mild cleaning solution to:
- Wipe down reflective walls
- Remove dust or debris
- Clean floor tray if included
- Check for mold or residue
Let the tent dry completely before folding. Moisture trapped inside can lead to mold growth during storage.
Step 4: Remove Grow Tent Fabric from the Frame
Start by carefully unzipping and removing the fabric from the metal frame.
Most tents are designed so the fabric can be pulled off without forcing anything. If it feels tight, avoid pulling aggressively. Instead, loosen one side at a time.
Place the fabric on a clean, flat surface once removed. Avoid placing it directly on dirty floors to prevent damage or staining.
Step 5: Disassemble the Frame
Now move on to the frame structure.
Carefully disconnect the metal or plastic poles from the corner connectors. Work slowly to avoid bending the frame pieces.
A good method is:
- Start from the top frame
- Move down to vertical poles
- Finish with the base structure
As you remove each piece, group similar parts together. This will make reassembly much easier later.
Step 6: Organize and Label All Parts
One of the most overlooked steps is organization.
Before storing everything, sort all components:
- Frame poles
- Corner connectors
- Screws or clips (if any)
- Hanging straps
- Floor tray
- Fabric tent
If your tent has labeled poles, keep them in order. If not, you can label them using tape or markers.
Store small parts in a sealed plastic bag so nothing gets lost.
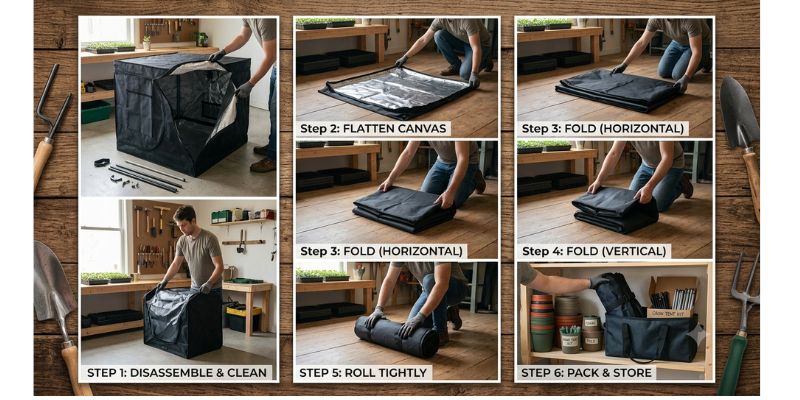
Step 7: Fold the Grow Tent Fabric Properly
Folding the fabric correctly is key to preventing creases, tears, and damage to the reflective interior.
Follow these steps:
- Lay the fabric flat on a clean surface
- Smooth out wrinkles gently
- Fold it lengthwise first
- Then fold it into a compact rectangle
- Avoid sharp folds on zippers or seams
Do not stuff or roll the fabric tightly. Excess pressure can damage the lightproof coating and reduce its effectiveness over time.
If possible, place tissue paper or a soft cloth between folds to protect reflective surfaces.
Step 8: Pack Everything in a Storage Box
Once everything is disassembled and folded, store all components together in a durable container.
Ideally, use:
- A plastic storage bin with a lid
- Or the original packaging if available
Make sure to include:
- Fabric tent
- Frame poles
- Connectors
- Accessories
- Instruction manual (if you have it)
Keeping everything in one place prevents missing parts during your next setup.
Step 9: Choose the Right Storage Location
Where you store your grow tent is just as important as how you pack it.
Choose a location that is:
- Dry
- Cool
- Away from direct sunlight
- Free from pests
- Not exposed to heavy weight or pressure
Avoid damp basements or hot attics. Moisture can cause mold, while heat can weaken fabric and plastic components over time.
A closet, storage room, or sealed cabinet is usually ideal.
Step 10: Check Periodically During Storage
If you’re storing your grow tent for a long period, it’s a good idea to check it occasionally.
Every few months, inspect for:
- Moisture buildup
- Mold or odor
- Pest activity
- Bent frame parts
This ensures your tent stays in good condition and is ready for use whenever you need it again.
Final Thoughts
Folding and storing a grow tent properly is just as important as setting it up correctly. A careful breakdown process protects your investment and makes future assembly much easier.
By cleaning, organizing, and storing each component properly, you can extend the lifespan of your grow tent and avoid unnecessary replacement costs.
When you’re ready to set it up again, everything will be clean, organized, and ready for quick reassembly, allowing you to get back to growing without delays.
I’m Maya L. Greenwood, a lifelong plant lover who believes anyone can grow something beautiful with the right guidance. After years of testing soil mixes, pruning methods, irrigation tricks, and pest-safe solutions, I started EasyGardenTips.com to turn hard-won lessons into step-by-step advice. From seed starting and container gardens to composting and seasonal checklists, my goal is to make gardening simple, sustainable, and fun.