How to Build a Raised Bed on a Slope: Level, Brace, and Fill
To build a raised bed on a slope, measure the elevation change, create a level foundation or small terrace, construct a sturdy frame, and fill it with suitable garden soil. The finished planting surface should be nearly level, even when the surrounding ground slopes downhill.
Building directly on uneven ground without preparation can cause problems. Soil may collect against the downhill wall, water can move across the growing surface, and an unsupported frame may shift or bow under the weight of wet soil.
The best construction method depends on how steep the slope is. A gentle incline may need only minor excavation, while a moderately sloped yard may benefit from several small terraced beds. Steep or unstable hillsides may require professionally designed retaining structures.
Materials and drainage also deserve attention. Wooden frames are relatively easy to customize, while metal and masonry beds require designs suited to the terrain.
With careful measurements and a properly supported structure, a sloped backyard can provide stable, accessible growing space for vegetables, flowers, and herbs.
How to Build a Raised Bed on a Slope Step by Step
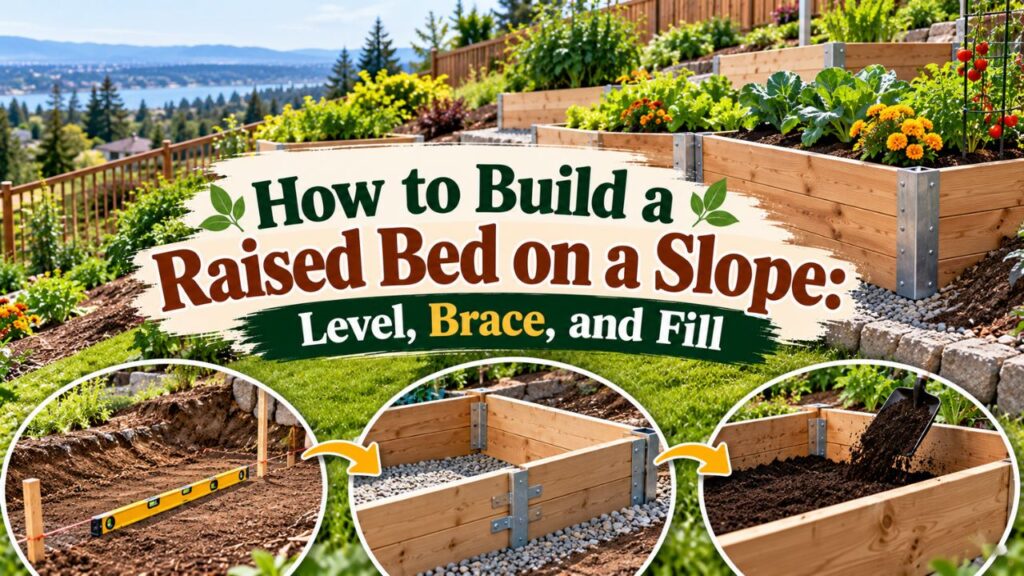
The simplest approach for a manageable slope is to build a rectangular, open-bottom raised bed on a level planting area.
The following instructions cover a small wooden garden bed rather than a structural retaining wall.
Step 1: Choose a Suitable Location on the Slope
Start by examining the hillside and identifying a location with sufficient sunlight, stable ground, and reasonable access.
Many popular vegetables require at least six hours of direct sunlight daily, although individual crops have different requirements.
Look for an area where:
- The slope is relatively uniform.
- Rainwater doesn’t collect or rush through the proposed bed.
- The ground is stable and free from visible erosion.
- The planting area is accessible for watering and harvesting.
- The bed won’t interfere with existing drainage systems.
- Excavation won’t damage important tree roots or underground utilities.
Avoid placing a garden bed directly against a building foundation or where runoff could collect near a structure.
Before digging, check for buried utilities through the appropriate local utility-location service. In the United States, 811 is the common starting point for requesting utility markings.
Important: If the site shows signs of soil movement, deep cracks, active erosion, or previous slope failure, don’t excavate or add a soil-retaining structure without qualified professional guidance.
Step 2: Measure the Slope and Elevation Difference
Measure how much the ground drops across the proposed raised bed.
A simple method uses two stakes, string, a line level, and a measuring tape.
- Drive one stake into the ground at the uphill edge of the proposed bed.
- Place another stake at the downhill edge.
- Tie a string to the uphill stake close to ground level.
- Stretch the string toward the downhill stake.
- Use a line level to make the string horizontal.
- Measure the vertical distance between the string and the downhill ground.
- Record the measurement before planning the frame height.
For example, suppose the ground drops 6 inches across a horizontal distance of 4 feet.
That means the downhill edge is 6 inches lower than the uphill edge.
The slope percentage is:
Slope (%) = Vertical drop ÷ Horizontal distance × 100
Convert both measurements to the same units:
6 ÷ 48 × 100 = 12.5% slope
This measurement helps determine how much soil needs to be excavated and whether the downhill wall requires additional height.
Repeat the measurement in more than one location if the ground is irregular.
Step 3: Position the Raised Bed Along the Slope’s Contour
The orientation of the bed affects how much leveling work is required.
A contour line follows approximately the same elevation across a hillside.
For a rectangular raised bed, placing the long sides roughly parallel to the contour often minimizes the elevation difference across its footprint.
For example, a 4-by-8-foot raised bed on a hillside can be positioned so its 8-foot dimension runs across the hill rather than directly downhill.
That leaves the shorter 4-foot dimension extending in the downhill direction.
According to the University of Georgia Extension’s raised garden bed dimensions guide, raised beds on sloped sites should have level frames and planting surfaces. The guidance recommends positioning the shortest bed dimension perpendicular to the slope to reduce unnecessary excavation.
This arrangement also makes it easier to create a series of stepped beds along the hillside.
Step 4: Create a Level Foundation
Once the layout is marked, prepare the footprint.
For a gentle slope, a small amount of excavation may create a suitable level area without requiring a tall downhill retaining wall.
Follow these steps:
- Mark the perimeter using stakes and string.
- Remove grass, weeds, and loose surface debris.
- Remove soil from the uphill portion of the footprint as needed.
- Gradually shape a level bench across the proposed frame location.
- Check the surface with a long level or level string.
- Stabilize the areas that will support the frame.
- Recheck the elevation before assembling the bed.
A level bench is a relatively flat area cut into a hillside.
Avoid placing the frame on loosely piled soil that may settle or wash away.
If the downhill side needs substantial fill to support the structure, the foundation requires more careful construction than simply piling garden soil beneath the boards.
For a small bed on a gentle slope, limited excavation into stable ground is generally preferable to building a high unsupported wall.
Safety Note: Cutting into a steep hillside can affect slope stability. If significant excavation, fill retention, or structural support is required, consult a qualified landscape contractor or engineer and check local requirements before proceeding.
Step 5: Build a Strong Wooden Raised Bed Frame
Wood is convenient for sloped gardens because boards can be cut to suit the required dimensions.
Cedar and appropriately rated pressure-treated lumber are common choices.
For a basic rectangular bed, useful materials include:
- Exterior-grade lumber of suitable thickness.
- Corner posts or structural supports.
- Corrosion-resistant exterior screws.
- A measuring tape and carpenter’s square.
- A level.
- A drill or impact driver.
- A saw, when custom cuts are needed.
- Additional bracing where required.
Assemble the frame on a stable surface when practical.
Check that the corners are square before tightening the fasteners.
On a prepared level bench, a conventional rectangular frame may be sufficient.
If the design follows the uneven ground at its bottom edge, the downhill wall will need additional height to keep the top level.
That wall must be designed to retain the greater soil depth and pressure.
Don’t assume that longer corner posts or a few extra screws can safely support a substantial downhill retaining wall.
For larger beds, install bracing appropriate to the wall length, height, and retained soil load.
Step 6: Position, Level, and Secure the Frame
Place the assembled frame onto the prepared foundation.
Check the top edges in both directions.
A level frame helps maintain a consistent planting surface and prevents irrigation water from concentrating at one end.
If one corner sits too high, carefully adjust the foundation.
Don’t solve a major height difference by balancing the frame on loose stones, bricks, or scraps of lumber.
Make sure the bottom edges are supported and there are no large openings through which growing soil can wash out.
Where anchoring is required, choose an appropriate system for the material, soil conditions, and frame design.
Ground stakes, structural posts, and manufacturer-provided anchors serve different purposes. Their suitability depends on the loads and site conditions.
After positioning the bed, check that it doesn’t rock or shift under moderate hand pressure.
Do not fill an unstable frame.
Step 7: Add Growing Soil and Finish the Bed
Once the structure is level and secure, prepare the growing area.
For an open-bottom bed, loosen compacted native soil beneath the planting surface where practical.
This helps roots enter the underlying ground and may improve drainage.
A suitable raised bed mixture commonly contains quality loamy topsoil and finished compost.
A practical starting blend is:
- 2 parts loamy topsoil.
- 1 part mature compost.
Adjust the mixture based on the existing soil and plants.
Fill the bed in manageable amounts, spreading the material evenly.
Avoid forcing soil against unsupported walls or compacting the planting area by walking on it.
Water gently to settle the mixture.
Finish with a suitable mulch layer while leaving enough space below the frame’s top edge to contain the mulch and irrigation water.
Best Methods for Building Raised Beds on Different Slopes
Not every hillside requires the same construction method.
The slope’s steepness, soil stability, and available space should determine the design.
| Site condition | Practical construction method | Main consideration |
| Nearly level ground | Conventional raised bed | Minor leveling |
| Gentle slope | Level bench with standard frame | Limited excavation |
| Moderate, stable slope | Small terraced beds | Retained soil and erosion control |
| Irregular slope | Individually leveled smaller beds | Different elevations |
| Steep or unstable slope | Professionally designed terracing | Structural stability and drainage |
These categories are descriptive, not engineering classifications or universal slope-percentage limits.
Building on a Gentle Slope
A gentle incline may allow a standard wooden frame to sit on a small excavated bench.
This is often the least complicated construction method.
Remove enough uphill soil to create a stable, level footprint.
Avoid building a tall downhill support when minor excavation can solve the elevation difference.
A single level bed may be sufficient for a small vegetable garden.
Building Raised Beds on a Moderate Slope
On a moderate slope, several smaller beds may be more practical than one large bed.
Each bed can sit on its own level terrace.
This reduces the amount of excavation needed in any one location and helps maintain manageable wall heights.
The spaces between beds can be used as pathways or planted areas.
Ensure each terrace has a stable foundation and doesn’t direct uncontrolled runoff onto the structure below.
Building Raised Beds on a Steep Slope
Steep hillsides require additional caution.
A raised bed that retains a large quantity of soil can function partly as a retaining wall.
Wet soil creates substantial loads, and concentrated runoff or unstable ground can increase the risk of failure.
For these locations, a professionally designed terracing system may be necessary.
Local regulations may also impose rules on retaining wall height, excavation, setbacks, and drainage.
Avoid assuming a conventional raised bed kit is suitable for a steep hillside simply because the manufacturer offers tall panels.
How to Build Terraced Raised Beds on a Hillside
Terracing divides sloped ground into separate, relatively level growing areas.
Instead of creating one long bed that follows the incline, each terrace provides a stable planting surface at a different elevation.
This is especially useful when establishing several beds on a hillside.
Plan the Beds Along Contour Lines
Lay out each raised bed approximately parallel to the hillside contour.
Place additional beds uphill or downhill at separate elevations.
Each planting area should be individually leveled.
The University of Maine Cooperative Extension’s guidance on gardening on slopes recommends terraced raised beds that follow the land’s contours.
Its guidance describes using wooden frames or large rocks to retain soil and protecting pathways with mulch or groundcover to help limit erosion.
The principle is to create stable planting areas without leaving large sections of bare, exposed soil between them.
Keep Each Terrace Manageable
Smaller terraces are often easier to construct and maintain.
For a typical home vegetable garden, a raised bed width of approximately 3–4 feet allows access from both sides.
Low frames around 8–12 inches high can be suitable where the underlying ground provides additional rooting depth.
However, wall height must also account for elevation differences.
A bed designed to retain substantially more soil on the downhill side requires adequate structural support.
Avoid connecting several terraces into one retaining structure without considering how their loads interact.
Create Safe Paths Between Terraces
Pathways are especially important on sloped ground.
Leave enough space to move safely while watering, planting, and harvesting.
For ordinary walking access, approximately 18–24 inches of clear space may be workable, while wider paths are preferable for wheelbarrows and garden equipment.
On a hillside, the actual pathway should provide stable footing rather than simply follow the steep grade.
Protect exposed path soil with suitable mulch, vegetation, or another erosion-resistant surface.
Where elevation changes are substantial, properly constructed steps may be necessary.
Do not create narrow, slippery passages beside high retaining walls.
How to Prevent Drainage Problems in a Sloped Raised Bed
Drainage is one of the most important parts of a hillside garden.
Water moving downhill can erode soil, undermine supports, or collect against the rear of a retaining structure.
A raised bed should allow normal irrigation and rainfall to move through its growing medium without allowing uncontrolled surface runoff to damage the surrounding hillside.
Keep the Planting Surface Nearly Level
Don’t install a raised bed with the planting surface tilted sharply downhill.
A steeply sloped growing surface encourages water and loose soil to move toward the lower edge.
A nearly level surface allows irrigation water more opportunity to soak into the growing medium.
The goal is not to create a permanently water-filled basin.
The soil must still drain adequately through its profile.
Control Water Coming From Uphill
Rainwater moving down the hillside may enter the garden from above.
This is different from normal rainfall landing directly on the raised bed.
Observe the site during ordinary rain to identify where water flows.
For small projects, maintaining vegetation and avoiding bare disturbed soil uphill may help reduce runoff.
Where concentrated water regularly enters the garden, a properly designed diversion or drainage system may be necessary.
Never redirect concentrated runoff toward a neighbor’s property, building foundation, retaining wall, or unstable slope.
Significant drainage modifications may require professional design or local approval.
Protect the Soil Around the Bed From Erosion
Even when growing soil remains inside the frame, the ground outside the bed can wash away.
Pay particular attention to exposed soil immediately downhill of the structure.
Suitable protection may include:
- Maintaining grass or other established groundcover.
- Applying organic mulch on manageable paths.
- Using appropriate erosion-control matting during vegetation establishment.
- Avoiding concentrated discharge from irrigation or roof drains.
- Repairing small erosion channels before they become larger.
Don’t use loose fill to cover visible erosion without identifying where the water is coming from.
Avoid Trapping Water Behind a Downhill Wall
If a raised bed has a substantial retaining wall, water pressure and saturated soil can affect structural stability.
An ordinary open-bottom garden bed may drain through suitable native soil.
A higher retaining structure may need a specific drainage design.
The appropriate solution depends on wall height, construction material, soil conditions, and local rainfall.
Don’t assume that adding gravel behind a wall or drilling random holes provides sufficient drainage.
When the structure is functioning as a retaining wall, its drainage and reinforcement should be designed together.
How to Calculate Soil Needed for a Raised Bed on a Slope
A sloped site can affect soil quantity because the height of the growing medium may vary across the bed.
The calculation depends on whether the bottom has been fully leveled or whether the frame retains soil above the original sloping ground.
Soil Volume for a Level-Bottom Raised Bed
If the foundation and planting surface are level, calculate soil volume normally.
Soil volume (cubic feet) = Length × Width × Fill depth
For example, a bed with inside dimensions of 4 feet by 8 feet and a uniform soil depth of 12 inches requires:
4 × 8 × 1 = 32 cubic feet
Convert cubic feet to cubic yards:
32 ÷ 27 = 1.19 cubic yards
This calculation assumes the specified inside dimensions and fill depth.
Soil Volume When the Bottom Is Sloped
If the base remains uniformly sloped while the finished soil surface is level, the soil depth may differ across the bed.
For a simple rectangular bed with a consistent slope, use the average depth.
Average soil depth = (Uphill depth + Downhill depth) ÷ 2
Suppose the soil depth measures:
- 12 inches at the uphill side.
- 18 inches at the downhill side.
Average depth:
(12 + 18) ÷ 2 = 15 inches, or 1.25 feet.
For a 4-by-8-foot bed:
4 × 8 × 1.25 = 40 cubic feet
40 ÷ 27 = 1.48 cubic yards
This is a volume estimate for a uniformly sloping base, not a structural recommendation to retain that extra soil with an ordinary garden frame.
Irregular ground, stepped foundations, and excavated benches require measurements that reflect the actual shape.
Best Materials for Raised Garden Beds on a Slope
Choose materials based on their durability, structural requirements, and how easily they can accommodate uneven terrain.
Wood for Custom Sloped Garden Beds
Wood is useful when the frame needs custom dimensions.
Boards can be cut to accommodate a leveled foundation or carefully designed stepped construction.
Cedar provides natural decay resistance.
Properly identified ground-contact-rated pressure-treated lumber may also be suitable where its treatment is acceptable for the intended garden use.
The frame must be strong enough to withstand outward soil pressure.
For substantial retaining walls, ordinary raised bed framing details may be insufficient.
Metal Raised Beds on Uneven Ground
Prefabricated galvanized steel beds can work on sloped sites when installed on a suitable level base.
However, a lightweight kit isn’t automatically designed to hold back hillside soil.
Follow the manufacturer’s installation and anchoring instructions.
Avoid cutting structural panels or extending support posts without confirming that the modified design remains adequate.
When a metal bed sits on a leveled bench, it can be installed much like a standard raised bed.
Concrete Blocks and Natural Stone
Blocks and stones can create attractive terraced planting areas.
However, stacked materials must be selected and installed to handle the retained soil loads.
Loose decorative blocks shouldn’t be relied upon as a tall retaining wall.
A larger masonry terrace may need an engineered base, reinforcement, drainage, and local approval.
Use professional guidance when the project extends beyond low garden edging.
Raised Bed Mistakes to Avoid on Sloped Ground
Several common installation mistakes can cause problems even when the frame initially looks level.
Placing the Frame Directly on Uneven Ground
A standard rectangular frame may leave large gaps beneath its lower edge.
Soil can escape through those openings, and the frame may lack reliable support.
Prepare a suitable foundation or use a properly designed stepped structure.
Building One Long Bed Downhill
A bed extending directly downhill can experience a substantial elevation difference between its ends.
This increases the amount of leveling, excavation, or retaining construction required.
Running the long axis along the contour is often simpler.
Using Loose Fill as Structural Support
Loose soil or uncompacted fill beneath the frame can settle after rainfall and watering.
This may cause tilting or joint separation.
Use a stable foundation rather than balancing the structure on unprepared fill.
Ignoring Rainwater Runoff
A bed may perform well during dry weather but experience erosion during heavy rain.
Inspect the location’s natural drainage before construction.
Protect nearby exposed soil and avoid directing concentrated runoff toward vulnerable areas.
Making the Downhill Wall Too Tall Without Reinforcement
The taller downhill wall may retain more soil than a conventional bed.
Wet soil and outward pressure can cause poorly supported walls to bow or fail.
For significant height differences, choose terracing or a professionally designed retaining structure instead of improvising a taller frame.
How to Maintain Raised Beds on a Slope
Sloped raised beds require the same basic plant care as level beds, plus periodic checks for erosion and structural movement.
Inspect the Frame After Heavy Rain
Look for changes in the frame’s alignment.
Check whether:
- Boards have started bowing.
- Corners have separated.
- Support posts have shifted.
- Soil has washed out beneath the frame.
- New erosion channels have appeared.
- Water remains trapped near the base.
Address small issues before they undermine the structure.
If the wall is leaning or the ground appears unstable, avoid loading or working around the affected area until it has been evaluated.
Maintain Mulch and Groundcover
Mulch protects growing soil from heavy rainfall.
Groundcover and stabilized paths help protect the areas between terraces.
Replace material that has washed away and identify the runoff source before adding more.
Keep plant crowns and stems clear of excessive mulch.
Check Soil Moisture Across the Bed
A properly leveled bed should reduce uncontrolled surface movement of irrigation water.
However, sunlight, wind, soil depth, and drainage can still create moisture differences.
Check soil moisture in several locations rather than assuming the entire bed dries uniformly.
Drip irrigation or a soaker hose can help water the root zone gently.
Recheck Level and Structural Stability
Seasonal settling can change the relationship between the frame and surrounding ground.
Examine the structure before each planting season.
Small changes may be manageable, but significant leaning or movement can indicate a foundation or drainage problem.
Avoid simply adding more growing soil to a structure that has become unstable.
Conclusion
Understanding how to build a raised bed on a slope starts with measuring the elevation difference and choosing a construction method appropriate for the terrain.
For gentle slopes, a small level bench and a standard wooden frame are often sufficient. For moderate slopes, several individually leveled terraces can create practical growing areas without requiring one large retaining structure.
Positioning beds along the contour helps limit excavation, while a stable foundation and properly supported walls protect the structure from soil movement.
Drainage and erosion control are just as important as frame construction. Water must be able to move through the growing medium without washing out the surrounding ground.
For steep or unstable hillsides, professional assessment is the safer choice.
A successful sloped raised bed should provide a level planting surface, reliable structural support, suitable soil depth, and safe access throughout the growing season.
FAQs About How to Build a Raised Bed on a Slope
Can You Put a Raised Garden Bed on Uneven Ground?
Yes, but the bed needs a stable foundation and a nearly level planting surface.
For a gentle slope, minor excavation may be sufficient. Larger elevation differences may require stepped frames or terracing.
Should Raised Garden Beds Be Completely Level?
The frame and planting surface should generally be nearly level.
This helps prevent irrigation water and loose soil from concentrating at the downhill side. Adequate drainage through the soil is still necessary.
How Do You Level a Raised Bed Without Digging Too Much?
Position the bed’s long dimension along the hillside contour to reduce the elevation difference across its footprint.
For a gentle slope, limited grading may be enough. Avoid supporting a tall downhill wall on loose fill simply to eliminate excavation.
Can You Use a Metal Raised Bed on a Slope?
Yes. A metal raised bed can be installed on a properly prepared level foundation.
However, ordinary prefabricated metal kits shouldn’t be assumed suitable for retaining large amounts of hillside soil. Follow the manufacturer’s structural and anchoring requirements.
Do Raised Beds on Slopes Need Retaining Walls?
Not always. A low bed on a stable, gently leveled surface may require only a conventional frame.
Retaining structures become more important when substantial soil must be held back or when the hillside needs major terracing.
How Do You Stop Soil From Washing Out of a Sloped Raised Bed?
Keep the frame properly supported, close large gaps beneath the walls, and maintain a nearly level growing surface.
Use mulch, stabilized pathways, and suitable groundcover to reduce surface erosion. Correct concentrated runoff before it damages the structure.
Is It Better to Build One Large Raised Bed or Several Terraces on a Slope?
Several smaller terraces are often easier to level and maintain on moderately sloped ground.
They can reduce individual wall heights and provide clearer access paths. A single larger bed may be practical on a gentle slope when it can be supported without significant excavation or retained fill.

I’m Maya L. Greenwood, a lifelong plant lover who believes anyone can grow something beautiful with the right guidance. After years of testing soil mixes, pruning methods, irrigation tricks, and pest-safe solutions, I started EasyGardenTips.com to turn hard-won lessons into step-by-step advice. From seed starting and container gardens to composting and seasonal checklists, my goal is to make gardening simple, sustainable, and fun.