How to Build a Raised Bed Greenhouse: Hoops, Film, and Vents
To build a raised bed greenhouse, install a series of sturdy hoops over the bed, cover them with clear greenhouse plastic, and secure the edges so you can open them for watering and ventilation. This simple structure is usually called a low tunnel or hoop-house cover. It helps protect vegetables from cool winds and mild frost while using sunlight to warm the space around the plants.
A 4-by-8-foot raised bed is a practical starting size because flexible PVC or metal hoops can span its width without requiring a walk-in structure. The main challenge is balancing warmth with airflow. An enclosed plastic tunnel can become dangerously hot for plants on a sunny day, even when the outdoor air feels cool.
The frame also needs secure anchors, especially in windy weather, and sufficient headroom so the cover does not rest on growing leaves.
In this article, I explain how to build a raised bed greenhouse with a simple hoop frame, choose the right plastic and hardware, and size the cover for a 4-by-8-foot bed. I also cover ventilation, watering, frost protection, crop selection, and options for a sturdier hinged design.
What Is a Raised Bed Greenhouse?
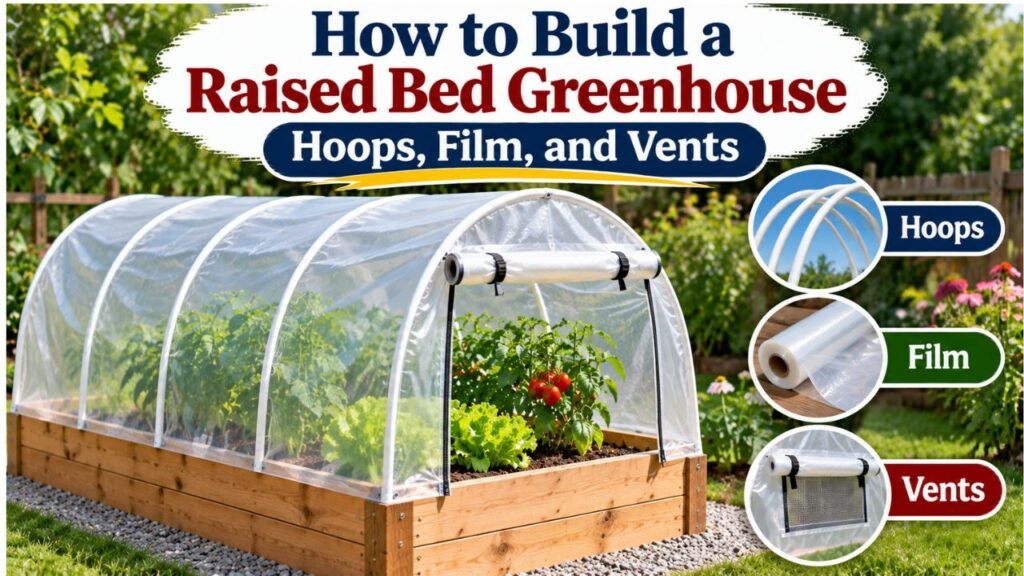
A raised bed greenhouse is a covered growing structure built over a raised garden bed.
It creates a protected space around plants by trapping some solar warmth and reducing direct exposure to wind, rain, and cold weather.
The simplest design consists of flexible hoops supporting a clear plastic sheet.
More permanent versions use wooden frames, hinged lids, and rigid transparent panels.
Although these structures are often called mini greenhouses, they are not necessarily heated or climate-controlled.
How a Raised Bed Greenhouse Works
Sunlight passes through the clear covering and warms the soil, plants, and interior surfaces.
The covering slows the exchange of warm interior air with cooler outdoor air.
It also reduces wind movement around the plants.
This can create a warmer growing environment during cool spring and fall weather.
However, the temperature advantage changes throughout the day.
A covered bed may warm rapidly in sunlight and then lose much of that heat overnight.
A simple plastic tunnel should not be expected to maintain greenhouse temperatures during prolonged freezing weather.
Raised Bed Greenhouse vs. Cold Frame vs. Hoop House
These structures serve similar purposes but have different designs.
| Structure | Typical Design | Best Use |
| Raised bed hoop greenhouse | Flexible hoops with clear plastic | Seasonal protection for vegetables |
| Low tunnel | Low arched supports with plastic or fabric | Early planting and fall season extension |
| Cold frame | Low box with transparent lid | Seedlings and short cool-season crops |
| Hinged raised bed greenhouse | Rigid frame with opening cover | Repeated access to a small bed |
| Walk-in greenhouse | Tall enclosed structure | Larger-scale protected growing |
For most DIY gardeners, a removable hoop-style cover is the simplest way to turn an existing raised bed into a miniature greenhouse.
Materials Needed to Build a Raised Bed Greenhouse
This example uses a 4-foot-wide by 8-foot-long raised garden bed with a flexible hoop frame.
The design is intended for low-growing vegetables, seedlings, and seasonal crop protection.
It is not a permanent snow-rated greenhouse.
Materials for a 4×8-Foot Raised Bed
| Material | Suggested Quantity | Purpose |
| Flexible ½-inch PVC pipe | 5 lengths, approximately 8–10 feet before final trimming | Curved hoop supports |
| Compatible pipe straps or mounting sleeves | As required for 10 hoop ends | Attach hoops to the frame |
| Outdoor-rated screws | As required by the mounting hardware | Fasten hardware to suitable wooden framing |
| PVC pipe for a ridge support | Approximately 8 feet, optional | Connect hoop tops |
| UV-stabilized greenhouse polyethylene film | Approximately 12 × 12 feet, subject to final measurements | Transparent covering |
| Greenhouse film clips | Approximately 10–20 | Hold the film to the frame |
| Suitable ground anchors and tie-down cords | As needed for local conditions | Help resist wind |
| Weather-resistant ties | Several | Secure optional frame braces |
| Thermometer | 1 | Monitor temperatures inside the tunnel |
| Drip irrigation or soaker hose | Optional | Water plants beneath the cover |
These quantities are a planning example, not a universal construction specification.
Measure your particular bed and test the intended hoop shape before cutting all the materials.
A wider, taller, or more exposed greenhouse may need different structural components and anchoring.
Tools You’ll Need
Basic tools include:
- Measuring tape
- Marker
- PVC pipe cutter or suitable saw
- Drill and screwdriver, if attaching brackets to wood
- Scissors or utility knife for cutting plastic
- Safety glasses
- Work gloves
- Level or straightedge
If you choose metal conduit rather than PVC, you may also need a suitable conduit bender and metal-cutting equipment.
Which Materials Are Best for a Raised Bed Greenhouse Frame?
The frame must be strong enough to support the cover and withstand ordinary weather conditions.
Common DIY options include PVC, galvanized metal conduit, and wood.
PVC Pipe Hoops
Flexible PVC is popular for small garden tunnels because it is relatively inexpensive, lightweight, and easy to shape.
Its main advantages are straightforward assembly and convenient removal.
However, PVC can become brittle through outdoor exposure and may perform poorly under heavy snow or strong wind.
Use pipe suitable for the intended outdoor application.
Also check whether protective tape or another approved barrier is recommended where the pipe contacts the greenhouse film.
Some combinations of PVC and polyethylene can contribute to premature film deterioration.
Galvanized Metal Hoops
Galvanized electrical conduit provides a more rigid alternative.
It can be suitable for gardeners who want a longer-lasting frame.
However, bending metal conduit requires appropriate equipment and technique.
According to Oregon State University Extension’s low tunnel construction guide, galvanized electrical conduit, wire, and PVC can be used for low tunnel hoops.
The guide describes using approximately 6–8-foot hoop material for beds around 3–4 feet wide, with final dimensions adjusted to the crop and structure.
For a raised bed, the mounting height and desired headroom also affect the required pipe length.
Wooden Frames
Wood is commonly used for rigid greenhouse covers and hinged cold frames.
It provides a convenient structure for attaching hinges, braces, and transparent panels.
However, a rigid wooden cover takes more construction work than a flexible hoop tunnel.
Wooden components also need appropriate protection from moisture.
For a basic seasonal project, PVC or metal hoops are generally easier.
How to Build a Raised Bed Greenhouse Step by Step
The following method creates a simple hoop greenhouse over an existing 4-by-8-foot raised bed.
It uses flexible PVC hoops and a removable clear plastic cover.
The structure is designed to be opened during warm weather and removed when no longer needed.
Step 1: Choose the Best Location
Start with a raised bed that receives adequate sunlight for the vegetables you want to grow.
Many fruiting vegetables need approximately 6–8 hours of direct sunlight during the growing season.
Cool-season leafy vegetables may tolerate somewhat less, depending on climate and season.
Consider the following site conditions:
- Sun exposure
- Prevailing wind direction
- Drainage
- Access to water
- Space for opening the cover
- Nearby trees and overhead obstructions
Avoid installing the greenhouse beneath branches that could fall onto the plastic.
A sheltered location can reduce wind stress, but the structure should still be securely anchored.
If you can choose the bed’s orientation, account for seasonal sunlight and prevailing winds.
For an existing raised bed, work with its location and select appropriate materials.
Step 2: Inspect the Existing Raised Bed
Check the bed’s frame before installing the greenhouse.
Look for damaged boards, loose screws, weakened corners, or corroded metal.
If you plan to attach mounting hardware directly to the bed, make sure the supporting structure can safely carry the additional load.
Do not assume thin sheet-metal panels are suitable for direct screw attachments.
For metal raised beds, use manufacturer-compatible mounting hardware or an independently anchored hoop support system.
Repair structural problems before adding the greenhouse cover.
The bed should also have appropriate drainage.
A greenhouse cover does not eliminate the need for water to move through the soil.
Step 3: Measure and Mark the Hoop Positions
Measure the length and width of the raised bed.
For a typical 4-by-8-foot bed, plan a hoop near each end and additional hoops between them.
A practical layout uses five hoops spaced approximately 2 feet apart along the 8-foot length.
<escape></escape>
| Hoop | Approximate Position |
| First hoop | Near the first end |
| Second hoop | About 2 feet farther along |
| Third hoop | Near the center |
| Fourth hoop | About 2 feet beyond the center |
| Fifth hoop | Near the opposite end |
The actual positions should be adjusted to match the frame and attachment hardware.
Closer spacing provides more support for the plastic but does not make a lightweight PVC frame suitable for heavy snow loads.
Mark matching positions on both long sides of the bed.
Keeping the mounting points aligned helps the hoops form a consistent tunnel.
Step 4: Install the Hoop Mounting Hardware
The mounting method depends on the raised bed material.
For a sturdy wooden raised bed, appropriately sized pipe straps or sleeves can be attached to suitable structural boards.
Install the brackets at the marked locations.
Use corrosion-resistant fasteners compatible with the wood and hardware.
Avoid placing screws too close to board edges, where they may split the lumber.
For a metal raised bed, a freestanding support system anchored into the surrounding ground is often preferable to drilling into thin panels.
If using ground anchors, verify that they will not strike buried irrigation, wiring, or other utilities.
The mounting system should prevent the hoops from shifting or lifting out during ordinary weather.
Step 5: Bend and Install the PVC Hoops
Begin with one PVC pipe.
Gradually bend it into an arch over the width of the raised bed.
Position its ends in the mounting sleeves or brackets.
Adjust the pipe length to create the desired height.
For a typical low tunnel, approximately 2–3 feet of clearance above the bed’s growing surface can be useful for short crops.
However, the final height depends on the pipe length, bend radius, mounting position, and bed width.
Do not cut all five hoops before testing the first one.
Once the first hoop fits correctly, use it as a template for the remaining pieces.
Install the other hoops and check their alignment.
Make sure every hoop is securely seated.
If the frame twists or shifts easily, improve its mounting and bracing before installing plastic.
Step 6: Add a Ridge Support if Needed
A ridge support runs lengthwise along the top of the hoops.
It can help keep the arches aligned and reduce independent movement.
For a small 4-by-8-foot tunnel, an appropriately sized PVC pipe may serve as a ridge member.
Position it along the top of the hoops.
Secure it using compatible fittings or weather-resistant fasteners that do not create sharp projections against the plastic.
If using ties, trim or position their ends so they cannot puncture the cover.
A ridge support improves alignment but is not a substitute for proper anchoring.
It also does not provide a verified wind or snow load rating.
Step 7: Measure and Cut the Greenhouse Plastic
Use clear, UV-stabilized greenhouse polyethylene film suitable for outdoor agricultural use.
A thickness of approximately 4–6 mil is commonly used for durable low tunnel coverings.
Six-mil greenhouse film is a practical choice when greater tear resistance and repeated seasonal use are priorities.
However, thicker film can be heavier and may need stronger attachment points.
Before cutting, measure:
- The curved distance over the hoops from one side to the other.
- The complete length of the tunnel.
- The extra material needed to secure both sides.
- The additional length needed to close both ends.
For a 4-by-8-foot bed, a sheet approximately 12 × 12 feet may provide sufficient material for many compact hoop designs.
However, the actual requirement depends on the height and curve of the arches.
A taller frame can require a wider sheet.
Leave enough excess material to secure the covering without pulling it excessively tight.
Step 8: Drape the Plastic Over the Frame
Choose a calm day for installing the plastic.
Unfold the greenhouse film carefully.
Drape it over the hoops and center it along the length of the bed.
Make sure the sheet reaches both sides.
Adjust it until the excess material is reasonably even.
Avoid dragging the film across rough ground or sharp edges.
The plastic should fit smoothly over the hoops without large loose sections.
However, do not stretch it so tightly that normal frame movement tears the material.
Step 9: Secure the Plastic Cover
Use clips designed for the chosen hoop diameter and film material.
Attach the film along the frame.
Then secure the lower edges using an appropriate method.
Possible options include:
- Compatible greenhouse film clamps
- Weighted edges
- Secured base battens on suitable wooden frames
- Outdoor tie-down cords
- Properly installed ground anchors
Keep one side easy to open.
You will need regular access for ventilation, watering, inspection, and harvesting.
Gather the excess film at each end and secure it so the tunnel can be closed during cool weather.
Do not leave large openings that allow the covering to lift in the wind.
Avoid relying on a few lightweight clips as the only wind protection.
For exposed sites, use a stronger anchoring system appropriate to the weather conditions.
Step 10: Create a Ventilation Opening
A raised bed greenhouse needs a way to release excess heat.
The simplest method is to make one long side of the plastic cover easy to lift.
Secure the lifted section with clips or straps so it cannot fall unexpectedly.
You can also arrange the end panels to open when additional airflow is needed.
Install a thermometer inside the tunnel at approximately plant-canopy height.
Keep it shaded from direct sunlight so it provides a more useful indication of air temperature.
Test the opening and closing mechanism several times.
You should be able to ventilate the greenhouse without dismantling the entire frame.
Step 11: Check the Greenhouse Before Planting
Inspect the completed structure.
Confirm that:
- Every hoop is securely mounted.
- The plastic is properly attached.
- No sharp edges contact the covering.
- The tunnel can be opened for ventilation.
- The cover does not rest on the plants.
- Water can drain from the raised bed.
- The frame does not move excessively.
- The covering can be removed when necessary.
Do not leave a newly completed greenhouse closed in direct sunlight without checking its internal temperature.
Even cool outdoor weather can produce substantial heat buildup inside a sealed plastic tunnel.
How to Size a Raised Bed Greenhouse Correctly
The greenhouse dimensions should match both the raised bed and the mature size of the crops.
A cover designed for seedlings may be too low for established vegetable plants.
Width of the Greenhouse
The hoop must span the full width of the bed.
For a 4-foot-wide bed, the inside width should provide adequate coverage without forcing the frame against the plants.
Allow enough space between the outer leaves and the covering.
If the bed is wider than 4 feet, you may need longer or stronger hoops.
Do not increase the span of a flexible structure indefinitely without considering stability.
Height Above the Soil
The tunnel must provide room for the mature crop.
A small low tunnel approximately 2–3 feet above the growing surface may work for:
- Lettuce
- Spinach
- Arugula
- Radishes
- Small kale plants
- Other low-growing vegetables
However, full-size tomatoes, peppers, and tall trellised crops may eventually outgrow it.
A greenhouse built over a 2-foot-tall raised bed also needs to be evaluated for total height above the surrounding ground.
The raised bed’s height and the tunnel’s height are separate measurements.
Length of the Greenhouse
The cover should extend beyond both ends of the raised bed so it can close securely.
For an 8-foot-long bed, additional plastic is needed for the end panels or gathered closure.
The exact amount depends on the frame shape and fastening method.
If you intend to use separate end panels, measure them independently.
Hoop Spacing
Closer hoop spacing helps support the plastic.
For small home tunnels, spacing of approximately 2–3 feet can be practical when using light PVC supports.
More rigid systems may use wider spacing.
However, spacing depends on wind, cover weight, frame material, and site conditions.
A closer-spaced design should still be considered temporary unless its structural capacity has been properly established.
What Is the Best Cover for a Raised Bed Greenhouse?
Several materials can cover a raised bed, but they provide different levels of warmth, airflow, and weather protection.
The most common choices are greenhouse polyethylene film, floating row cover fabric, and rigid polycarbonate panels.
| Cover Material | Main Advantage | Best Application |
| Clear greenhouse polyethylene | Traps warmth and blocks rain | Spring and fall hoop greenhouse |
| Frost-protection row cover | Breathable and lightweight | Light frost and cool-season growing |
| Insect netting | Allows airflow while excluding some pests | Warm-weather pest protection |
| Twin-wall polycarbonate | Rigid and reusable | Hinged cold frame or sturdy greenhouse |
| Lightweight perforated plastic | Provides some protection with increased airflow | Certain low tunnel systems |
Clear Greenhouse Plastic
Clear polyethylene is a practical option for a basic hoop house.
It allows sunlight into the protected space and helps reduce direct exposure to cold wind and rain.
Choose UV-stabilized agricultural greenhouse film rather than assuming ordinary indoor-use plastic sheeting will last outdoors.
The main limitation is overheating.
Because the covering restricts airflow, it must be opened when temperatures rise.
Floating Row Cover Fabric
Floating row cover is a lightweight fabric designed for plant protection.
Depending on the product, it can help reduce frost and wind exposure.
Unlike solid polyethylene film, many row cover fabrics allow air and water to pass through.
This makes them easier to manage during some changing weather conditions.
However, row cover fabric generally does not trap heat in exactly the same way as sealed clear greenhouse plastic.
Choose a suitable weight for the crop and season.
Polycarbonate Panels
Polycarbonate is a rigid transparent material commonly used for greenhouse panels.
Twin-wall polycarbonate contains internal air spaces that can provide useful insulation.
It is suitable for hinged cold frames and other rigid structures.
However, it requires a properly supported frame.
Panels must be installed according to manufacturer instructions, including suitable fasteners and allowances for thermal expansion.
Insect Netting
Insect netting is useful when the weather is warm but pests remain a concern.
It allows more airflow than solid plastic.
However, it does not function as a sealed greenhouse cover and provides limited frost protection.
The same hoop frame may sometimes support seasonal changes between plastic, row cover, and insect netting.
How to Ventilate a Raised Bed Greenhouse
Ventilation is one of the most important aspects of greenhouse management.
A closed plastic tunnel can overheat quickly when exposed to direct sunlight.
According to Colorado State University Extension’s frost protection guidance, temperatures inside a closed covered frame can rise above 130°F in as little as an hour of sunshine under some conditions.
That level of heat can seriously damage plants.
Open the Greenhouse During Sunny Weather
Check the internal temperature regularly.
When the greenhouse begins warming beyond the preferred range for your crops, open part of the plastic covering.
A simple method is to lift one side and secure it to the hoops.
On warmer days, open both sides or remove the cover if the design permits.
The appropriate ventilation temperature depends on the vegetables.
Cool-season crops such as lettuce and spinach may experience stress at lower temperatures than heat-loving crops.
Avoid treating one temperature as the correct ventilation threshold for every plant.
Improve Airflow Around the Plants
Air movement helps reduce excessive humidity and condensation.
A completely sealed tunnel can remain damp for extended periods.
This may create conditions favorable to certain plant diseases.
Openings at the ends or sides allow warm, humid air to escape.
Keep the opening wide enough to provide meaningful airflow.
However, resecure the cover when windy conditions could cause it to lift.
Close the Cover Before Cold Nights
During cool spring and fall weather, the covering may need to be closed before nighttime temperatures drop.
Monitor the weather forecast.
A simple tunnel provides limited frost protection and does not guarantee that plants will remain above freezing.
For severe cold, additional protection or a more capable structure may be necessary.
Use a Thermometer
A minimum-maximum thermometer is particularly useful.
It records the lowest and highest temperatures reached between checks.
This helps you understand how much the tunnel warms during the day and cools overnight.
Do not rely entirely on the outdoor weather forecast to estimate the temperature beneath the cover.
How to Keep a Raised Bed Greenhouse Warm at Night
A small raised bed greenhouse stores some solar warmth during the day and reduces exposure to cold air and wind.
However, it has limited insulation.
Its effectiveness depends on outdoor temperature, soil warmth, wind, and cover construction.
Close the Plastic Before Sunset
Closing the cover before temperatures drop can help retain some of the warmth gained during the day.
Make sure the ends and lower edges are secured.
Avoid leaving large openings where cold wind can move freely through the tunnel.
Add a Suitable Row Cover Inside
A lightweight frost-protection fabric may provide an additional layer around the plants.
The fabric can be supported by smaller hoops or installed according to the product’s instructions.
Keep the material positioned appropriately for the crop.
Do not press a plastic cover directly against tender foliage during freezing conditions.
Use Mulch Where Appropriate
A suitable organic mulch can help moderate soil temperature changes.
However, thick mulch may slow soil warming in early spring.
For seedlings, keep mulch away from crowns and planting rows.
Choose the mulch based on crop requirements rather than adding the deepest possible layer.
Avoid Unsafe Heating Methods
Do not place candles, charcoal burners, propane heaters, or improvised open-flame devices inside a plastic-covered raised bed.
These can create fire, burn, or harmful gas hazards.
For gardeners needing reliable protection through severe winter weather, a properly designed greenhouse with suitable heating equipment may be necessary.
A lightweight hoop tunnel should not be treated as a substitute for a winter-rated greenhouse.
Best Vegetables to Grow in a Raised Bed Greenhouse
The most suitable crops depend on the greenhouse height and the season.
A low tunnel works particularly well for short, cool-season vegetables.
Lettuce
Lettuce is a practical crop for early spring and fall growing.
A raised bed greenhouse can reduce exposure to cold winds and help create a more favorable environment during cool weather.
However, lettuce may overheat under a sealed plastic cover on sunny days.
Monitor temperatures closely.
Spinach
Spinach is well suited to cool conditions.
A covered raised bed can be useful for protecting young spinach plants during cold weather.
Avoid excessive heat, which can contribute to premature bolting.
Radishes
Radishes grow relatively quickly and remain compact.
They are useful for short growing periods beneath a low tunnel.
Maintain consistent soil moisture.
Excessive heat may reduce root quality.
Kale
Young kale plants can grow well in a covered raised bed.
However, mature kale may require more height than a low tunnel provides.
Select suitable varieties and adjust the cover as plants grow.
Arugula
Arugula is another cool-season crop that can benefit from early spring or fall protection.
It grows relatively quickly and is suitable for smaller spaces.
Ventilate when temperatures rise.
Strawberries
Low tunnels are also used for strawberry production.
They can protect plants and developing fruit from certain weather conditions.
However, flowering strawberries may require access for pollinators, depending on the variety and growing conditions.
Open or remove covers when necessary for pollination and temperature control.
What About Tomatoes and Peppers?
A raised bed greenhouse can help protect young tomatoes and peppers during early establishment.
However, these crops eventually need substantial growing space.
A small low tunnel is generally better for temporary early-season protection than full-season growth of large tomato plants.
Remove or replace the cover before plants outgrow the available space.
How to Water Plants Inside a Raised Bed Greenhouse
A solid plastic cover prevents most direct rainfall from reaching the soil.
This means plants may require regular watering even when the surrounding garden is wet.
Check Soil Moisture Frequently
Inspect the soil beneath the cover.
Use your finger or a suitable moisture probe to check beneath the surface.
For many garden vegetables, checking the upper 1–2 inches of soil can help indicate when more water may be needed.
However, deeper-rooted plants require attention to moisture farther into the root zone.
Avoid judging soil moisture by condensation on the plastic.
Condensation does not necessarily mean the growing soil has enough water.
Use Drip Irrigation or a Soaker Hose
Drip irrigation is a convenient option for covered raised beds.
It applies water directly to the soil without requiring the entire cover to be removed.
A soaker hose can serve a similar purpose.
Follow the irrigation equipment instructions and adjust watering to the crop, soil, and weather.
Avoid Excessive Moisture
Greenhouse coverings can reduce evaporation and airflow around plants.
Overwatering may leave the soil excessively wet.
Poor drainage and high humidity can contribute to plant health problems.
Water according to actual soil conditions.
Open the cover when necessary to reduce humidity.
How to Build a Hinged Raised Bed Greenhouse
If you want a more permanent structure, consider a hinged greenhouse cover.
This design resembles a cold frame with a lid that opens for ventilation and access.
Instead of flexible hoops and loose plastic, it uses a rigid frame and transparent covering.
Materials for a Hinged Design
Common components include:
- Suitable exterior wood framing
- Transparent polycarbonate panels
- Corrosion-resistant screws
- Outdoor-rated hinges
- Appropriate latches
- Lid supports or locking stays
- Weather-resistant fastening hardware
The finished cover should be designed for the dimensions of the raised bed and the loads it may experience.
Step 1: Build a Rigid Frame
Construct a rectangular frame that fits the top of the raised bed.
Check that the corners are square and the structure is adequately braced.
Use materials suitable for outdoor exposure.
The cover must be strong enough to hold the transparent panels and resist ordinary opening and closing forces.
Step 2: Install the Transparent Panels
Attach polycarbonate or another suitable greenhouse glazing material.
Follow the panel manufacturer’s instructions for cutting, fastening, and allowing thermal expansion.
Seal exposed panel channels where required.
Avoid overtightening fasteners.
Step 3: Install Hinges and Lid Supports
Attach the lid to a suitably strong supporting frame.
Use hinges designed for the expected load.
Install lid stays or supports that can hold the cover securely open.
A heavy lid should not rely on an improvised stick or unsecured prop.
Step 4: Add a Ventilation and Latching System
The lid should open easily and remain secure in its intended positions.
Install latches or other restraints so the wind cannot lift or slam it unexpectedly.
Use an appropriate temperature-monitoring system.
A hinged design may be more convenient for regular access, but it still requires ventilation and frost management.
Important: The added weight of a rigid lid and frame must be supported by a suitable structure. Do not attach a heavy greenhouse lid to a thin or weakened raised bed wall.
How Much Does It Cost to Build a Raised Bed Greenhouse?
A small hoop greenhouse is generally less expensive than a rigid cold frame or walk-in greenhouse because it uses fewer materials.
However, actual costs depend on local prices, materials, and whether you already have a raised bed.
Basic PVC Hoop Greenhouse
Main expenses include:
- PVC pipe
- Mounting brackets or anchors
- Greenhouse film
- Clips and fasteners
- Optional ridge support
This is usually the simplest and most economical option for seasonal use.
Metal Hoop Greenhouse
Galvanized conduit may increase the initial material and tool costs.
However, it can provide a more durable frame than lightweight PVC.
A conduit bender may also be required.
Hinged Polycarbonate Greenhouse
This design generally costs more because it requires:
- Structural framing
- Rigid transparent panels
- Hinges
- Latches
- Lid supports
- Additional fastening hardware
It may be worthwhile when you want a reusable structure that is easier to open repeatedly.
Cost Comparison
| Greenhouse Design | Relative Cost | Construction Difficulty |
| PVC hoop cover | Low | Easy |
| Metal hoop cover | Low to moderate | Moderate |
| Hinged wooden cold frame | Moderate | Moderate |
| Hinged polycarbonate cover | Moderate to high | Moderate |
| Walk-in greenhouse around beds | High | Advanced |
For a first project, a removable PVC hoop cover is usually a practical starting point.
You can upgrade to metal supports or a rigid structure after learning how the covered bed behaves in your climate.
How to Protect a Raised Bed Greenhouse From Wind and Snow
A lightweight greenhouse cover is vulnerable to strong winds and heavy precipitation.
Its design should reflect the weather conditions at the garden site.
Secure the Hoops Properly
Make sure each hoop is firmly attached to its support.
For wooden raised beds, use suitable mounting brackets attached to sound structural components.
For independent frames, use adequate ground anchors.
Do not depend on loose soil inside a raised bed to resist substantial wind loads unless the anchoring system is specifically designed for that purpose.
Keep the Plastic Tight
Loose plastic can flap in the wind.
Repeated movement may damage the film or loosen the frame.
Use appropriate clamps and tensioning methods.
Inspect them after windy weather.
Remove the Cover Before Severe Weather
A basic PVC hoop greenhouse is not designed to withstand heavy snow or extreme wind.
Snow can accumulate on the plastic and increase structural loads.
If severe weather is expected, remove the film or dismantle the lightweight frame when it is safe to do so.
Do not attempt to clear a collapsing greenhouse from underneath the structure.
Consider Stronger Materials for Permanent Use
If the greenhouse must remain installed through winter storms, use an appropriately engineered structure.
Stronger hoops alone may not be sufficient.
Anchoring, bracing, snow shedding, and local weather loads all need consideration.
A simple DIY low tunnel should be viewed primarily as a seasonal growing aid.
Common Mistakes When Building a Raised Bed Greenhouse
Several construction and maintenance errors can reduce the greenhouse’s usefulness.
Making the Tunnel Too Short
A low cover may work for seedlings but become unsuitable as plants mature.
Choose the tunnel height according to the expected crop growth.
Using Ordinary Plastic That Deteriorates Outdoors
Not all clear plastic sheeting is designed for prolonged UV exposure.
Use suitable greenhouse-grade material when long-term outdoor durability is important.
Forgetting to Add Ventilation
A sealed plastic greenhouse can become dangerously hot for plants.
Provide openings and monitor the interior temperature.
Attaching Hoops to Weak Cabinet-Style or Thin Metal Edges
Raised bed walls are not always designed to carry a greenhouse frame.
Use appropriate mounting hardware or independent anchors.
Letting Plastic Touch Plant Leaves
Contact between plastic and foliage can increase the risk of cold injury during freezing conditions.
Keep the covering supported above the plants.
Ignoring Wind Exposure
Loose film and poorly secured hoops can fail during wind.
Use suitable anchors and remove the cover during severe weather.
Assuming Rain Will Water the Plants
Solid plastic blocks rainfall.
Check soil moisture and water when needed.
Keeping the Greenhouse Closed During Pollination
Some fruiting crops depend on insects for pollination.
A sealed cover can prevent pollinators from reaching flowers.
Open or remove the cover when necessary for pollination.
Using a Lightweight Tunnel as a Permanent Winter Greenhouse
A simple hoop tunnel provides limited temperature protection and has no verified snow capacity.
Use a properly designed structure when full winter protection is required.
How to Maintain a Raised Bed Greenhouse Throughout the Year
A simple greenhouse needs regular attention even though it contains few mechanical parts.
Spring Maintenance
Inspect the frame and film before planting.
Repair or replace damaged components.
Check that the greenhouse can open easily for ventilation.
Monitor temperatures as daylight increases.
Remove the cover when it is no longer useful for the crop.
Summer Maintenance
In hot weather, a sealed plastic cover may become unsuitable.
Remove it when temperatures are consistently above the crop’s preferred range.
The hoops can sometimes be reused with insect netting or another breathable covering.
Check that the remaining structure does not interfere with irrigation or plant growth.
Fall Maintenance
Reinstall suitable protective coverings before temperatures become consistently cold.
Check for tears and weakened fasteners.
Monitor soil moisture and internal humidity.
Close the tunnel during cool nights when appropriate, but continue ventilating on sunny days.
Winter Maintenance
If the design is not rated for snow and severe wind, remove the covering before those conditions occur.
Clean reusable film gently according to its manufacturer instructions.
Allow it to dry before folding and storing.
Store removable PVC components away from unnecessary sunlight and physical damage when practical.
Check the raised bed structure before reinstalling the greenhouse the following season.
Conclusion
Learning how to build a raised bed greenhouse starts with a simple hoop frame, suitable clear plastic, secure anchors, and an easy way to ventilate the growing area.
For most home gardeners, I recommend beginning with a 4-by-8-foot raised bed and a removable PVC or galvanized metal hoop cover. This design is relatively straightforward to construct and can help protect low-growing vegetables during cool spring and fall weather.
Use greenhouse-grade film, keep the hoops properly supported, and make sure the covering does not rest on the plants. A thermometer and an accessible ventilation opening are especially important because temperatures can rise quickly inside a closed tunnel.
If you want a more permanent structure, a properly supported hinged cold frame with polycarbonate panels may offer greater convenience.
Remember that a simple raised bed greenhouse extends growing opportunities but does not guarantee protection during severe freezing, snow, or strong wind.
With suitable construction and regular temperature management, it can be a useful addition to a small vegetable garden.
FAQs About How to Build a Raised Bed Greenhouse
Can You Turn an Existing Raised Garden Bed Into a Greenhouse?
Yes. You can install hoops or a suitable rigid frame over an existing raised bed and add a transparent covering.
Before doing so, inspect the bed’s structural condition and choose an appropriate anchoring method.
For many small vegetable beds, a removable hoop tunnel is the easiest option.
What Size PVC Pipe Should I Use for a Raised Bed Greenhouse?
Flexible ½-inch PVC pipe is commonly used for small DIY hoop tunnels.
The required length depends on the bed width and desired tunnel height.
For a 4-foot-wide bed, test an approximately 8-foot length before cutting all the hoops.
Larger structures or exposed locations may require stronger materials and additional bracing.
What Is the Best Plastic for a Raised Bed Greenhouse?
Clear UV-stabilized greenhouse polyethylene is a practical choice.
Films around 4–6 mil thick are commonly used in low tunnel applications.
Six-mil film can offer improved durability compared with thinner plastic, but the frame and anchors must support the covering.
Ventilation remains necessary regardless of film thickness.
How Warm Does a Raised Bed Greenhouse Stay in Winter?
A simple low tunnel may provide some frost protection, but its temperature advantage varies with sunshine, wind, soil warmth, and outdoor conditions.
It can still drop below freezing during cold weather.
Do not assume that a plastic-covered raised bed will keep frost-sensitive vegetables alive through severe winter conditions.
Do Raised Bed Greenhouses Need Ventilation?
Yes. Clear plastic traps warmth and can cause rapid overheating during sunny weather.
Use an opening side, vented ends, or another suitable ventilation method.
Monitor temperatures with a thermometer and adjust the cover according to the crop and weather.
Can You Grow Tomatoes in a Raised Bed Greenhouse?
Yes, particularly during early establishment when protection from cool weather may be useful.
However, a low hoop tunnel may be too short for mature tomato plants.
Remove or upgrade the covering as the plants grow, and provide appropriate airflow and pollination access.
Can You Build a Raised Bed Greenhouse Without PVC?
Yes. Galvanized metal conduit, appropriate wire hoops, or rigid wooden framing can support a greenhouse cover.
A hinged cold frame with polycarbonate panels is another option.
Choose the material according to the bed size, intended season, weather exposure, and required structural strength.

I’m Maya L. Greenwood, a lifelong plant lover who believes anyone can grow something beautiful with the right guidance. After years of testing soil mixes, pruning methods, irrigation tricks, and pest-safe solutions, I started EasyGardenTips.com to turn hard-won lessons into step-by-step advice. From seed starting and container gardens to composting and seasonal checklists, my goal is to make gardening simple, sustainable, and fun.