How to Build a Raised Garden Bed With Concrete Blocks: Steps
To build a raised garden bed with concrete blocks, choose a sunny location, prepare a level foundation, arrange the blocks into a rectangular frame, and fill the open-bottom structure with well-draining garden soil. A simple one-course bed can be built without mortar when the blocks rest securely on stable ground.
Concrete blocks are a practical alternative to wood because they don’t rot, require relatively little maintenance, and can create sturdy garden borders. Their hollow openings can also provide additional planting spaces for compact herbs or flowers.
However, building with concrete blocks requires careful planning. Uneven ground can make the walls unstable, while stacking blocks too high without proper support can create structural problems. Block dimensions, soil depth, drainage, and the choice between dry-stacking and mortared construction also affect the finished bed.
A well-built concrete block raised bed can support vegetables, herbs, and ornamental plants for many growing seasons.
In this article, I cover how to choose suitable blocks, calculate materials, prepare the ground, assemble the frame, and fill it with soil. You’ll also learn when mortar or reinforcement is needed, how to manage drainage, and which construction mistakes to avoid.
Plan Your Concrete Block Raised Garden Bed Before Building
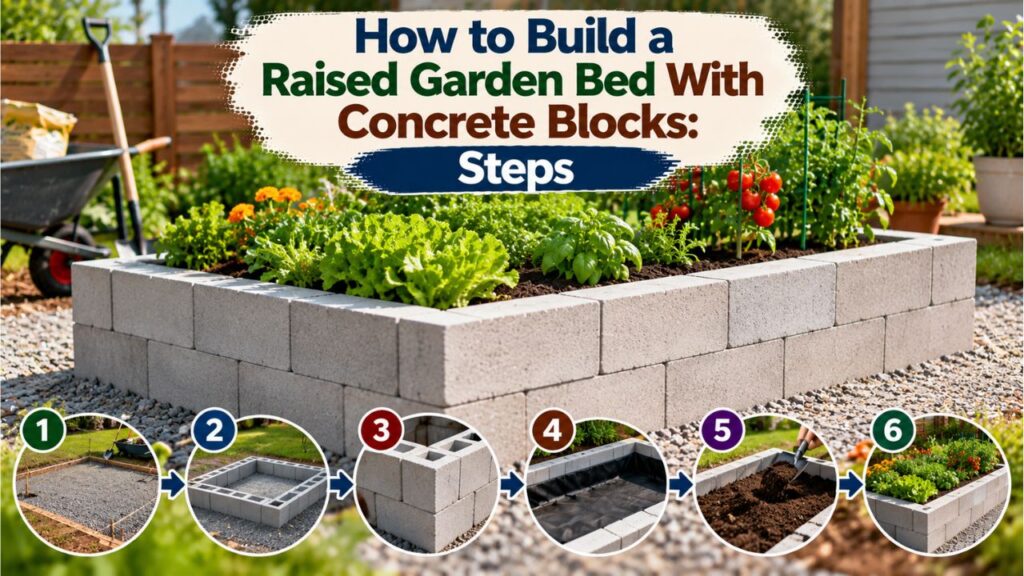
The first step is deciding where the raised bed will go and how large it should be.
Concrete blocks are heavy, so choosing the correct location before construction can prevent unnecessary lifting and rebuilding.
Choose a Location With Enough Sunlight
Most fruiting vegetables, including tomatoes, peppers, cucumbers, and squash, grow best with at least six to eight hours of direct sunlight daily.
Leafy vegetables such as lettuce and spinach can tolerate somewhat less sunlight, particularly in warmer climates.
Before building:
- Observe sunlight throughout the day.
- Avoid areas shaded heavily by buildings or trees.
- Check whether water collects after rainfall.
- Keep the bed away from downspouts that discharge large amounts of water.
- Leave enough room for walking, watering, and harvesting.
A location with direct sunlight and well-draining soil is generally preferable.
If the garden is on a slope, plan how to create a stable, level base for the blocks.
Determine the Best Concrete Block Raised Bed Size
A rectangular bed is usually the easiest design for beginners.
Common dimensions include:
| Raised bed size | Suitable application |
| 3 × 4 feet | Small herb or vegetable gardens |
| 4 × 4 feet | Compact square gardens |
| 3 × 6 feet | Narrow backyard spaces |
| 4 × 8 feet | Larger vegetable gardens |
| 4 × 12 feet | Long garden layouts with accessible sides |
A width of approximately 4 feet allows many adults to reach the center when both long sides are accessible.
If the bed can only be reached from one side, a width closer to 2 feet may be more comfortable.
The measurements should account for the thickness of the concrete block walls, not just the interior planting area.
Decide How Tall the Raised Bed Should Be
The easiest concrete block raised bed has a single course of standard blocks.
A common concrete masonry unit measures approximately 8 inches high by 8 inches wide by 16 inches long, using nominal dimensions.
One course creates a low raised bed suitable for many vegetables when roots can extend into healthy native soil.
Two courses create a taller bed approximately 16 inches high, but they require more careful wall construction.
| Wall design | Approximate height | Main consideration |
| One course | 8 inches | Simple low garden border |
| Two courses | 16 inches | Requires secure wall construction |
| Three courses | 24 inches | Needs appropriately designed masonry support |
| Taller masonry bed | Above 24 inches | Professional structural design may be necessary |
These are nominal heights. Actual finished dimensions depend on the block size, joints, and installation method.
For a first project, a one-course bed is generally easier to construct.
What Type of Concrete Blocks Should You Use?
Several types of concrete blocks can be used for raised garden beds.
Choosing the correct material affects stability, appearance, and construction requirements.
Standard Hollow Concrete Blocks
Standard hollow concrete masonry units, or CMUs, are commonly used for simple raised garden beds.
A widely available nominal size is 8 × 8 × 16 inches.
The actual dimensions are typically approximately:
- Height: 7⅝ inches.
- Width: 7⅝ inches.
- Length: 15⅝ inches.
The difference between nominal and actual dimensions allows for standard mortar joints in masonry construction.
Hollow blocks are popular because they:
- Create straight garden walls.
- Have relatively consistent dimensions.
- Can be arranged into rectangular beds.
- Provide hollow cells that may be used for small plants.
- Do not require wooden framing.
However, ordinary hollow CMUs are not automatically suitable for tall, unsupported, dry-stacked walls.
Solid Concrete Blocks
Solid concrete blocks contain substantially less hollow space than standard hollow CMUs.
They can be useful for low garden edging or decorative construction.
However, they are typically heavier than comparable hollow blocks.
Their weight makes transportation and positioning more demanding.
Use solid units only when their dimensions and intended application suit the garden design.
Interlocking Concrete Landscape Blocks
Interlocking landscape blocks are designed to fit together in a particular arrangement.
Some have lips, pins, or other features that help position neighboring courses.
These blocks may be more convenient for curved or multi-course raised bed walls.
However, not every landscape block is designed to retain the same height or soil load.
Follow the manufacturer’s instructions concerning:
- Base preparation.
- Maximum wall height.
- Block alignment.
- Adhesive or mechanical connections.
- Drainage.
- Reinforcement requirements.
For taller beds, an appropriate retaining-wall block system may be preferable to ordinary hollow CMUs.
Materials and Tools Needed for a Concrete Block Raised Bed
For a beginner-friendly project, consider a single-course rectangular bed with approximate outside dimensions of 4 × 8 feet.
The example uses standard nominal 8 × 8 × 16-inch concrete blocks.
Concrete Block Raised Bed Materials
You will need:
- Approximately 16 standard hollow concrete blocks for a single course.
- One or two additional blocks in case of damage or layout adjustments.
- Marking stakes and garden string.
- Compactable crushed stone for the perimeter base, if needed.
- Clean raised bed soil or suitable topsoil.
- Finished compost, when appropriate.
- Optional galvanized hardware cloth for burrowing pest protection.
- Mulch.
- Vegetable seeds or transplants.
If you choose a taller two-course design, the quantity increases to approximately 32 full-block equivalents, although the final count depends on joint staggering, corner details, and any specialty blocks required.
A taller wall also needs a suitable bonding, reinforcement, and foundation design.
Tools for Building the Garden Bed
Prepare:
- Measuring tape.
- Carpenter’s level.
- Square.
- Shovel.
- Garden rake.
- Hand tamper.
- Rubber mallet.
- Wheelbarrow.
- Work gloves.
- Safety glasses.
- Appropriate lifting equipment or assistance when needed.
Concrete blocks can be heavy and abrasive.
Wear gloves to protect your hands, and avoid lifting more weight than you can handle safely.
If cutting masonry is necessary, use suitable dust suppression and respiratory protection. Cutting concrete can release hazardous respirable silica dust.
Purchasing the correct block sizes and corner units can help minimize cutting.
How to Build a Raised Garden Bed With Concrete Blocks Step by Step
The following method explains how to construct a simple, one-course concrete block raised bed directly on natural ground.
This design avoids unnecessary masonry cutting and allows plants to grow into suitable soil beneath the frame.
Step 1: Measure and Mark the Garden Bed
Select the exact location and measure the intended outside dimensions.
For this project, use a rectangular layout approximately 4 feet wide and 8 feet long.
Place stakes at the four corners.
Run garden string between the stakes to outline the frame.
Check the measurements along each side.
Measure diagonally between opposite corners to determine whether the outline is square.
If the diagonal measurements differ, adjust the stakes until the rectangle is properly aligned.
Remember that standard concrete blocks are sold using nominal dimensions.
A tightly dry-stacked arrangement may finish slightly smaller than the nominal 4 × 8-foot layout.
Step 2: Remove Grass, Weeds, and Debris
Clear the area inside the marked outline.
Remove unwanted grass, persistent weeds, large stones, and other debris.
If the site contains compacted soil, gently loosen it using a garden fork.
This can help vegetable roots penetrate the native ground beneath the raised bed.
Avoid digging or turning soil when it is saturated.
Working excessively wet soil can damage its structure and create hard clumps.
If you’re building over an existing vegetable garden with healthy soil, extensive excavation is usually unnecessary.
Step 3: Prepare a Level Base for the Concrete Blocks
The blocks need a stable, level surface.
Uneven ground can cause them to rock, shift, or separate after the bed is filled.
For a low, single-course garden border:
- Follow the marked perimeter.
- Remove loose soil and vegetation where the blocks will sit.
- Excavate a shallow, level trench along the perimeter if needed.
- Compact the exposed ground.
- Add a thin layer of compactable crushed stone where necessary to create a stable base.
- Tamp the base firmly.
- Check the level along each side.
The purpose of the perimeter base is to support the blocks, not to cover the entire planting area with gravel.
Keep the interior soil open.
Important: This preparation is suitable only for a low, nonstructural garden border on stable ground. Taller masonry walls may require a concrete footing, reinforcement, and construction details appropriate to local soil and frost conditions.
Step 4: Arrange the First Course of Concrete Blocks
Begin at one corner of the marked rectangle.
Position the first concrete block on the prepared base with its hollow openings facing upward.
Continue arranging blocks along the perimeter.
For the nominal 4 × 8-foot example, a simple layout can use:
- Six blocks along one long side.
- Six blocks along the opposite long side.
- Two blocks between the long sides at one end.
- Two blocks between the long sides at the opposite end.
Total:
6 + 6 + 2 + 2 = 16 concrete blocks
This produces an approximate 4 × 8-foot outside footprint using standard block dimensions.
Actual measurements will be slightly different when the blocks are placed tightly together without mortar joints.
Check that the blocks sit firmly without rocking.
Use a rubber mallet for minor positioning adjustments.
Do not strike the blocks aggressively with a steel hammer, which can chip or crack the concrete.
Step 5: Check the Frame for Level and Stability
Once all blocks are positioned, check the wall alignment.
Place the carpenter’s level across neighboring blocks.
Examine the corners and look for gaps underneath.
If one block sits higher than the others, lift it and adjust the underlying base.
Avoid trying to correct significant unevenness by forcing the block downward.
The entire perimeter should rest on a reasonably uniform, stable foundation.
A single-course garden border may remain stable without mortar when installed on suitable level ground.
However, it should not be treated as a retaining wall or used to hold a substantial slope.
Step 6: Decide Whether to Add Another Course
A second course increases the height of the raised bed and provides more room for the growing medium.
However, adding another layer changes the structural demands.
Do not simply pile a second course of ordinary hollow concrete blocks on top of the first and assume the wall will remain secure.
A properly constructed multi-course CMU bed may require:
- Mortar-bonded joints.
- Staggered vertical joints.
- Appropriate corner construction.
- Reinforcement where needed.
- A suitable footing.
- Construction details that account for lateral soil pressure.
For a permanent two-course masonry bed, use a construction design suitable for its height and site conditions.
Alternatively, select an interlocking landscape wall system specifically approved for the intended bed height.
For a taller wall or uncertain ground conditions, obtain guidance from a qualified masonry contractor.
Step 7: Prepare the Bottom of the Raised Bed
For a garden bed placed directly on healthy natural soil, leave the bottom open.
This allows water and roots to move into the soil beneath the growing medium.
An impermeable plastic sheet is generally unnecessary.
If burrowing rodents are a concern, hardware cloth can be installed beneath the bed before filling it.
Choose an appropriate mesh size, secure the edges, and avoid leaving openings around the perimeter.
Do not place an unnecessary layer of gravel across the entire bottom.
Step 8: Fill the Concrete Block Bed With Soil
Once the frame is ready, fill the interior with suitable growing medium.
For a permanent open-bottom bed, a mixture of good-quality mineral topsoil and finished compost is often appropriate.
A practical starting mixture is:
- Two parts suitable loamy topsoil.
- One part finished plant-based compost.
The University of Minnesota Extension’s raised-bed gardening recommendations suggest approximately one-half to two-thirds topsoil and one-third to one-half plant-based compost, depending on the materials.
The correct proportions depend on the existing soil.
If your topsoil already contains substantial organic matter, additional compost may not be necessary.
Spread the mixture evenly into the corners.
Break apart large clumps and level the surface without compacting it.
Leave approximately 1–2 inches of space below the top edge for watering and mulch.
Step 9: Water the Soil and Check for Settling
After filling the bed, water the soil gently.
Allow moisture to penetrate the growing layer.
Watch for areas where water collects or fails to soak in.
If the soil settles unevenly, add more growing medium where needed.
Avoid pressing the soil down with your feet.
Heavy compaction can reduce the air spaces needed for healthy root growth.
Step 10: Plant Vegetables or Flowers
Once the soil has been prepared and moistened, planting can begin.
Choose plants appropriate for the bed’s sunlight, soil depth, and growing season.
For seeds, follow the recommended planting depth on the packet.
For transplants:
- Dig a hole large enough for the root ball.
- Remove the plant carefully from its container.
- Gently loosen tightly circling roots when necessary.
- Position the plant at the recommended depth.
- Return soil around the roots.
- Firm the soil lightly.
- Water thoroughly.
Most transplants should remain close to their original growing depth, although tomatoes can tolerate deeper stem planting.
Keep plants spaced according to their mature size.
How Many Concrete Blocks Do You Need for a Raised Garden Bed?
The number of blocks depends on the frame’s length, width, height, and the type of block used.
For standard nominal 8 × 8 × 16-inch CMUs, each block contributes approximately 16 inches of wall length in a conventional modular layout.
A simple planning formula is:
Approximate Blocks per Course = Planned Perimeter ÷ Nominal Block Length
However, corner arrangements, block thickness, mortar joints, and overlapping units can affect the final count.
Example: A 4 × 8-Foot Concrete Block Raised Bed
For a nominal 4 × 8-foot bed:
Perimeter:
(4 + 8) × 2 = 24 feet
Convert to inches:
24 × 12 = 288 inches
The basic perimeter calculation gives:
288 ÷ 16 = 18 block-length modules
However, this calculation treats the perimeter like a single line and doesn’t account for the width of the blocks at the corners.
For the rectangular layout described earlier, with two short sides fitting between the longer sides, approximately 16 standard blocks form one course.
| Bed design | Approximate block quantity |
| One-course 4 × 8-foot bed | 16 blocks |
| Two-course 4 × 8-foot bed | 32 full-block equivalents |
| Additional allowance | Extra units for cuts, breakage, or adjustments |
These quantities are specific to the example layout.
A mortared, staggered masonry design may require half-blocks, different corner arrangements, or additional components.
Prepare the actual layout before buying the complete quantity.
How Much Soil Does a Concrete Block Raised Bed Need?
Concrete blocks are relatively thick, so the outside dimensions are not the same as the interior planting dimensions.
This matters when calculating soil volume.
For a nominal 4 × 8-foot bed with approximately 8-inch-thick walls, the interior planting area is roughly:
- Length: 80 inches.
- Width: 32 inches.
The actual dimensions depend on block placement and mortar joints.
To calculate soil volume, use:
Length × Width × Soil Depth = Soil Volume
All measurements must use the same unit.
Soil Needed for a One-Course Concrete Block Bed
Suppose the interior measures approximately:
- Length: 6.67 feet.
- Width: 2.67 feet.
- Soil depth: 6 inches, or 0.5 feet.
Calculate:
6.67 × 2.67 × 0.5 = approximately 8.9 cubic feet
If using 2-cubic-foot soil bags:
8.9 ÷ 2 = 4.45 bags
Approximately five bags would provide the calculated quantity.
For this low, open-bottom design, roots may also grow into the native soil.
Soil Needed for a Two-Course Concrete Block Bed
For a taller bed with approximately 14 inches of soil depth:
14 ÷ 12 = 1.167 feet
Using the same approximate interior dimensions:
6.67 × 2.67 × 1.167 = approximately 20.8 cubic feet
If using 2-cubic-foot bags:
20.8 ÷ 2 = 10.4 bags
Plan on approximately 11 bags, with additional material if needed for settling.
The actual volume depends on the completed wall’s inside measurements and the soil level below the rim.
For larger raised beds, purchasing bulk soil by the cubic yard may be more practical.
One cubic yard contains 27 cubic feet.
Should You Use Mortar Between Concrete Blocks?
Mortar isn’t always necessary for a low, single-course garden border, but taller masonry beds need more reliable structural construction.
Dry-Stacking Concrete Blocks
Dry-stacking means placing blocks without mortar.
For a single-course raised bed on level, stable ground, dry-stacking can be convenient.
Advantages include:
- Faster assembly.
- Easier block replacement.
- No mortar mixing.
- Easier dismantling if the garden layout changes.
However, loose blocks can shift if the ground settles, the wall is bumped, or water erodes the supporting base.
Dry-stacking ordinary hollow CMUs should not be assumed suitable for higher walls.
Building a Mortared Concrete Block Raised Bed
Mortared construction joins blocks into a more integrated masonry structure.
It is generally more appropriate when using ordinary CMUs for permanent walls higher than a single course.
However, mortar alone does not automatically make a wall structurally adequate.
The foundation, joint arrangement, reinforcement, soil pressure, and wall dimensions must work together.
A proper masonry layout typically staggers vertical joints rather than aligning every joint directly above the one below.
Some walls may require reinforced cells or additional structural features.
The construction details depend on the design and local conditions.
For a taller or permanent masonry raised bed, follow a suitable engineered or professionally established design.
Are Concrete Blocks Safe for Raised Vegetable Beds?
Concrete blocks are commonly used for raised vegetable gardens, but the material composition deserves attention.
Modern concrete masonry units generally contain cement and aggregates, although some products may include supplementary materials such as fly ash.
Can Concrete Blocks Leach Chemicals Into Soil?
The University of Maryland Extension’s guidance on raised-bed material safety notes that some concrete and cinder blocks contain fly ash and that limited research is available on potential concerns related to their use in edible gardens.
The university explains that gardeners should consider the uncertainty when selecting materials.
It also identifies sealing the blocks with an appropriate polymer coating or choosing an alternative material as possible responses for gardeners who remain concerned.
This does not establish that every concrete block is unsafe.
However, it also means that all concrete blocks should not automatically be described as chemically identical.
Choose Blocks From a Reliable Supplier
For a vegetable garden, consider purchasing new blocks from a supplier that can identify their intended use and material specifications.
Avoid using salvaged blocks when their history is unknown.
For example, blocks previously exposed to pesticides, industrial chemicals, or other contaminants may introduce avoidable risks.
Do not use heavily deteriorated or chemically contaminated materials simply because they are inexpensive.
If the block composition is uncertain and food-growing safety is your main concern, consider another suitable bed material.
Can Concrete Blocks Change Soil pH?
Concrete-based materials can be alkaline.
Depending on the material and environmental conditions, contact with masonry may influence soil chemistry near the wall.
However, the effect is not necessarily significant throughout an entire raised bed.
If you’re concerned about soil pH, use a soil test rather than relying on assumptions.
Most vegetables perform well within a moderately acidic to near-neutral soil pH range, although individual crops have different requirements.
Do Concrete Block Raised Garden Beds Need Drainage Holes?
A concrete block raised bed installed directly on suitable natural soil usually doesn’t need separate drainage holes.
The bottom is open, allowing excess water to move into the ground.
However, drainage still depends on the underlying soil.
Drainage for Concrete Block Beds on Natural Ground
If the native soil drains adequately, the raised growing layer can release excess water downward.
Avoid installing impermeable plastic across the entire bottom.
That can restrict drainage and prevent roots from reaching the soil underneath.
If the ground is severely compacted, loosen it where appropriate before filling the bed.
Do not rely on a gravel layer alone to correct drainage problems.
Drainage for Concrete Block Beds on Concrete
A raised bed constructed on a concrete patio requires a different approach.
The pavement prevents roots from extending into the ground and restricts downward drainage.
If using concrete blocks on a hard surface:
- Provide sufficient soil depth.
- Confirm that water has a suitable path out of the bed.
- Avoid trapping water behind completely sealed walls.
- Consider using a permeable liner to retain loose soil.
- Prevent drainage from collecting against nearby buildings.
- Choose a growing medium suited to a contained root zone.
Beds on concrete may also experience more heat and moisture stress because their roots cannot access deeper soil.
Should You Put Landscape Fabric Under the Bed?
Landscape fabric is usually unnecessary when the bed sits on healthy natural soil.
It may interfere with root growth and doesn’t guarantee permanent weed prevention.
For a hard-surface installation, a permeable liner may help keep soil from escaping through gaps.
Choose the material according to the actual purpose rather than installing it automatically.
Can You Plant in the Holes of Concrete Blocks?
Yes. The hollow openings in standard concrete blocks can sometimes be used to grow compact plants.
This is one of the practical design features of a simple concrete block raised bed.
Best Plants for Concrete Block Openings
Suitable options may include:
- Small thyme varieties.
- Compact marigolds.
- Certain low-growing sedums.
- Small ornamental flowers.
- Compact herbs suited to the available soil volume.
The available root space is limited, and the concrete can become warm in direct sunlight.
Choose plants that tolerate those conditions.
Avoid planting large vegetables in individual block openings.
Tomatoes, zucchini, and similar crops usually require more growing volume.
How to Fill Concrete Block Holes for Planting
If the holes are not required for structural reinforcement:
- Check that the cells are clean.
- Fill them with suitable growing mix.
- Leave some space below the upper edge.
- Plant small seeds or transplants.
- Water gently.
- Monitor moisture frequently.
The soil inside the block cells may dry faster than the main bed.
In hot climates, regular moisture checks are especially important.
Do not use structural cells for planting when a reinforced masonry design requires them to contain steel or grout.
How to Maintain a Raised Garden Bed Made From Concrete Blocks
Concrete block walls need relatively little routine maintenance, but the growing area still requires attention.
Check for Block Movement or Settling
Inspect the perimeter after heavy rainfall and seasonal ground movement.
Look for:
- Blocks that have shifted.
- Uneven wall sections.
- Gaps developing between units.
- Settlement beneath corners.
- Cracked blocks or deteriorating joints.
For a simple one-course dry-stacked bed, individual blocks can sometimes be reset after correcting the supporting base.
For a mortared wall with structural cracks or significant displacement, obtain professional repair guidance.
Water the Soil Consistently
Raised bed soil can dry faster than surrounding ground-level soil.
The concrete blocks may also absorb and release heat during the day.
Check the soil several inches beneath the surface.
Water when the root zone needs moisture, rather than following a fixed daily schedule.
Drip irrigation or soaker hoses can help provide consistent watering.
Apply Organic Mulch
Mulch helps reduce moisture loss and suppress weeds.
Suitable materials include:
- Clean straw.
- Shredded leaves.
- Shredded bark.
- Other appropriate organic mulch materials.
Apply mulch around established plants while keeping it away from direct contact with their stems.
Mulch is especially useful during hot, dry weather.
Refresh the Soil Between Growing Seasons
Over time, the soil level may decrease as organic materials settle and decompose.
Add suitable growing medium when necessary.
Check fertility before applying large amounts of compost or fertilizer.
A soil test can identify nutrient needs and help prevent unnecessary amendments.
The concrete block frame may last through many growing seasons, but the soil still needs appropriate care.
Common Mistakes When Building a Concrete Block Raised Bed
Several installation errors can make a simple garden project more difficult or less durable.
Building Directly on Uneven Ground
Blocks placed on an uneven surface can rock or separate.
Prepare a stable, level perimeter before assembling the wall.
Avoid relying on loose soil to support heavy blocks.
Stacking Too Many Blocks Without Reinforcement
A tall wall made from ordinary hollow blocks can experience significant lateral soil pressure.
Simply stacking several loose courses is not a dependable construction method.
Use an appropriate masonry design or a manufacturer-approved retaining-wall system for taller beds.
Making the Bed Too Wide
A wide raised bed can make the center difficult to reach without stepping onto the soil.
Limit the width according to the gardener’s reach and the available access.
For many adults, approximately 4 feet works well when both sides remain accessible.
Using Poor-Quality Soil
A sturdy concrete block frame cannot compensate for unsuitable growing medium.
Avoid filling the bed entirely with compacted clay or contaminated fill.
Use clean soil with appropriate structure, drainage, and fertility.
Ignoring the Weight of Concrete Blocks
Concrete blocks are heavy, especially when moving enough units for a large bed.
Plan transportation and unloading carefully.
Use appropriate lifting practices or mechanical assistance when necessary.
Avoid storing large quantities of blocks on decks, balconies, or other structures without checking their load capacity.
Building Too Close to a House Foundation
Raised beds should not trap moisture against building walls or interfere with foundation drainage.
Leave suitable clearance for maintenance and water movement.
If the garden is near a building, ensure that the grading continues directing water away from the structure.
Is a Concrete Block Raised Garden Bed Better Than Wood?
Concrete blocks and wood both work well for raised gardens, but each has advantages and limitations.
| Feature | Concrete blocks | Wood |
| Resistance to rot | Does not rot | Depends on species and treatment |
| Installation | Heavy lifting and leveling | Cutting and fastening |
| Design flexibility | Modular shapes and sizes | Easy to customize |
| Portability | Heavy but individual blocks can be moved | Some frames can be relocated |
| Wall thickness | Usually thicker | Usually thinner |
| Maintenance | Inspect movement and mortar joints | Inspect decay and fasteners |
| Material considerations | Composition and possible soil-contact concerns | Wood species and treatment matter |
| Tall bed construction | May require masonry footing and reinforcement | Requires suitable structural bracing |
When Concrete Blocks Are a Good Choice
Concrete blocks may be preferable when:
- You want a permanent garden border.
- You prefer not to use wood.
- You have a stable, level location.
- The garden design uses straight sides.
- You want a low bed that can be assembled from modular units.
They are particularly convenient for one-course garden borders.
When Wood May Be More Practical
Wood may be easier when:
- You need unusual dimensions.
- The garden is on uneven ground.
- You want thinner walls and more planting space.
- You need to relocate the bed later.
- You prefer a structure assembled with common woodworking tools.
For taller raised beds, properly constructed wooden frames can sometimes be simpler than permanent masonry walls.
The best option depends on budget, available tools, intended height, and long-term use.
Conclusion
Understanding how to build a raised garden bed with concrete blocks begins with selecting the right site, preparing a stable base, and choosing a wall height appropriate for the construction method.
For beginners, a one-course rectangular bed built from standard hollow concrete blocks is a manageable option. A nominal 4 × 8-foot layout can use approximately 16 blocks, depending on the arrangement.
Leave the bottom open when building on healthy natural soil, use a suitable soil-and-compost mixture, and provide enough growing room for the vegetables you intend to plant.
If you want a taller bed, use an appropriate mortared or interlocking masonry system with the necessary foundation and reinforcement rather than stacking loose blocks.
Concrete blocks can provide a durable, low-maintenance garden enclosure, but stability, material selection, and soil quality are essential to a successful finished bed.
FAQs About How to Build a Raised Garden Bed With Concrete Blocks
Can You Build a Raised Garden Bed With Concrete Blocks Without Mortar?
Yes. A low, single-course garden border can often be dry-stacked on a stable, level base. Taller walls may require mortar, reinforcement, and proper footings. Ordinary hollow blocks should not be stacked into high, unsupported walls.
How Many Concrete Blocks Do You Need for a 4 × 8 Raised Bed?
A simple one-course layout can use approximately 16 standard nominal 8 × 8 × 16-inch blocks, depending on corner placement. A two-course version requires approximately 32 full-block equivalents, with adjustments for staggered joints or specialty units.
Are Concrete Blocks Safe for Growing Vegetables?
Concrete blocks are commonly used for vegetable beds, but their composition can vary. Some may contain fly ash or other supplementary materials, and research on specific soil-contact concerns is limited. Choose blocks from a reliable supplier and consider alternatives if the material composition raises concerns.
Do You Need Gravel Under a Concrete Block Raised Bed?
You generally do not need gravel beneath the entire growing area. A compacted gravel base along the perimeter may help support low block walls. Keep the interior open to suitable native soil for drainage and root growth.
Can You Build a Concrete Block Raised Bed on a Slope?
Yes, but the supporting base must be properly leveled and stabilized. A significant slope may require stepped construction, retaining-wall engineering, and suitable foundations. Do not place tall, loosely stacked blocks against a sloping soil bank.
How Deep Should a Concrete Block Raised Garden Bed Be?
A single course provides approximately 8 inches of nominal wall height and may work for many crops when roots can grow into the native soil. Two courses provide approximately 16 inches of nominal height, but the wall requires more secure construction. Beds on hard surfaces need sufficient contained soil depth for the selected crops.
Can You Grow Herbs in the Holes of Concrete Blocks?
Yes. Small herbs and compact ornamental plants can grow in the hollow block openings when the cells are not needed for structural reinforcement. Use suitable growing mix and monitor moisture because these small planting spaces can dry quickly.

I’m Maya L. Greenwood, a lifelong plant lover who believes anyone can grow something beautiful with the right guidance. After years of testing soil mixes, pruning methods, irrigation tricks, and pest-safe solutions, I started EasyGardenTips.com to turn hard-won lessons into step-by-step advice. From seed starting and container gardens to composting and seasonal checklists, my goal is to make gardening simple, sustainable, and fun.