
If you’ve just gotten a lawn aerator, you might run into some hiccups. One of the more common hurdles is dealing with tow behind aerator problems. It can seem tricky at first, figuring out why your aerator isn’t working as expected. Don’t worry, many people experience similar issues when starting out. This guide breaks down common issues and offers clear, simple steps to get you back on track. We’ll explore the basics of these lawn care tools and how to solve their problems, so let’s get started.
Common Issues Affecting Tow Behind Aerator Performance
One of the initial challenges with using a tow behind aerator is recognizing and diagnosing the issues that prevent it from doing its job effectively. These aerators are a fantastic way to improve the health of your lawn, helping with better air circulation and nutrient absorption. Still, various things can affect their performance. It might be something like the tines not penetrating the soil deeply enough, or perhaps the aerator isn’t covering the intended area correctly. Learning how to identify these performance problems is the first step toward getting your lawn in tip-top shape. We’ll explore the common issues.
Tine Penetration Failures
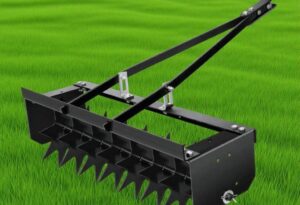
The core function of a tow behind aerator is to create small holes in your lawn. These holes, or cores, allow air, water, and nutrients to get into the soil, leading to healthier grass. If the tines aren’t going deep enough, this process is ineffective. The depth of tine penetration depends on several things, including the type of soil, the weight of the aerator, and the condition of the tines themselves. Hard, compacted soil can be a real challenge, requiring extra attention. It’s a common issue, and with a little adjustment, you can usually overcome it.
- Soil Type: Different soil types require different approaches. Clay soil, which is often very dense, usually needs a heavier aerator or multiple passes. Sandy soil, on the other hand, is generally easier to penetrate.
- Aerator Weight: The weight of the aerator plays a big part in how well the tines penetrate. Some aerators have trays where you can add extra weight, like concrete blocks, to help with penetration.
- Tine Condition: Dull or damaged tines won’t penetrate the soil easily. Over time, tines can wear down from use, making them less effective. Inspect the tines regularly and replace them when they get worn.
- Moisture Level: The soil’s moisture level also influences the effectiveness of the aerator. Aerating after a rain or watering the lawn a day before can help.
Coverage Inconsistencies
Another common problem is uneven coverage. This means the aerator may not be creating a consistent pattern of holes across your lawn. Gaps in aeration can lead to sections of your lawn still suffering from compaction, leaving them unhealthy. Several factors contribute to this issue, including the width of the aerator, the speed at which you are towing it, and the pattern you use. Making sure you have complete coverage is a must. Proper aeration encourages healthy root growth, making your lawn greener and more resilient.
- Aerator Width: The width of your aerator impacts how much area you can cover in a single pass. A wider aerator can cover more ground, but you’ll still need to ensure consistent overlap on subsequent passes.
- Towing Speed: The speed at which you pull the aerator matters. Going too fast can cause the tines to bounce and not penetrate the ground properly, leading to uneven coverage. A slow and steady pace is best.
- Towing Pattern: The pattern you use when aerating also affects coverage. Overlapping passes, like mowing the lawn, helps to ensure that all areas of the lawn get aerated. Start by going in one direction and then make another pass at a right angle.
- Obstacles: Tree roots, rocks, or other obstacles can interfere with the aerator’s path. Be sure to avoid these to prevent damage to the aerator and to ensure a consistent pattern.
Towing and Weight Considerations for Tow Behind Aerators
The way you tow and load your aerator significantly impacts its effectiveness. The goal is to get the tines into the soil at the right depth and coverage. You will want to be sure you are using the correct vehicle for towing. The addition of weight can improve the ability of the tines to penetrate. You will want to carefully consider the amount of weight you add so you don’t overdo it. The right setup helps achieve a well-aerated lawn, promoting healthy growth. Let’s explore these important details.
Selecting the Right Tow Vehicle
Picking the correct vehicle for towing your aerator is crucial. You want to match the weight and towing capacity of your aerator with your vehicle’s capabilities. Using a vehicle that’s too small might lead to strain on the engine and transmission. It also reduces your control and makes maneuvering difficult. Consider a vehicle with enough power to handle the weight, especially when you’re going uphill. Knowing your aerator’s weight and your vehicle’s towing specs is your first move toward a safe and effective aeration job.
- Owner’s Manual: Always consult your vehicle’s owner’s manual. This manual provides details on your vehicle’s towing capacity and recommended procedures. It also tells you about any modifications that are necessary to tow.
- Aerator Weight: Know your aerator’s weight, especially when loaded with additional weights. Consider the total weight when matching your aerator to the vehicle. Check the information on the aerator itself or in the product specifications.
- Vehicle’s Towing Capacity: Your vehicle has a maximum towing capacity, which is also in the owner’s manual. Make sure the total weight of the aerator, including any added weight, doesn’t exceed this limit.
- Hitch Type: Ensure your vehicle is equipped with the correct type of hitch for your aerator. This can vary from a simple ball hitch to more specialized setups.
Proper Weight Distribution
Adding weight to your aerator helps the tines penetrate the soil. It’s important to find the right balance, so you don’t damage your lawn or the aerator itself. Too much weight can cause excessive compaction. Not enough weight means the tines won’t go deep enough to do the job effectively. Weight distribution is just as important as the total weight. Adding the weight in a way that is even across the aerator helps maintain stability while it’s in use. This method allows you to get the best results while making sure you protect your lawn.
- Weight Type: Common methods for adding weight include concrete blocks, sandbags, or purpose-built weight trays. The type of weight you use depends on the design of your aerator.
- Placement: Position the weights evenly across the aerator’s tray or designated areas. This distribution helps to keep the aerator level and provides even penetration of the tines.
- Starting Weight: Start with a small amount of weight and observe the results. Add more weight gradually until you achieve the desired tine depth.
- Soil Conditions: The type of soil will impact how much weight you need. For compacted clay soils, you’ll generally need more weight than for sandy soils.
Maintenance Tips for Tow Behind Aerators
Proper maintenance of your tow behind aerator is an investment in your lawn’s health. Regular care prevents many problems and ensures that the aerator functions correctly year after year. This care involves regular inspections, cleaning, and occasional adjustments. Taking good care of your aerator means that the machine will last longer and improve the quality of your lawn. Proper maintenance also makes the whole process smoother and more efficient. It also helps prevent problems from occurring while aerating.
Cleaning and Inspection Procedures
Regularly cleaning and inspecting your aerator is an easy way to make sure it’s working well and to catch any issues early on. Cleaning removes debris like grass clippings, soil, and other materials that can build up. Inspections allow you to catch problems such as loose parts, worn tines, or damage. Taking care of your aerator this way makes it last longer and helps your lawn stay healthy. Taking a few minutes after each use to do this can save you time and money. Here are some key steps for keeping your aerator in top shape.
- Cleaning After Use: After each use, clean the aerator. Use a garden hose and a brush to remove debris. Make sure to get rid of any grass clippings or soil from the tines and other moving parts.
- Tine Inspection: Inspect the tines for wear, damage, or dullness. Replace or sharpen tines if necessary. Damaged tines won’t penetrate the soil effectively, which affects the aerator’s performance.
- Bolt Check: Check all bolts and fasteners regularly to ensure they’re tight. Vibration during operation can cause these parts to loosen over time. Tightening loose bolts keeps the aerator from falling apart.
- Wheel and Tire Care: Examine the wheels and tires. Inflate tires to the recommended pressure and
Storage Best Practices
Proper storage is essential for the long-term health of your tow behind aerator. Whether you store it for a few weeks or during the off-season, you’ll need to do some maintenance. A clean and protected storage area will help prevent rust, damage, and wear and tear. Good storage practices ensure your aerator is ready to go whenever you need it. Storing it properly also helps extend the life of your equipment and protects your investment. Here are some steps to keep your aerator in top condition.
- Clean and Dry: Before storing, clean the aerator thoroughly. Remove all dirt, debris, and moisture. Store it in a dry place to prevent rust.
- Lube Moving Parts: Lubricate any moving parts, such as the wheel bearings and tine shafts, with a suitable lubricant to prevent corrosion and ensure smooth operation.
- Protection from Elements: Store the aerator inside a shed, garage, or under a tarp to protect it from harsh weather. This will keep the equipment from sun damage.
- Tine Protection: Some aerators benefit from a tine cover. This helps keep the tines from rusting, and also protects people from injury when moving the aerator.
Troubleshooting Common Tow Behind Aerator Problems
Even with good care, you may run into a few issues. Being able to quickly identify and fix these problems can save you from a lot of frustration. It also helps you get back to aerating your lawn, with a minimum of downtime. These easy troubleshooting tips will help you quickly solve many of the problems you might have. With a little practice, you can handle almost any issue that comes up.
Aerator Not Penetrating Soil
If your aerator isn’t penetrating the soil, it’s a frustrating situation that can be fixed. This usually means the tines aren’t reaching the right depth to create the aeration holes. There are a number of reasons this may happen. These could include problems like insufficient weight, compacted soil, or dull tines. By using the following steps, you can troubleshoot the issue. Proper tine penetration ensures your lawn gets the air and nutrients it needs to be healthy.
- Check Weight: Make sure you are using enough weight on your aerator. Add weight gradually until the tines reach the desired depth.
- Soil Conditions: Water the lawn a day before aerating if the soil is dry and compacted.
- Tine Condition: Inspect the tines. Sharpen or replace dull or damaged tines.
- Towing Speed: Make sure you’re not towing too fast. A slower pace gives the tines more time to penetrate the soil.
Uneven Aeration Results
Uneven aeration can leave your lawn looking patchy. Areas that aren’t aerated well will not get the benefits of air, water, and nutrient exchange. This issue can stem from several factors, like inconsistent towing, improper overlap, or obstacles. Finding and fixing the issue is very important for the health of your lawn. Following the tips below will give you a well-aerated, healthy lawn that looks good and feels great under your feet.
- Towing Pattern: Ensure you are using a consistent towing pattern, with overlapping passes to avoid missed areas. Go in one direction and then go again in a perpendicular direction.
- Towing Speed: Maintain a steady, consistent speed. Avoid sudden stops or starts that can affect the penetration and coverage.
- Check for Obstacles: Clear any debris or obstructions that might interfere with the aerator’s path and cause uneven results.
- Aerator Width: Ensure the aerator is wide enough to cover the desired area effectively. Wider aerators can cover more ground with fewer passes.
Tow Behind Aerator Solutions: A Step-by-Step Guide
Getting your aerator to work efficiently is all about understanding the mechanics and making the right adjustments. Whether it’s the weight, the speed, or the condition of the tines, each aspect has a role in how well the aerator performs. By taking the time to work through these steps, you can deal with the issues and get the most out of your equipment. This guide provides a set of actionable instructions to make sure you get the most from your aerator.
Step 1: Preparation
Preparation is key to getting the best results. Start by mowing your lawn short, so the tines have clear access to the soil. This will also make it easier to see the holes created by the aerator. It also means you won’t get grass clippings caught in the tines. Check the weather and make sure the ground is neither too wet nor too dry. Wet soil might cause the aerator to clog, while dry soil may be difficult for the tines to penetrate. Prepare and you will have a better outcome.
- Mow the lawn: Cut the grass to a short length, about 1-2 inches. This prevents the grass from interfering with the tines and makes the aeration process more effective.
- Water the lawn: If the soil is dry, water the lawn a day or two before aerating. This helps soften the soil, making it easier for the tines to penetrate.
- Clear the area: Remove any debris, rocks, or large sticks from the lawn. These could damage the aerator or obstruct its movement.
- Inspect the aerator: Check the aerator for any damage, loose parts, or worn tines. Make necessary repairs or replacements.
Step 2: Aeration Process
Once your lawn is ready, it’s time to aerate. Start by hooking the aerator to your tow vehicle. Make sure the hitch is secure and the aerator is properly aligned. Slowly begin to move the aerator across your lawn, maintaining a steady, consistent speed. Overlap passes to ensure full coverage. Adjust your speed and weight as needed to achieve the proper depth and coverage. Following the process carefully and with attention to detail will ensure a successful outcome.
- Attach to Tow Vehicle: Connect the aerator to your tow vehicle’s hitch. Make sure it’s securely attached and properly aligned.
- Begin Towing: Start towing the aerator at a slow, steady pace, typically around 3-5 miles per hour. Avoid sudden stops or starts.
- Overlap Passes: Overlap each pass by a few inches to ensure complete coverage. This prevents any areas from being missed.
- Monitor Penetration: Check the tine penetration depth. Adjust the added weight as needed to achieve the best results for your soil type.
Step 3: Post-Aeration Care
After aerating, your lawn benefits from a bit of extra attention. You may want to leave the cores on the lawn, so they break down naturally and reintroduce nutrients to the soil. If you prefer, you can also break up the cores by dragging a piece of chain link fence or a lawn sweeper across the lawn. Finally, you can fertilize, overseed, and water the lawn. This is how you help your lawn recover and benefit from the aeration process. Post-aeration care is very important to get the best results.
- Leave the Cores: After aeration, you can leave the soil cores on the lawn to break down naturally.
- Break up the Cores: Alternatively, you can break up the cores by dragging a piece of chain link fence or a lawn sweeper across the lawn.
- Fertilize and Overseed: Consider fertilizing and overseeding the lawn to promote growth and fill in any bare spots.
- Watering: Water the lawn thoroughly after aeration and fertilization. This helps the grass roots to recover.
Frequently Asked Questions
Question: Why isn’t my aerator penetrating the soil?
Answer: There are a few reasons why your aerator may not be penetrating the soil. The soil may be too dry, requiring pre-aeration watering. You might also need to add more weight to the aerator. The tines may be worn or dull and require sharpening or replacement.
Question: How often should I aerate my lawn?
Answer: Aeration frequency depends on your soil type and usage. Lawns with heavy clay soils typically benefit from aeration once or twice a year, while sandy soils might need it less often. Consider aerating in the spring or fall.
Question: What’s the best time to aerate my lawn?
Answer: The best time to aerate is when the grass is actively growing. For cool-season grasses, this is usually in the spring or fall. For warm-season grasses, it’s typically in late spring or early summer.
Question: How do I store my tow behind aerator during the off-season?
Answer: Clean the aerator thoroughly, removing any dirt, debris, and moisture. Store it in a dry, covered area. Lubricate any moving parts with a suitable lubricant to prevent rust. Consider covering the tines to protect them.
Question: What type of weight should I use on my aerator?
Answer: Common methods for adding weight include concrete blocks, sandbags, or purpose-built weight trays. The type of weight you use depends on the design of your aerator and is often listed in the product’s manual.
Final Thoughts
Dealing with tow behind aerator problems doesn’t have to be a headache. By knowing a few common issues, and how to address them, you can keep your lawn looking great. This guide gave you the knowledge needed to get started, so you can solve problems with your aerator. Don’t hesitate to explore and experiment to find what works best for your lawn and soil. Consistent maintenance and a few simple adjustments can make a big difference. With the right approach, you can have a beautiful, healthy lawn.